Showing posts with label pastry. Show all posts

Strawberry Eclairs / Boiled Icing (c.1909) ★★★★


This is a recipe I've had in my drafts for quite a while now, but just never got around to making.
It comes from The Good Housekeeping Woman's Home Cook Book, published around 1909. This cookbook is a good example of an early publication from a magazine. These kinds of cookbooks, compiled by readers and tested by committees became quite popular. For example, in Canada in the 20th and 21st century you can find a lot of cookbooks from Chatelaine, a women's lifestyle magazine.

This recipe sounded like a fun and summery take on the traditional eclair. Here in Japan it's already averaging 25 degrees during the day, so it's perfect weather for such a treat.


Original Recipe:


Strawberry Eclairs
Boil together in a saucepan one cup of 
boiling water, one-fourth cup of butter 
and a speck of salt. As it begins to boil 
stir in one cup of sifted flour. Stir con-
stantly until the mixture leaves the sides 
of the pan and cleaves together in a ball.
When partly cool add four eggs, beating 
them in one at a time. Drop carefully
in long narrow strips, some distance
apart, on buttered tins, and bake in a 
moderate oven until well risen--about
thirty minutes. Leave the oven door 
open a few minutes before removing the
eclairs, to prevent their falling. When
they are cool split one side, fill with
sweetened strawberries or jam. Spread
with boiled icing colored with strawberry 
juice.--Annabel Lee.


Boiled Icing
Boil one cup of granulated sugar with
one-fourth cup of water, until the syrup
hairs when dropped from a spoon. Have
ready the beaten white of one egg. Pour
the syrup slowly upon the egg, stirring
constantly. Flavor the same as the cake
and spread on the cold cake, when the
icing is stiff enough not to run. Cut in
squares or slices.

Notes:

Because I have only a Japanese measuring cup, I adjusted the measurements.

The choux pastry:
For the water, I used 237ml.
For the butter, I used 57g.
For the flour, I used 125g.
I only added 3 eggs, to account for modern large sized eggs.
I baked at 180C in a convection oven for around 25-35 minutes, depending on size.

The icing:
For the sugar, 200g.
For the water, 60ml.


The Verdict:

Overall, not too bad.
The pastry itself is kind of bland and gross on its own. It is a tiny bit eggy in taste, which I dislike. They were also a bit soggy inside, since the recipe didn't say anything about letting out the steam. However, these work alright as a vessel for a filling and icing.
I used a combination of fresh strawberries and strawberry jam as a filling. It worked nicely. Just jam on its own it alright, but using fresh strawberries really makes a difference. The icing is lovely and marshamallowy. I am a big fan of boiled icing. However, my icing didn't get very pink (I used the juice of 4 medium strawberries). Also, there was a ton of icing left over, which was kind of wasteful.
So, these aren't my favorite dessert, but they have some nice aspects to them. They were pretty quick and easy to prepare, as well. I probably don't like these enough to make them again, but if I did love choux pastry, I would probably enjoy this dessert a lot more. It's mostly personal preference here, so I give this recipe four stars.

Modernized Recipe:

(Adapted from The Good Housekeeping Woman's Home Cook Book)

1 cup water
1/2 cup butter
pinch of salt
1 cup flour, sifted
3 eggs
strawberries, or jam to fill

1 cup sugar
1/2 cup water
1 egg white
juice from strawberries, for color

1. In a saucepan, add the water, butter, and salt. Bring to a boil and let the butter melt.
2. Add the sifted flour and stir until the dough leaves the sides of the pan and comes together in a ball. Set aside to cool. Preheat the oven to 350F. Line a baking sheet with parchment paper. If desired.
3. When the dough is partly cool, add the eggs, one at a time. When the dough is smooth, put it onto the prepared baking sheet in fairly narrow strips. I used a plastic bag with the corner cut off to pipe the filling on.
4. Bake at 350F for 25-35 minutes, depending on the size. They should be crisp and golden.
5. When done, cut them in half or poke a hole in them to let the steam escape. Return them to the oven for 15 minutes to cool (oven off). Then let them cool completely before filling and icing.
6. To make the icing, mix the sugar and water in a saucepan. Slowly bring to a boil and simmer for about 3 minutes or until it reaches 245 degrees. Add the strawberry juice. Have the egg white beaten to stiff peaks in a mixing bowl. Slowly pour in the hot sugar syrup, while beating the egg white. Beat until cool and fluffy.


Chocolate Tarts (1829) ★★★★

I felt like the 1820s were being left out, so here's a recipe to fill in that time gap!


Original Recipe:


The Verdict:

Different, but not bad!
The flavour is a bit different from what we normally pair with chocolate today. Lemon and cinnamon is not what my tongue prefers, but I got used to it as I tasted and after finishing one tart, I think I could definitely eat another.
I had an issue with the chocolate filling not setting thickly, as I think it probably should have. That was probably because I didn't cook it enough and/or it needed more eggs. I like to round way down with eggs in historical recipes because I really hate eggy taste.
I used these pre-made puff pastry shells because I was feeling lazy (and Mr. Man picked those up instead of the tart shells haha), but I think puff paste tart shells would have worked way better.
Oh! I should add that I didn't add the diced lemon peel...I forgot about that and only had one lemon. I'm also not sure if the recipe meant fresh lemon peel (since its already in the recipe) or candied lemon peel. I imagine this can't have made much different flavour-wise, as there was already lemon in the filling.
Overall, this is a lovely recipe and although it may be a bit of an acquired taste, its good!

Edit: After sitting out for a while they did get firmer, and after being in the fridge the tarts became quite firm.


Modernized Recipe:

(Adapted from Modern Domestic Cookery, and Useful Receipt Book)

1/4 pound (4 ounces) CHOCOLATE, chopped
1/2 teaspoon CINNAMON
Zest of 1 LEMON
3 tablespoons SUGAR
2 teaspoons FLOUR
3+ EGGS, separated (see above about number of eggs)
1 tablespoon MILK
LEMON PEEL, diced fine
PUFF PASTRY SHELLS

1. In a saucepan whisk together the flour, egg yolks, and milk. To this add the chocolate, cinnamon, lemon zest, and sugar. Whisk together well and cook over medium heat until thick.
2. Add finely diced lemon peel to the cooked filling and let it stand until cold.
3. Meanwhile, beat the egg whites until stiff peaks form. Preheat oven to 350F.
4. Fill puff pastry shells with chocolate filling and cover with the beaten egg whites. Sift some sugar over the top. Bake for five minutes at 350F, then broil until egg whites are golden on top.


Pour faire tourtes de pommes (To make apple tarts) (1604) ★★★★


This recipe for apple tart comes from Ouverture de Cuisine, which was written by Lancelot de Casteau and published in Liege, Belgium. Although there is only one surviving copy of the book, it did play a significant role in culinary history. de Casteau's cookbook has been credited as a bridge between medieval food and haute cuisine. It was also the first cookbook published in French in the Low Countries. 

I also want to make two notes on ingredients: apples and short paste.

Antique apple varieties are either very difficult to find today or are completely lost to past palates. Apparently Faro and Reinette were popular varieties in France and Permain, Costard, Blaunderelle, and Pippins were common in England. I think the best bet for today's cooks are Pippins, but I can't find any myself, so I just used a random assortment of modern varieties. I should also note that historically, apples were smaller and had larger cores, which is probably why this recipe calls for 12 (which is a lot!). I didn't have 12 on hand, and I think I ended up using 8 or so. That was definitely enough.

As for the short paste, its a fairly basic element, so I just used a modern recipe: 7 ounces flour, 4 ounces butter, ice water to bind. However, afterward I did find a more period appropriate recipe, which could be used as well. 

Original Recipe:


[Transcription, by Thomas Gloning et. al.]

Pour faire tourtes de pommes.
Prennez vne douzaine de pommes
haschées fricassees dedans le beurre, trois
onces de succre, vn satin de canelle, &
quatre iaulnes d'oeuf, vn peu d'anisse
estampé, & faictes tourte de grasse pa-
ste.


[English translation, by Daniel Myers]

To make apple tarts.
Take a dozen chopped apples 
fried in butter, three 
ounces of sugar, a quarter ounce of cinnamon, & 
four yolks of eggs, a little 
ground anise, & make the tart with short 
paste.


The Verdict:

It was pretty good. The apples were nicely spiced and weren't too sweet, actually. I am not convinced about the point of the egg yolks, however. I thought maybe they were meant to sort of cook up with the juice from the apples, to prevent a watery tart, but I'm not sure how true that really is. If that is the case, I'd rather just use cornstarch, since separating eggs is annoying AND you end up with a bunch of whites. My pastry was pretty good, but I think adding a bit of sugar to the crust would have been nice. Overall, I would eat this again, but this recipe also calls for a LOT of peeling and chopping apples, which is a pain, so its definitely one I would save for special (read: not lazy) occasions.


Modernized Recipe:

(Adapted from Ouverture de Cuisine)

8 - 12 APPLES, peeled and chopped
~2/3 cup BUTTER
3 ounces SUGAR
1/4 ounce CINNAMON, ground
A little ANISE, ground
4 EGG YOLKS
1 SHORTCRUST PASTRY

1. Preheat oven to 375F and line a tart tin (or whatever - I used a springform pan) with the shortcrust pastry.
2. In a large pot, melt the butter and sugar. Add the chopped apples, cinnamon, and anise. Stir together well until the apples are evenly coated with spice.
3. Cook the apples until slightly tender. Let cool. Stir in the egg yolks. Pour the apple filling into the prepared pastry.
4. Bake for about 40 minutes. The apples should be bubbling and the crust should be lightly browned.


Sources:

Adamson, Melitta Weiss. Food in Medieval Times. Westport, CT: Greenwood Publishing Group, 2004.

"Lancelot De Casteau." Wikipedia. Wikimedia Foundation, 19 Oct. 2013. Web. 26 Jan. 2014. <http://en.wikipedia.org/wiki/Lancelot_de_Casteau>.

To make cherry pie and berry pie (c. 15th - 16th century) ★★★


Finally, a recipe! I've been busy the past few weeks with work and renovations on our house. I've had this recipe as a draft for probably months now, but when I saw bags of fresh cherries in the grocery store I decided that I would buy a bag, thus forcing myself to make this pie or else lose $13 of cherries!

I found this recipe in a Dutch cookbook, known as Gent KANTL 15. I found the translated version at Coquinaria, and there is a great introduction to the cookbook there as well. This cookbook is actually a number of manuscripts bound together, written around the 15th to 16th centuries, likely in the same household.

In the medieval period, most pies were still filled with savory foods, and on top of that modern ideas of taste did not apply. Therefore this recipe for berry pie with only sugar and cinnamon is actually pretty rare. Many of the other recipes in the cookbook include interesting combinations such as berries and chicken, a cake made with pike's roe, and an omelette stuffed with spiced apples.

Original Recipe:


[Original Dutch]
2.78. Om kersentaart en bessentaart te maken
Neem kersen en ontpit sommige wel en andere niet. Neem veel kaneel en suiker, en vul het brood. Kleur de bovenkant met zwarte kersen. Hetzelfde met aardbeien, vossebessen en aalbessen. Om fijn brood hiervoor te maken: neem tarwebloem en wat raapolie, niet veel, en eiwit.


[Translation]
2.78. To make cherry pie and berry pie
Take cherries and stone some of them, and others not. Take a lot of cinnamon and sugar, stuff the bread. Colour on top with black cherries. The same with strawberries, lingonberries and redcurrants. To make fine bread for this: take wheat flour and some rape oil, not much, and egg white.


The Verdict:

Well, to be honest the crust sucked. This was probably because the recipe was pretty vague and also because silly Mr.Man put the pie in the fridge and I had used coconut oil, which gets pretty hard in cool temperatures. So yes, I was going to use canola oil, since I assumed that's what the recipe called for. I don't know anything else called "rape oil", and the first known use of the word dates back to the 14th century, interestingly enough from the Latin word for turnip (rapa or rapum). But, after I mixed the egg into the flour I discovered that I didn't have any canola oil, so I decided to use coconut instead. I mean, the crust is definitely edible, but its not the best ever. It wasn't flaky at all and basically just snapped into pieces like a cookie or something.

The filling, on the other hand, was delicious! The cinnamon and sugar paired perfectly with the cherries, and somehow I got the perfect balance of flavours. The only issue was that the filling was ridiculously runny. Probably close to a cup of liquid spurted out when I cut the pie. A little cornstarch would easily fix the problem. Oh, and having some cherries un-pitted was a huge pain, both in eating and in cutting. Don't do it. Lastly, as you can see, the top doesn't really come out very colored. It was a bit brighter when it first came out of the oven, but I think my paltry attempt at coloring combined with heat just didn't make for a bright red pie.

So overall Mr. Man and I gave this recipe three stars for average, but I think if you adapted the recipe a bit it could be 4 stars. Changes that would need to be made are: 1) use your favourite pastry recipe; 2) add some sort of thickener to the filling; and 3) pit all the cherries.


Modernized Recipe:

(Adapted from Gent KANTL 15)

FLOUR
CANOLA OIL
2 EGG WHITES
BERRIES (strawberries, cherries, lingonberries, or red currants), plus extras for coloring the top
CINNAMON
SUGAR

1. In a mixing bowl, mix 2 eggs whites with about 2 1/2 to 3 cups of flour. Add enough oil to get a workable dough. Blend it together in a food processor, with a pastry blender, or with your hands (my preferred method). Knead into a ball and divide into two disks. Roll out both disks. Place the first one in a pie pan.
2. In a separate mixing bowl, mix the cherries with cinnamon and sugar to taste (I used about a tablespoon of cinnamon and 1/4 cup sugar). Mix together well and pour into the prepared bottom crust.
3. Place the second crust on top, crimp down the edges, and make slices or holes in the top to let out steam. To color the top of the pie, I tried to rub a cut cherry on the pastry, but it didn't make much juice, so I would suggest pureeing or mashing some berries, straining them, and brushing the juice on with a pastry brush. Or even mix some juice with an egg white or butter and then brush it on.
4. Bake the pie in a 350F oven for about 30 minutes.


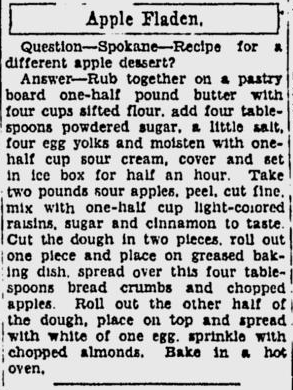
Apple Fladen (Hungarian) (1919) ★★★★


A slightly altered recipe for Apple Fladen
in the Oct. 22 1934 Spokesman-Review
I had a bunch of egg yolks left over from making my foam torte, and I found this recipe while searching for a way to use them up. I searched around for a bit, but couldn't find any references to "Apple Fladen" aside from this recipe itself. All I found was that "fladen" means "cakes" in German. I tried looking for variants of "Hungarian apple cake/pie/squares" and found that there is a Hungarian dessert known as Almas Pite which is very similar to this recipe. Hungary is actually a big exporter of apples, and almas pite is often made during the Christmas holidays.
One intriguing thing I did find was this recipe for apple fladen, which was printed in the Spokesman-Review in 1934 in response to a reader's query: "Recipe for a different apple dessert?" The Spokesman-Review is printed out of Washington, USA. The recipe printed is nearly a direct quote of the The International Jewish Cook Book recipe. It made me wonder why the author of the recipe column decided to feature this recipe (and without credit, too!). Obviously they had access to The International Jewish Cook Book, because the recipe is almost word-for-word. It was not necessarily the 1919 book either - The International Jewish Cook Book was popular for many years.


Original Recipe:


The Verdict:
I made two minor substitutions in this recipe: I used dark raisins instead of golden, and chopped up some whole almonds myself instead of using powdered almonds.
These are pretty much apple pie bars. However, there is a LOT of apple filling, so these are best eaten with a fork. The filling is nice, but the granny smith apples I used were VERY tart. If I made this again, I would probably use a mixture of sweet and sour apples. Also, I think I slightly undercooked the pastry, but it was still nice (yum, yum, sour cream pastry!) and the egg white made the top very brown and beautiful.
I baked mine on a cookie sheet, which was fine, but a 9x13 casserole dish would probably also work well.
Overall, 4 stars. Mr. Man and Little Y liked them, but they "weren't a favourite." Mr. Man really liked the pastry, and Little Y seemed to prefer the filling.


Modernized Recipe:
(Adapted from The International Jewish Cook Book)

1/2 pound UNSALTED BUTTER
1 pound FLOUR
4 tablespoons POWDERED SUGAR
A dash of SALT
4 EGG YOLKS
1/2 cup SOUR CREAM
2 pounds SOUR APPLES, peeled and minced
1/2 cup GOLDEN RAISINS
SUGAR, to taste (I used 3 tablespoons)
CINNAMON, to taste (I used 1 tablespoon)
4 tablespoons BREAD CRUMBS
1 EGG WHITE
2 tablespoons POWDERED ALMONDS

1. In a large mixing bowl, blend together the flour, powdered sugar, and butter, using your hands, a pastry cutter, or a food processor. When well blended, add the egg yolks and sour cream. Knead together until the dough forms a ball and doesn't stick to your fingers. Wrap it up and let it sit in the fridge for half an hour.
2. In a large bowl. mix together the minced apples, raisins, sugar, and cinnamon.
3. Preheat the oven to 400F. Roll out half of the dough into a rectangle and lay it in a greased 9x13 pan or on a cookie sheet lined with parchment paper. Trim the edges with a knife if necessary.
4. Sprinkle the breadcrumbs onto the bottom layer of the pastry. Add the apple filling. Roll out the second half of the pastry and place it on top of the apple filling. Trim if necessary.
5. Brush the top of the pastry with an egg white. Sprinkle on the almonds. Bake for about 25 - 35 minutes.


Raspberry Tart (1831) ★★★★

Hi everyone!
I've been super busy with school lately, as I'm taking a 120% course load this semester! Crazy, right?!
The good news is that I am done mid-April, so hopefully then I can give this blog a little more attention.
(The bad news is that I have about 3 essays due before then that I haven't even started yet! Shhh!)

Anyway, for one of my courses I've been designing a website, called Early Canadian Cookbooks Online. It's basically an online bibliography for Canadian cookbooks, 1825 - 1875. I've also got links up so that people can read the digitized copies online. As part of the project, I decided it would be a great idea to set up a blog with a similar premise to this one. So as an example post, I made a raspberry tart from the 1831 cookbook, The Cook Not Mad. You can check it out over at ECCO!
(As a side note, if you visit my website, please note that it is still under construction in a lot of places!)

(Click this delicious looking tart to see the post!)


Cramberry Tart/Royal Paste (1798) ★★★


I realize this cranberry-themed recipe is late, but better late than never, right?!

Cranberries are an essentially part of holiday food traditions, especially in North America, but also in Europe. Yes, cranberries do grow outside of the Americas, but they don't seem to hold quite the same cultural importance that they do there. Interestingly, cranberries seem to be relegated to three uses: sauce, jelly, and pie. Today we can see the cranberry branching out a bit, in juice, muffins, breads, and other baked goods, but this was not really the case in the past.

In North America - like with many other foods - Aboriginals were the first harvesters of cranberries. The 1999 Encyclopedia of American Food and Drink states: "The Native Americans of New England, who called them sassamensesh or ibimi, long enjoyed cranberries, both raw or sweetened with maple sugar." Catharine Parr Traill noted that, "The Indians attribute great medicinal virtues to the cranberry, either cooked or raw : in the uncooked state the berry is harsh and very astringent : they use it in dysentery, and also in applications as a poultice to wounds and inflammatory tumours, with great effect." Similarly, today we often recognize cranberries as an aid in urinary tract infections, so there is a long history here of food as medicine.

The other great thing about cranberries is that stored properly they will keep for quite a while, something which would have been valued in a food in a time when electric refrigerators and freezers didn't exist.

Cranberries were known by a variety of names, including bounce berry, marsh-wort, fen-wort, moss-berry, and fenberry. A few different explanations for the name cranberry exist. The Encyclopedia of American Food and Drink states that the word is derived from the Dutch word kranbeer, while An A to Z of Food and Drink claims the term is German and relates to the long, beak-like stamens of the plant. The Oxford Companion to Food only notes the "dubious" theory that the name comes from the cranes that like to eat the fruit.

A more thorough history of cranberries can be read here.

Cranberries start to appear in text around the early 1700s, so this 1798 recipe for Cramberry Tart is one of the earliest recipes involving the fruit. This 1798 cookbook, American Cookery, was the first that was written by an American for Americans. Previously, all cookbooks had been imported or were re-written versions of European texts. One of the key aspects of this new American work was the inclusion of local ingredients such as squash, turkey, corn, potatoes, and - of course - cranberries. Not surprisingly, the book achieved considerable success.


Original Recipe:


The Verdict:
So, this recipe doesn't give amounts or instructions for the cranberries, which is always nice. What I did was pick over and wash my berries and simmer them in a pot with water and sugar. I think I ended up with about 2 cups of berries, 1/2 cup of water, and 2 cups of sugar. Roughly. The cranberries do give off a lot of liquid as they cook. I simmered this until the berries popped and most of liquid was gone. It's good to leave some liquid, because the cranberries will naturally gel up, and then you can stretch you yield if you don't have many berries, like I did. Also, sweetener is by whatever you like. I found I needed quite a lot of sugar in order to make it palatable for me. Also, this recipe suggests straining the berries. To be honest I find it kind of wasteful with what gets leftover in the sieve and it's a pain in the butt to clean that thing too, so I just pureed my cooked berries. I cheated. Sorry guys.
As for the paste, I halved the recipe, which was a good idea because even halved it made about double the amount I needed. So about a quarter of the recipe is enough for one tart. It's a pretty tough dough as well, so I really had to work my arm muscles to make sure the eggs were incorporated well enough.
When I tasted the tart, I found that the filling was still super tart. It needed way more sugar to be edible for me, which just ends up being a ridiculous amount of sweetener. Maybe if a sweeter fruit was incorporated, like apples or strawberries, it would cut the tartness of the cranberries on their own. The crust was good, but I could taste the eggs. That sort of bothers me, but I feel like most people wouldn't notice. I gave this recipe an average rating. It's not awful, but it needs some tweaking. The biggest issue was the filling, but that way my own fault - not that the recipe helped much.


Modernized Recipe:
(Adapted from American Cookery)

CRANBERRIES, about 2 cups
SUGAR, about 4 cups

1/4 pound FLOUR
1/8 pound BUTTER, cold
1 EGG, divided with the whites beaten stiff
1/2 ounce SUGAR

1. Pick over and wash the cranberries. Put them in a medium saucepan with 1/2 cup of water and about 4 cups of sugar, or to taste. Simmer gently until the berries are bursting and tender and the filling begins to thicken. When done, remove from heat and let cool.
2. Meanwhile, preheat the oven to 350F. Prepare the crust by rubbing the butter into the flour until well-combined (or use a pastry blender or food processor - I like my hands). Add the sugar and the egg and knead well. Roll out with flour and line a tart or pie pan.
3. Use a blender or a food processor to puree the cranberry filling. Pour into the prepared crust. Bake for about 20 minutes, or until the filling has set and the crust is golden brown. Let cool before serving.

-----
Sources

"American Cookery." Feeding America. Accessed 01 Jan. 2013. <http://digital.lib.msu.edu/projects/cookbooks/html/books/book_01.cfm>.

"Cranberries." Epicurean. Accessed 01 Jan. 2013. <http://www.epicurean.com/articles/cranberries.html>.

"Cranberries." The Food Timeline. Accessed 01 Jan. 2013. <http://www.foodtimeline.org/foodfaq1.html>.

Traill, Catherine Parr Strickland. The Female Emigrant's Guide: And Hints on Canadian Housekeeping. Toronto: Maclear &, 1855, pg. 88 - 89.


Chocolate Eclairs (1887) ★★

Well, chocolate eclairs wouldn't be the first food I think of when I think of what to eat at Thanksgiving, but apparently they were appropriate during the 1880s at least! Perhaps this was due to the relative novelty of the dish - it seems that the first English recipe for eclairs was just published in 1884. But - what more American source than the Whitehouse Cookbook to validate their appearance on a Thanksgiving menu!

Eclairs are listed under "Supper," which would be lunch to us modern folk. For the curious, here's the menu in full:
Breakfast: grapes, oat flakes, broiled porterhouse steak, codfish balls, browned potatoes, buckwheat cakes, wheat bread, coffee
Supper: cold roast turkey, scalloped oysters, potato salad, cream short-cake, eclairs, preserved egg plums, tea
Dinner: oysters on half shell, cream of chicken soup,  fried smelts, sauce tartare, roast turkey, cranberry sauce, mashed potatoes, baked squash, boiled onions, parsnip fritters, olives, chicken salad, venison pastry, pumpkin pie, mince pie, charlotte russe, almond ice-cream, lemon jelly, hickory nut cake, cheese, fruits, coffee

Overall, the dinner menu looks quite similar to something we'd see today, although perhaps a little...more elaborate. The only thing I think is missing is sweet potatoes, and of course there are a few oddities (fried smelts, boiled onions), but overall the link to modern Thanksgiving is obvious.

Happy Thanksgiving, from 1887!


Original Recipe:

CHOCOLATE ECLAIRS.
Make the mixture exactly like the recipe for "Boston Cream Cakes." Spread it on buttered pans in oblong pieces about four inches long and one and a half wide, to be laid about two inches apart; they must be baked in a rather quick oven about twenty-five minutes. As soon as baked ice with chocolate icing, and when this is cold split them on one side and fill with the same cream as "Boston Cream Cakes."
BOSTON CREAM CAKES.
Put into a large-sized saucepan half a cup of butter and one cup of hot water; set it on the fire; when the mixture begins to boil, turn in a pint of sifted flour at once, beat and work it well with a vegetable masher until it is very smooth. Remove from the fire, and when cool enough add five eggs that have been well beaten, first the yolks and then the whites, also half a teaspoonful of soda and a teaspoonful of salt. Drop on buttered tins in large spoonfuls about two inches apart. Bake in a quick oven about fifteen minutes. When done and quite cold, open them on the side with a knife or scissors and put in as much of the custard as possible.
Cream for Filling.—Made of two eggs, three tablespoonfuls of sifted flour (or half cup of cornstarch) and one cup of sugar. Put two-thirds of a pint of milk over the fire in a double boiler; in a third of a pint of milk, stir the sugar, flour and beaten eggs. As soon as the milk looks like boiling, pour in the mixture and stir briskly for three minutes, until it thickens; then remove from the fire and add a teaspoonful of butter; when cool, flavor with vanilla or lemon and fill your cakes.

PLAIN CHOCOLATE ICING.
Put into a shallow pan four tablespoonfuls of scraped chocolate, and place it where it will melt gradually, but not scorch; when melted, stir in three tablespoonfuls of milk or cream and one of water; mix all well together, and add one scant teacupful of sugar; boil about five minutes, and while hot, and when the cakes are nearly cold, spread some evenly over the surface of one of the cakes; put a second one on top, alternating the mixture and cakes; then cover top and sides, and set in a warm oven to harden. All who have tried recipe after recipe, vainly hoping to find one where the chocolate sticks to the cake and not to the fingers, will appreciate the above. In making those most palatable of cakes, "Chocolate Eclairs," the recipe just given will be found very satisfactory.


The Verdict:
I was super excited when these were baking, but alas, my dreams were crushed. Firstly, I undercooked the pastry. I've never made eclairs before, so I didn't realize until it was too late. Because of that they fell, were gooey instead of crisp, and tasted eggy. The chocolate icing was tasty, but grainy from using regular sugar. The filling was edible, but not my favourite flavour. It was basically identical to the blancmange I made a little while ago. I would've much preferred whipped cream. They are edible, but I won't eat them, unfortunately. I think if I didn't make as many mistakes the pastry could've been good, but personally I just don't like the filling, so the whole recipe is pretty much moot.
Oh, and they are ugly, aren't they? The filling was running out, but possibly just because I didn't let it cool completely. Little Y saw the photos and said, "Ewwwww, gross!" Haha!

Modernized Recipe:
(Adapted from The Whitehouse Cookbook)

Eclairs
1/2 cup UNSALTED BUTTER
1 cup HOT WATER
1 pint (2 cups) FLOUR, sifted
4 EGGS, separated
1/2 teaspoon BAKING SODA
Pinch of SALT

Chocolate Icing
4 tablespoons BAKING CHOCOLATE, finely chopped or grated
3 tablespoons MILK
1 tablespoon WATER
1 cup SUGAR

Filling
1 pint (2 cups) MILK
1 cup SUGAR
3 tablespoons FLOUR
2 EGGS, beaten
1 teaspoon BUTTER
VANILLA or LEMON EXTRACT

1. In a medium saucepan, melt the butter and hot water. When it starts to boil, remove from heat and add in the flour. Mix well until a smooth dough forms (a potato masher may be useful). Let cool.
2. Preheat the oven to 400F. Meanwhile, separate the eggs into two bowls. Beat the whites until stiff peaks form and then beat the yolks until frothy.
3. When the dough is cool, beat in the yolks and fold in the whites, baking soda, and salt.
4. Line a baking sheet with parchment paper and put the finished dough into a ziploc bag (or pastry bag). Cut off one corner of the bag to be about 1.5 inches wide. Use the bag to squeeze out 4-inch tubes of dough, keeping them about 2-inches apart. If needed, use your fingers dipped in water to smooth out the tops and edges. Bake for 20 - 25 minutes.
5. While the eclairs are baking, make the chocolate icing. In a small saucepan, add the chopped chocolate. Put it on top of the stove or somewhere warm to gradually melt. When melted, stir in the milk and water. Add the sugar and boil it all together for about 5 minutes. When the eclairs are baked and nearly cold, ice them.
6. To make the filling, put two-thirds of the milk in a double boiler. In a separate bowl, mix the other third of milk, sugar, flour, and eggs. Just before the milk boils, stir in the mixture and whisk for three minutes or until thickened. Add the butter and flavouring, stir, and let cool. When the eclairs are cool as well, split them open  on one side and fill.


A Filling for Tarts (1900) ★★★★★

Butter tarts are one of the very few foods that Canada claims as its own. And yet it shares many similar features with other treats from around the world (pecan pie, shoofly pie, treacle tart, Ecclefechan tart, etc.). Perhaps these were the inspiration for whoever created the first butter tart. As it stands now, all we really know is that the first known printed recipe appeared in the 1900 cookbook produced by the Royal Victoria Hospital’s Woman’s Auxiliary in Barrie, Ontario. The recipe gained enough popularity to be printed in the Toronto Daily News in 1908 and to have six versions in the Canadian Farm Cook Book of 1911. At the same time, butter tarts were far from universal; I examined a few cookbooks from throughout the early 20th century and the best I could find was one recipe for "Egg Tarts" in a 1934 cookbook from Halifax. Perhaps its a regional issue?


A National Archives of Canada exhibition revealed the butter tart as a key source of Canadian identity (an especially idealistic one at that):
"Forget the beaver, forget the glorious maple leaf, forget the majestic and haunting loon – for all these years the country has completely overlooked the most important contribution to our identity as a nation, the butter tart…. The delicate crust supports the rich and creamy centre just as the oceans border our natural resources and the people and the animals that dwell here. Variations and sizes of butter tarts abound, just as there are so many varied cultures living harmoniously in our wonderful country. The Americans have their symbols and sayings, eagles and apple pies, bombs and movie stars. We have the butter tart. Born and baked in this incredible land of ours to be a constant reminder of how sweet and likeable we are."

I went with the apparent original recipe, but you could also try your hand at this one from circa 1950.

Original Recipe*:

FILLING:
2 cups boiling water
1 cup currants
1 cup brown sugar.
1/2 cup salted butter, softened
2 large eggs, slightly beaten

PASTRY:
12 tart-sized pastry shells

PREPARATION: Place pastry shells on cookie sheet, or line 12 muffins cups with prepared pastry.
Place currents in medium-sized bowl and cover with boiling water. Allow to stand five to 10 minutes. Drain currants, discard water, and place currants back in the same bowl. Whisk in brown sugar and butter, and combine well. Blend in eggs.

Spoon filling into tart shells until three-quarters full (make sure currants in the liquidity mixture are evenly distributed in each shell).

Bake in bottom third of 400F oven for about 15 to 20 minutes, or until filling is puffed and bubbly and pastry is golden. Let stand on rack for 1 minute. Immediately run flat metal spatula around tarts to loosen (this will help prevent sticking). After five minutes, carefully slide spatula under tarts and transfer to rack to cool. Makes 12.

The Verdict:

Delicious! Mr. Man and I both enjoyed these. I was worried about the dried fruit, but it wasn't bad at all. I substituted raisins for currants because I couldn't find any at my grocery store. Although it seems like currants were preferred in the earliest recipes, modern recipes usually call for raisins, so it is still partially authentic anyway. I also used pre-made tart shells, just out of laziness and because there was no recipe given (it's just for the filling). Plus pastry has stayed pretty much the same throughout history. The filling was gooey, not runny or firm. Also, I had enough for maybe 20 tarts and only bought 12 shells, so there's lots left over.

Modernized Recipe:

(Adapted from the Royal Victoria Hospital’s Woman’s Auxiliary Cook Book)

Already modernized.

*This is apparently the recipe from 1900. I took this from a website, so I can't verify it's authenticity. It was already modernized, so this is unlikely how it was originally printed.

-----

Sources


Elphick, Katherine. "RVH Cookbook Boasts One of First, Printed Butter Tart Recipes." CottageCountryNow.ca. 12 Feb. 2008. Web. 11 Nov. 2012. <http://www.cottagecountrynow.ca/cottagecountrynow/article/387501>.

Jacobs, Hersch. "Structural Elements in Canadian Cuisine." Cuizine: The Journal of Canadian Food Cultures 2.1 (2009): Web. <http://www.erudit.org/revue/cuizine/2009/v2/n1/039510ar.html#no62>.

Nuttall-Smith, Chris. "Eat, Drink and Be Daring." Toronto Life. Dec. 2007. Web. 11 Nov. 2012. <http://www.torontolife.com/features/eat-drink-and-be-daring/?pageno=7>.

"Canada Day: Iconic Canadian Foods." Shine from Yahoo! Canada. June 2012. Web. 11 Nov. 2012. <http://ca.shine.yahoo.com/photos/canada-day-iconic-canadian-foods-slideshow/butter-tarts-photo-1340643073.html>.

Cider Jelly Pie (1920) ★★★★★

Here's a fall recipe using apple cider.
This recipe really intrigued me because it's just so unique! It seems like a pretty cheap way to make dessert - no fruit necessary!
I had bought apple cider a little while ago and I had leftover pie dough from the lemon pudding, so I figured the time was right to make this recipe.


Original Recipe:
CIDER JELLY PIE
Place in a saucepan
Three-quarters cup of brown sugar,
Two cups of cider,
Eight tablespoons of cornstarch.
Dissolve the starch and then bring to a boil. Cook for three minutes and then remove from the fire and add
One-half teaspoon of cinnamon,
One tablespoon of vinegar.
Beat to mix and then cool and bake between two crusts.

The Verdict:
I didn't really expect much of this pie, but it was actually really good! I thought for sure the vinegar would be nasty, but it wasn't! Mr. Man looked like he was about to gag when I showed him the pie (it was really jiggly), but after I forced him to try it he practically inhaled the whole piece and sheepishly claimed it was amazingly delicious. Little Y and I enjoyed it as well. The filling is pretty tasty. It tastes exactly like an apple pie. I think it would be awesome with some actual apple pieces or caramel sauce, but truthfully it doesn't need anything extra. So if you don't feel like peeling 8 apples, this is a great substitute!


Modernized Recipe:
(Adapted from Mrs. Wilson's Cook Book)

3/4 cup BROWN SUGAR
2 cups APPLE CIDER
1/2 cup CORNSTARCH
1/2 teaspoon CINNAMON
1 tablespoon VINEGAR
2 PREPARED PIE CRUSTS

1. Preheat the oven to 325F. If using homemade pie crust, prepare the bottom crust in a pie dish.
2. In a medium saucepan, whisk together the sugar, cider, and cornstarch. Bring to a boil, whisking constantly. Cook for about 3 minutes, or until thickened. Whisk in the cinnamon and vinegar. Let cool.
3. Pour the filling into the prepared pie crust and cover with the other. Make a hole to vent and decorate (or not) as desired. Bake for about 25 - 30 minutes.


Delicious Lemon Pudding (1877) ★★★★★

Is it just me or does it seem like everything in baking was called "pudding" at one time or another?
Seriously, pudding is so confusing.
So apparently this is a "delicious lemon pudding", but it really just seems like a lemon meringue pie...

Original Recipe:

The Verdict:
I was kind of worried about this pudding because when I baked it the custard made this huge dome in the middle which I had to deflate. So the lemon layer was very thin in places. I also was milliseconds away from burning the meringue. People, be careful with your broilers. It was barely brown and about 30 seconds later it was smoking. Ahh!
Anyway, I was pleasantly surprised! The whole thing was quite tasty. I used butter in the crust and it was yummy and buttery and held up well. The lemon filling was thick and quite tart. The meringue was nice too. I used 1/3 cup of milk for the filling, which didn't make very much, so I was glad to have the meringue because it filled up all the extra space perfectly.
Really this is a lemon meringue pie. I mean, I'm not sure if it was meant to be baked in a circular shape, but that's what I went with. Mr. Man gave it five stars, even though he hates meringue. I would have to concur. I can't think of anything to change!

Modernized Recipe:
(Adapted from Buckeye Cookery, And Practical Housekeeping: Compiled From Original Recipes)

1 LEMON
1 cup SUGAR
2 EGGS, separated
3 tablespoons FLOUR
MILK (I used 1/3 cup)
1 PREPARED PIE CRUST*
4 tablespoons SUGAR

1. Preheat the oven to 350F. Make pie crust if needed.
2. Zest the lemon and juice it. In a medium bowl, mix the lemon zest and juice with the sugar, egg yolks, flour, and enough milk to fill your baking dish. Make sure there are no lumps of flour.
3. Line the baking dish with the prepared pie crust. Pour in the lemon filling and bake until thick and done, about 25 - 30 minutes.
4. While the pudding is baking, whip the egg whites with 4 tablespoons of sugar until stiff. When the pudding is done, spread the whites on top and brown in the oven. Serve.

*The recipe doesn't give directions for the crust ("paste"), so I used a recipe from the same cookbook:
GOOD COMMON PASTE.
One coffee-cup lard, three of sifted flour, and a little salt. In winter, soften the lard a little (but not in summer), cut it well into the flour with a knife, then mix with cold water quickly into a moderately stiff dough, handling as little as possible. This makes four common-sized covered pies. Take a new slice of paste each time for top crust, using the trimmings, etc., for under crust.--Miss Katy Rupp.


Cinnamon Scones (1914) ★★★

You know when you go to look something up on Wikipedia and you click on a link in the article and before you know it 2 hours have passed and you've gone from the history of pasta to the 1974 Olympics? Yeah, that's something like how I found this recipe. I was browsing Wikipedia and I stumbled across a website which had a digitized version of The Sure to Rise Cookery Book. This cookbook was originally published in 1908 and has been in print since then (but is now known as the Edmonds Cookery Book, after the Edmonds company). It is considered "the quintessential guide to traditional New Zealand cuisine". This recipe for cinnamon scones comes from the 1914 edition.


Because there weren't a lot of directions included in this recipe and because I have never made scones before, I took some direction from a slightly older scone recipe I found in an American cookbook from 1921.

Original Recipe:


The Verdict:
Not bad. At 20 minutes, mine were slightly overcooked, but I think I also made them on the small side. The cinnamon on the inside was a little dry - it didn't soak into the dough at all, so it just sort of sat there. I think maybe mixing it directly into the dough or brushing the inside of the scones with milk or melted butter would help the cinnamon get a bit wetter. I used 4 heaping tablespoons of sugar, and although these weren't very sweet, I liked them that way. The 1921 recipe called for just 2, so it could be reduced. I should also note that I used about a 1 to 4 ratio of white to whole wheat flour, so they were a bit dense and weren't very fluffy. More like cookies, than scones. I'm not sure if I would make this exact recipe again, but I will definitely eat all of them because they are tasty. I give them a high 3 star rating, because the taste is good, but the execution needs improvement.


Modernized Recipe:
(Adapted from The Sure to Rise Cookery Book)

1 pound FLOUR
3 teaspoons BAKING POWDER
SUGAR, to taste (I used 4 tablespoons)
A pinch of SALT
2 ounces UNSALTED BUTTER
1 EGG, beaten
1/3 to 1/2 cup MILK
2 teaspoons CINNAMON

1. Preheat the oven to 375F and line a cookie sheet with parchment paper.
2. In a large bowl or in a food processor, whisk together the flour, baking powder, sugar, and salt.
3. Use a pastry cutter or your food processor to blend in the butter. Add the egg and enough milk to make a soft dough. If it's a little wet, that's okay, because it will absorb flour during rolling.
4. On a well-floured surface, roll out the dough to about 1/2 an inch thickness. Cut into 3-inch squares and sprinkle on cinnamon. Fold into triangles and press lightly.
5. Bake for 15 to 20 minutes.