Showing posts with label 1920s. Show all posts

Recipes for Red Hots (1929-1972)

Still hanging on to those spicy cinnamon hearts from Valentine's? Also known as Red Hots (brand name) or cinnamon imperials (generic name), cinnamon hearts hold a fond place in my childhood memory. As a child I often accompanied my mother on long car trips, so there was nearly always some sort of candy or snack close at hand. Around Valentine's Day, cinnamon hearts made an appearance, and I can still recall the addictive, spicy sting of their flavour on my tongue. This year, Mr. Man brought some home for me, but oddly I found that I couldn't quite tolerate the flavour as much as I could when I was younger. I wondered if I could find some strange historical recipe so that I could use them up rather than waste them. Amazingly, recipes using cinnamon candies date back to at least 1929, which was before the Red Hots brand was trademarked. These candies are almost always paired with apple(sauce) and/or Jell-O, and often seems to hold a special place on holiday tables, as a symbol of family heritage and tradition.

So, compiled for your convenience, some recipes using cinnamon heart candies:

Applesauce with red hots 

From: Better Homes and Gardens Junior Cook Book (1963)
Source


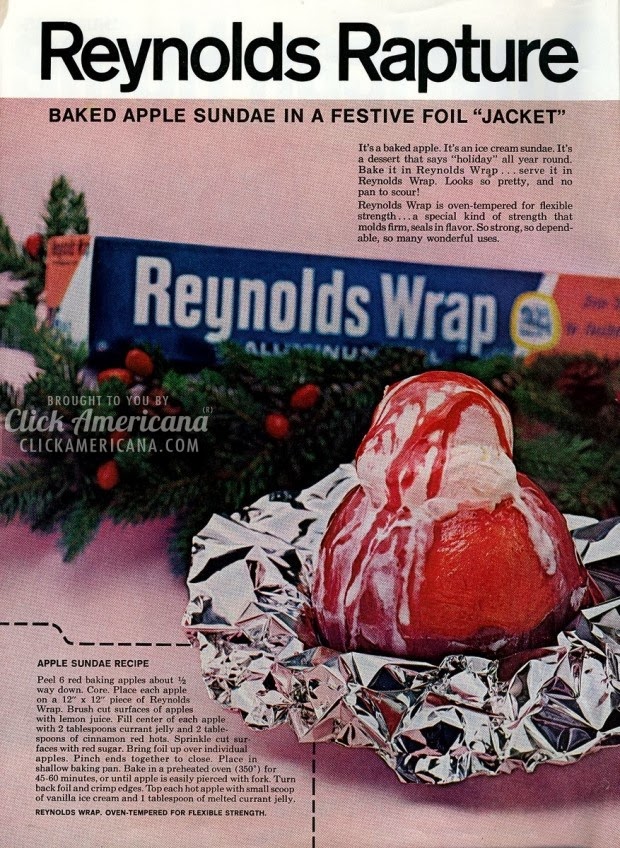
Apple Sundae

From: Reynolds Wrap advertisement (1972)
Source


Imperial Salad/Cinnamon Apple Salad

From: The Parker Cook Book (1932), updated by Laura Gutschke
Source

IMPERIAL SALAD
Cox's cinnamon apple salad called for an usual mix of ingredients that includes cottage cheese, walnuts and red cinnamon candies, famously known as Red Hots. (Another generic name for the candy is cinnamon imperials.) Surprisingly, they work well together.
The candy's intense cinnamon flavor reduces to a subtle hint when cooked in the sugar syrup in the following recipe.
The original instructions called for cooking cored apples whole in the red syrup and stuffing them with a mixture of cottage cheese and walnuts. I instead sliced the apples. I also eliminated the lettuce and mayonnaise that was included in the serving directions.
The apples also can be enjoyed without the cottage cheese.
CINNAMON APPLE SALAD
Ingredients
1/2 cup sugar1/2 cup water
1 cup red cinnamon candies
4 crisp apples, sliced
Cottage cheese
Chopped walnuts
Directions
1. In skillet, cook sugar, water and cinnamon candies over medium-high heat to make a syrup. Stir often to blend well.
2. Add apple slices to the syrup mixture and reduce heat to medium. Cook until apples are tender but not broken, about 10 to 15 minutes. Gently stir occasionally.
3. Remove cooked apples from syrup and place slices skin side down on serving platter. Chill in refrigerator about one hour.
4. In a separate bowl, mix about 2 tablespoons walnuts into 1/2 cup cottage cheese for each serving.
5. Place 5-6 apple slices on a plate and top with serving of cottage cheese mixture.


Applesauce Salad

From: Recipe collection, undated
Source


Cinnamon Candy Jell-O Salad

From: unknown (1961)
Source
1 pkg. Cherry Jello
1/4 C. cinnamon candies (Red Hots)
1 C. hot water
2 C. applesauce
Dissolve candies in hot water and add Jello. Stir into applesauce and chill.


Cinnamon Apple Salad Dessert

From: The Evening Independent (1929)
Source


Blushing Snowballs

From: Westinghouse recipe pamphlet (1950s)
Source


Alphabet Pie 

From: 250 Superb Pies and Pastries, Culinary Arts Institute (1941)
Source

Cinnamon Creme

From: Eugene Register-Guard (1959)
Source


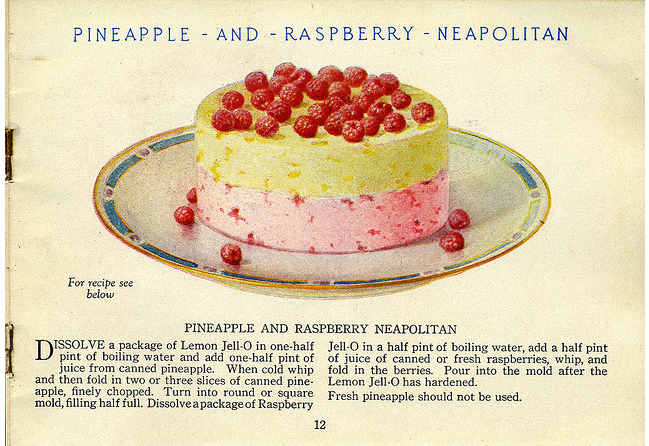
Pineapple and Raspberry Neapolitan (1926) ★★★★


Original Recipe:


Dissolve a package of Lemon Jell-O in one-half pint of boiling water and add one-half pint of juice from canned pineapple. When cold whip and then fold in two or three slices of canned pineapple, finely chopped. Turn into round or square mold, filling half full. Dissolve a package of Raspberry Jell-O in a half pint of boiling water, add half a pint of of juice of canned or fresh raspberries, whip, and fold in the berries. Pour into the mold after the Lemon Jell-O has hardened. 
Fresh pineapple should not be used.


The Verdict:

Well, visually, this was a huge disappointment. Which I should have anticipated, because honestly, how could Jell-O get that white and fluffy looking without adding any dairy? However, the "whipping" did make some beautiful bubbles in the Jell-O. I also had a problem with my layers not sticking together, which was interesting. When I tried to unmold my gelatin, the layers separated and the pineapple one even broke a little. Sad times. 
However, taste-wise, this was pretty good! I'm going to give this 4 stars because it was slightly above average. However, I wouldn't make this very often, because it does take a bit of work. The amount of real fruit/fruit juice really masked the fake Jell-O flavouring, which could be a good thing or a bad thing, depending on your preferences, I guess. I really enjoyed the taste. Also, the pineapple added a nice crunch, but the berries did get a bit mushy, which was a tad gross. 

Modernized Recipe:

(Adapted from Jell-O recipe booklet, found at Hey, My Mom Used to Make That!)

1 package LEMON JELL-O
1 cup PINEAPPLE JUICE (drained from the canned pineapple, add a little water if needed to reach 1 cup)
3 slices CANNED PINEAPPLE, finely chopped
1 package RASPBERRY JELL-O
1 cup RASPBERRY JUICE
A handful of RASPBERRIES
2 cups BOILING WATER, divided

1. In a mixing bowl (or directly in your mold, if you're lazy like me), dissolve the lemon Jell-O in 1 cup of boiling water. When the Jell-O has dissolved, mix in the pineapple juice. When the Jell-O is cooled, beat it with a hand mixer until very frothy. Gently fold in the fruit and let it set completely.
2. Do the same with the raspberry Jell-O, juice, and berries, making sure the pineapple layer is firm before pouring on the raspberry layer.
3. Let the mold set until firm. To unmold it, briefly soak the mold in warm water and invert onto a plate. Garnish with raspberries.


Honey and Raspberry Ade (1920) ★★★★★


I found this recipe while browsing and I thought the combination of honey and raspberry sounded delicious! It's especially fitting for summertime, when berries are bountiful. I imagine if one had access to berry bushes, this would be a great way to use up any extra berries, especially the squished or extra ripe ones.

Original Recipe:
HONEY AND RASPBERRY ADE
Place three baskets of well-washed raspberries in a saucepan and add
          One quart of water,
          One and one-half cups of honey,
          One-quarter teaspoon of nutmeg.
Bring to a boil and cook slowly until the fruit is soft, mashing frequently with the potato masher. Cool and strain into punch bowl. Add a piece of ice and the juice of one orange or one lemon.

The Verdict:
Yummy! I just used a whole bag of frozen raspberries (cheaper and already washed!), which ended up being 600g. I'm not sure if that's equal to "three baskets", but the flavour was good. With the juices from the berries and the orange, this didn't really cook down that much, so it probably makes about 4 cups (4 servings). Its a nice drink, although a little sweet, so the ice cubes are nice to water it down a bit. I actually tried some warm though, and it was really good, almost like a nice cider, but with raspberries. I think this recipe served warm would be an excellent cold weather drink. Overall, 5 stars. Simple and delicious is a win to me!

Modernized Recipe:
(Adapted from Mrs. Wilson's Cook Book)

4 cups WATER
600g RASPBERRIES
1 1/2 cups HONEY
1/4 teaspoon NUTMEG
1 ORANGE or LEMON

1. In a large pot, add all ingredients and bring to a boil. Let simmer for a few minutes, until the fruit has dissolved. Meanwhile, juice an orange or lemon.
2. Pour the orange or lemon juice into a large pitcher and strain in the raspberry ade. Let cool and serve with ice cubes (or serve hot!).


Peach Cup (1920) ★★★★

This recipe represents a very deep-rooted tradition of making fruit syrups for refreshing summer beverages.


Original Recipe:

PEACH CUP 
Place one quart of peeled and sliced peaches in a saucepan and add 
One pound of sugar,  
One cup of water. 
Cook until the fruit is soft and then rub through a fine sieve and add juice of one lemon. 
To use: Place one-half cup of the peach mixture in a glass and add 
Two tablespoons of cream, 
One-half cup of crushed ice, 
and fill with carbonated water. 
A box of straws to use in serving these iced drinks makes them doubly attractive.


The Verdict:
Well firstly, I was surprised at how much peach flavour the syrup actually had, because I used frozen peaches. That said, while I did taste the peach, it could have been even stronger, so I would suggest at least using some fresh peaches if you make this.
The cream was a little bit of a strange addition for my modern tastes. The flavour did grow on me, but it seemed like 2 tablespoons was a bit too much. Also, the syrup was very sweet, so maybe a little under 1/2 cup would be a better amount, but of course it all depends on how much carbonated water is added. I think even just using the peach syrup with carbonated water would be a yummy drink all on its own. Overall, this recipe is really nice and is definitely worth 4 stars!


Modernized Recipe:
(Adapted from Mrs. Wilson's Cook Book)

1 quart (4 cups) PEACHES, peeled and sliced
1 pound SUGAR
1 cup WATER
Juice of 1 LEMON
1-2 tablespoons CREAM
1/2 cup CRUSHED ICE
SODA WATER

1. In a medium saucepan, combine the peaches, sugar, and water. Bring to a boil and let it simmer until the peaches are very soft.
2. Strain the liquid through a sieve and gently push on the cooked peaches to ensure you get as much syrup as you can. Add the lemon juice to the syrup and stir well. (Tip: I saved the cooked peaches and blended them up in a smoothie! No need to waste!)
3. To make a "Peach Cup" put 1/2 cup of the peach syrup (cooled) in a large glass. Add 1-2 tablespoons of cream, as desired. Add 1/2 cup crushed ice and top the glass up with carbonated water, to taste. Stir well to combine and enjoy!


ANZAC Biscuits (1927) ★★★★★

Today is ANZAC Day!
Okay, so two days ago I found out what the whole ANZAC business is about. For anyone else still in the dark, this acronym stands for Australian and New Zealand Army Corps. ANZAC Day in particular, is a nation-wide celebration in both countries, honouring those who fought at Gallipoli in the Ottoman Empire during World War One (although the day now serves as a more general memorial). ANZAC biscuits - cookies to us North American folk, but never call them that! - have come to play a crucial role in the celebration of this holiday, and are often used in fundraising efforts by the Royal New Zealand Returned Services' Association (RSA) and the Returned and Services League of Australia (RSL). These biscuits are very much a part of Australian society and culture. By preparing and eating these cookies, Australians and New Zealanders create a connection to ANZAC Day, often seen as the birth of the Australian nation, and to their fellow countrymen. This is one example of the scholar Benedict Anderson's theory of nations as imagined communities - members of a community imagine their peers participating in the same rituals as themselves, thus creating and perpetuating a specific culture. I'm getting a little bit scholarly on you here, but it is certainly a fascinating topic to consider!

However, the ANZAC biscuits which are baked today are quite different from the original recipe.
The original recipe is quite simple, so it is anyone's guess as to when it was "created". However, the earliest known use of the term "ANZAC" as a recipe is an advertisement for the 1915 copy of St. Andrew's Cookery Book, from Dunedin, New Zealand. But this recipe was for a cake, not biscuits. In Australia, a Sydney cookbook called War Chest Cookery Book included a recipe for Anzac Biscuits in 1917, but the ingredients do not correspond with the recipe known as ANZAC today. The 1917 recipe was contributed by an "Alice Anderson from "Oakdale" N. Sydney" and includes rice flour, spices, and eggs. Oddly enough, there is a recipe in War Chest Cookery Book which is extremely similar to ANZAC biscuit recipes published later, but in this case it is called Rolled Oats Biscuits. By 1921, Rolled Oats Biscuits finally became Anzac Crispies (published in the 9th edition of St. Andrew's Cookery Book) and in 1923 the recipe finally became Anzac Biscuits in Mrs H. W. Shaw's Six Hundred Tested Recipes. Coconut was introduced to the recipe in 1927. Therefore, the recipe can currently be traced back to New Zealand, where the recipe for Rolled Oats Biscuits was first published.

ANZAC biscuits reflect the circumstances in which they were created. The lack of eggs reflects food shortages during wartime years, specifically the lack of poultry. The hardness of the biscuits indicates that they were a good choice for baking and sending to soldiers abroad. While the origins of ANZAC biscuits certainly dates to the beginning of World War One (if not earlier, under a different name), it was not until after the war that they really began to take off as a cultural and culinary product.

I decided to go with the 1927 recipe, since this is the first time the recipe for ANZAC biscuits appeared as it is made today.


Original Recipe:
Take a quarter of a pound of butter and one tablespoon of golden syrup. Place in a saucepan and melt. Add two tablespoonsful of boiling water in which is dissolved one teaspoonful carbonate of soda. Add three-quarters of a breakfast cup of flour, one breakfast cup of sugar, one breakfast cup of desiccated coconut, one breakfast cup of oatina, and a few almonds finely chopped. Place in teaspoon quantities on a cold slide, and bake in a moderate oven. Leave on a tray for a few minutes to harden before removing from slide, but not too long. A knife slipped under each biscuit will readily remove.


The Verdict:
So for my first try, I used 1 teaspoon of baking soda. The cookies were really tasty and very chewy, but they spread a LOT and were a bit wonky. They were also a little greasy and the almonds didn't want to incorporate into the dough. Oh, and I really didn't want to go and buy a whole can of golden syrup when the recipe only called for 1 tablespoon, so I substituted 1/2 tablespoon honey and 1/2 tablespoon light corn syrup (I know, I know - sorry!). Despite any issues, these were very tasty. Mr. Man said that he was pleasantly surprised, as he doesn't like chewy cookies.
I decided to try again, this time with 1/2 teaspoon baking soda. I also used just a bit less than 1/4 lb of butter and went with a slightly different mixing method. This time the recipe turned out much better, but it was a tiny bit dry, so I think the full amount of butter should be used. This attempt tasted very similar to the first batch - chewy and delicious.


Modernized Recipe:
(Adapted from Terrace Tested Recipes, found at New Zealand Listener)
Yield: ~16 cookies

1/4 lb UNSALTED BUTTER
1 tablespoon GOLDEN SYRUP
2 tablespoons BOILING WATER
1/2 teaspoon BAKING SODA
3/4 cup FLOUR
1 cup SUGAR
1 cup DESICCATED COCONUT
1 cup ROLLED OATS
1/4 cup ALMONDS, chopped

1. Preheat the oven to 350F. Line a baking tray with parchment paper.
2. In a medium saucepan, melt the butter and golden syrup. In a mixing bowl, whisk together the flour, sugar, coconut, oats, and almonds until well combined.
3. In a small container, dissolve the baking soda in the boiling water and pour it into the melted butter. Stir, remove from heat, and pour into the dry ingredients. Mix well.
4. Take tablespoon-sized chunks of dough and roll into slightly flattened balls. Bake about 10 - 12 minutes.


-----
Sources


"Anzac Biscuit." Wikipedia. Wikimedia Foundation, 19 Apr. 2013. Web. 22 Apr. 2013. <http://en.wikipedia.org/wiki/Anzac_biscuit>.


Fleming, Kylie. "Kiwis or Us - Culinary Historian Allie Reynolds Traces Origins of Anzac Biscuits." The Australian. N.p., 20 Apr. 2013. Web. 22 Apr. 2013. <http://www.theaustralian.com.au/news/kiwis-or-us-culinary-historian-allie-reynolds-traces-origins-of-anzac-biscuits/story-e6frg6n6-1226624784496>.


Gofton, Allyson. "The Anzac Biscuit Myth." Allyson Gofton. N.p., 15 Apr. 2006. Web. 22 Apr. 2013. <http://www.allysongofton.co.nz/index.php/page/articles/pi_articleid/57>.


Rae, Fiona. "Anzac Biscuits 1994-2000." New Zealand Listener. N.p., 22 Apr. 2011. Web. 22 Apr. 2013. <http://www.listener.co.nz/from-our-archive/anzac-biscuits-1994-2000/>.


Supski, Sian. Anzac Biscuits - A Culinary MemorialHumanities: Research and Graduate Studies, Australia at War and Peace. Curtin University, n.d. Web. 22 Apr. 2013. 
<http://research.humanities.curtin.edu.au/groups/awp/pdf/ANZAC_BISCUITS_G2015.pdf>.


Poinsettia Salad/Fruit-Salad Dressing (c.1928) ★★★★

I have this jar of maraschino cherries that has been sitting in my fridge for ages, because I bought them for some other historical recipe and never used them again. When I came across this recipe I knew I had to make it. I'm killing two birds with one stone here: using up some cherries AND making a recipe for my 4 Weeks of Yuletide.

Because there was no dressing specified, I decided on using the recipe for Fruit-Salad Dressing from the same cookbook. Because I was lazy, I didn't bother actually making up a whole batch of it, and just combined the ingredients without the eggs. I imagine it would have thickened up to something like a curd and probably would've been quite tasty over this salad.


Original Recipe:
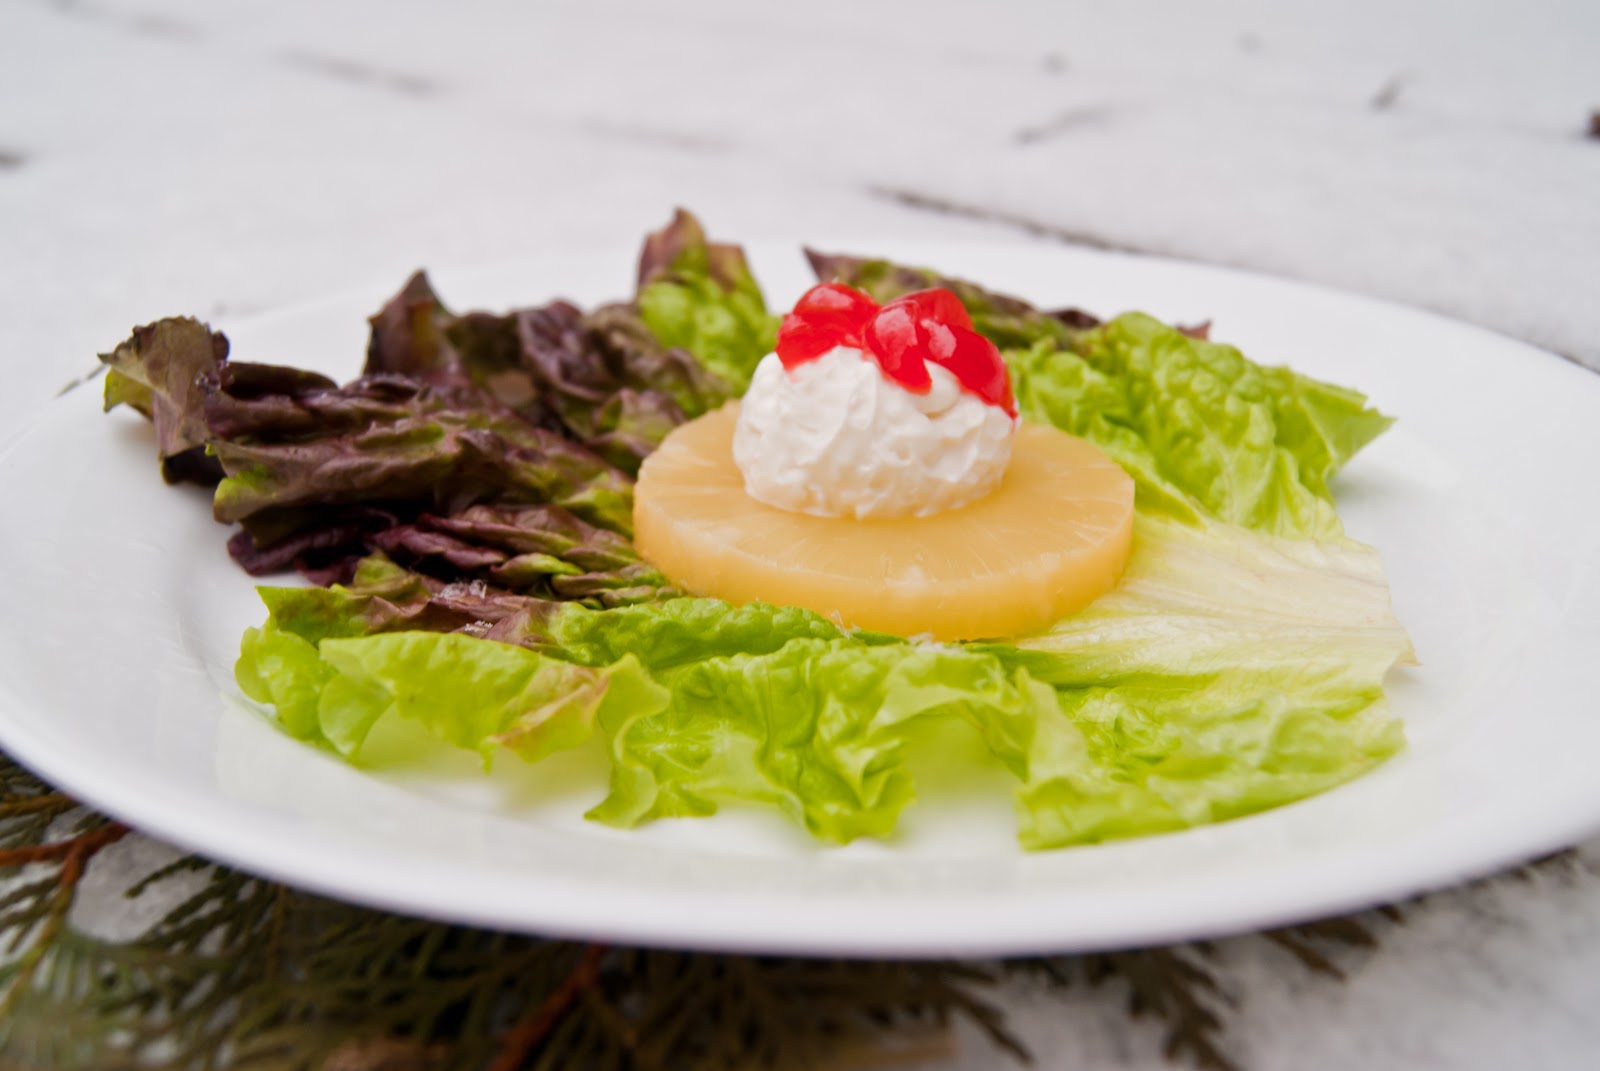
85. POINSETTIA SALAD--Cream cheese, such as Neufchâtel or Philadelphia cream cheese, combines very well with some fruits and vegetables. It is used with pineapple and cherries in the preparation of poinsettia salad, which is illustrated in Fig. 11. As can be imagined, this makes a pretty decoration for a Christmas table or a salad to be served around holiday time.

POINSETTIA SALAD
(Sufficient to Serve Six)
  • 1 pkg. cream cheese
  • Lettuce
  • 2 Tb. cream
  • 4 maraschino cherries
  • 1/4 tsp. salt
  • Salad dressing
  • 6 rounds pineapple
Mix the cream cheese with the cream and salt, and form this into small round balls with the fingers. Place the rounds of pineapple on salad plates garnished with lettuce, and put the cheese ball in the center of the pineapple. Cut the maraschino cherries in half, and then cut each half into narrow strips that resemble petals of a flower. Place five or six of these over the top of the cream cheese with the points meeting in the center, as shown in the illustration. Serve with any desired dressing, but instead of adding the dressing to the salad put it in a mayonnaise bowl and allow each person at the table to add it.

74. FRUIT-SALAD DRESSING.--Various dressings may be served with fruit salad, and usually the one selected depends on the preference of those to whom it is served. However, an excellent dressing for salad of this kind and one that most persons find delicious is made from fruit juices thickened by means of eggs. Whenever a recipe in this Section calls for a fruit-salad dressing, this is the one that is intended.
FRUIT-SALAD DRESSING
  • 1/2 c. pineapple, peach, or pear juice
  • 1/2 c. orange juice
  • 1/4 c. lemon juice
  • 1/4 c. sugar
  • 2 eggs
Mix the fruit juices, add the sugar, beat the eggs slightly, and add them. Put the whole into a double boiler and cook until the mixture begins to thicken. Remove from the fire and beat for a few seconds with a rotary egg beater. Cool and serve.
The Verdict:
Umm...kind of weird. Because the cream cheese was salted, it was confusing and strange with the sweet dressing and fruit. It wasn't bad, though. I think with some modifications  I would actually eat this and even make it again. I would add sweetener and perhaps some vanilla or lemon flavouring to make the cream cheese more like a raw cheesecake ball. Also, the cream is really unnecessary? And maybe use 2 or 3 rings of pineapple, because, um, this "salad" is a really pathetic amount of food. It's obviously supposed to be mostly ornamental, likely as part of a crazy historical meal with 24 courses or something. I give it 3 stars as is, or 4 stars with the above modifications.


Modernized Recipe:
(Adapted from Woman's Institute Library of Cookery, Vol. 4)
LETTUCE, 1 leaf per person
PINEAPPLE, 1-3 rings per person
MARASCHINO CHERRIES, 1-2 per person
CREAM CHEESE, 2 tablespoons per person
SUGAR, 1/2 teaspoon per person
VANILLA or LEMON extract

1/2 cup PINEAPPLE JUICE (if using canned pineapple, use the juice from the can)
1/2 cup ORANGE JUICE
1/4 cup LEMON JUICE
1/4 cup SUGAR
2 EGGS

1. Prepare the dressing by mixing all ingredients in a double boiler or in a saucepan over low heat. Cook until thickened and beat with a hand mixer when done. Let cool.
2. Wash and dry the lettuce leaves. In a bowl, mix together the cream cheese, sugar, and flavouring. Let it sit in the fridge if it needs to firm up before forming into balls. Slice the cherries into thin strips.
3. Assemble the plates as pictured: lettuce, pineapple, cheese ball. Arrange the strips of cherry on top of the cheese ball to make a flower shape.
4. Serve with the dressing on the side.


Jack O' Lantern Cakes (1920) ★★★★

Gibson Tally Card, 1925*
Halloween is a great time to have a historically-themed party. There is tons of information out there on how to have a Halloween party, including some pretty unique ideas. A search for "Halloween" on any of the blogs listed to the right will surely yield some great results. You can even provide your trick-or-treaters with a piece of history by giving out candy from this list, which includes ideas from the 1900s to 1960s.

You can also check out blogs or do a Google search and find some pretty neat historical Halloween costumes. Here's some ideas from the 1920s at Vixen Vintage which I just love!

The recipe I'm sharing today comes from a menu in Mrs. Wilson's Cook Book. This cook book is lovely because it includes a lot of menus for special occasions. I've also been impressed by the recipes I've made previously from this book. Many of them look quite tasty.

Original Recipe:
JACK O' LANTERN CAKES
Bake a sponge cake in individual or muffin pans and then ice with chocolate water icing and make the lantern face with white icing.


SPONGE CAKE—ONE EGG
Place in mixing bowl
One-half cup sugar,
Yolk of one egg,
One tablespoon butter.
Cream well, then add
Three tablespoons water,
Two-thirds cup of flour,
One teaspoon baking powder,
Pinch salt.
Beat to mix, then fold in the stiffly beaten white of one egg; bake in well-greased and floured pan in slow oven thirty minutes.


PLAIN WATER ICING
Place in bowl
One pound XXXX sugar.
Two tablespoonfuls cornstarch,
One teaspoonful lemon juice,
Sufficient hot water to spread.
Beat to mix, then use.


CHOCOLATE ICING
Place in bowl
One pound XXXX sugar,
Two tablespoons cornstarch,
One-half cup cocoa,
Sufficient boiling water to make mixture spread.
Beat until smooth, then add one tablespoon of melted butter and use.


The Verdict:
They were okay. I gave four stars because I probably would eat these by choice, but they're really just average. The cake was very thick and kind of unpleasant to chew through because of it. On its own the cake wasn't very nice. It really needs icing or filling to make it tasty. Maybe I'm just a failure at sponge cake, I don't know. The icing was okay, but not great. If I were to make this again, I would make the cakes half the size of a muffin, so that it's not so hard to eat them. The batter also only made four (!) cakes, so, um, yeah...And on the other end of the scale, even half the frosting was waaaay too much. 

Modernized Recipe:
(Adapted from Mrs. Wilson's Cook Book)

1/2 cup SUGAR
1 EGG, separated
1 tablespoon BUTTER
3 tablespoons WATER
2/3 cup FLOUR
1 teaspoon BAKING POWDER
Pinch of SALT

1. Preheat oven to 325F. If not using muffin papers, grease the pan well.
2. In a medium bowl, beat together the sugar, egg yolk, and butter. Beat the egg white separately until stiff peaks form.
3. To the egg yolk batter, add the water, flour, baking powder, and salt. Mix well and gently fold in the beaten egg white.
4. Divide equally into muffin cups and bake until a toothpick comes out clean, about 20 - 25 minutes for full-size muffins or less for smaller ones. Let cool before icing.
5. To make the icing, follow the original recipe (it's easy!), but seriously reduce the amounts...by like halves or quarters.


*I found this image from Sexy Witch. I wanted to find a 1920s representation of a Jack O' Lantern, to make sure I was decorating my cakes accurately!


Cider Jelly Pie (1920) ★★★★★

Here's a fall recipe using apple cider.
This recipe really intrigued me because it's just so unique! It seems like a pretty cheap way to make dessert - no fruit necessary!
I had bought apple cider a little while ago and I had leftover pie dough from the lemon pudding, so I figured the time was right to make this recipe.


Original Recipe:
CIDER JELLY PIE
Place in a saucepan
Three-quarters cup of brown sugar,
Two cups of cider,
Eight tablespoons of cornstarch.
Dissolve the starch and then bring to a boil. Cook for three minutes and then remove from the fire and add
One-half teaspoon of cinnamon,
One tablespoon of vinegar.
Beat to mix and then cool and bake between two crusts.

The Verdict:
I didn't really expect much of this pie, but it was actually really good! I thought for sure the vinegar would be nasty, but it wasn't! Mr. Man looked like he was about to gag when I showed him the pie (it was really jiggly), but after I forced him to try it he practically inhaled the whole piece and sheepishly claimed it was amazingly delicious. Little Y and I enjoyed it as well. The filling is pretty tasty. It tastes exactly like an apple pie. I think it would be awesome with some actual apple pieces or caramel sauce, but truthfully it doesn't need anything extra. So if you don't feel like peeling 8 apples, this is a great substitute!


Modernized Recipe:
(Adapted from Mrs. Wilson's Cook Book)

3/4 cup BROWN SUGAR
2 cups APPLE CIDER
1/2 cup CORNSTARCH
1/2 teaspoon CINNAMON
1 tablespoon VINEGAR
2 PREPARED PIE CRUSTS

1. Preheat the oven to 325F. If using homemade pie crust, prepare the bottom crust in a pie dish.
2. In a medium saucepan, whisk together the sugar, cider, and cornstarch. Bring to a boil, whisking constantly. Cook for about 3 minutes, or until thickened. Whisk in the cinnamon and vinegar. Let cool.
3. Pour the filling into the prepared pie crust and cover with the other. Make a hole to vent and decorate (or not) as desired. Bake for about 25 - 30 minutes.


Banana Pancakes (1920) ★★★

Banana pancakes! Something about that phrase is just fun to say. Anyway, I had some reeeeally ripe bananas and thought this would be a fun recipe to make. It seemed so easy too, with only 7 ingredients.


Original Recipe:
1 cup of crushed bananas
1 cup of milk
1 1/2 cups of flour
2 tablespoons of syrup
2 tablespoons of shortening
1 egg
2 teaspoons of baking powder

Beat to mix and then bake in the usual manner on a well-greased smoking hot frying pan.


The Verdict:
I got 6 pancakes about the size of my hand with the fingers spread all the way out. I was kind of excited about these, because they smelled really good while I was cooking them. But for some reason they tasted a bit gross. Like something a bit metallic. I'm not sure why - if it was the recipe or my ingredients. I'm not sure what would be wrong with the recipe though. This recipe is very similar to the first recipe that comes up on a Google search for "banana pancakes". This makes me say it's worth a try. Little Y didn't seem to mind anyway, but of course she's not very picky.

Modernized Recipe:
(Adapted from Mrs. Wilson's Cook Book)

The original recipe is easy to follow. About two bananas equals 1 cup of mashed. For "syrup" I used maple syrup, but I would guess honey or agave would work well too. I also substituted butter for shortening. Make sure you add the baking powder right before frying, so that the leavening is still active. 

Cocoa Cookies (1921) ★★★★★

With this quick and simple recipe, you can have warm cookies straight out of the oven in a jiffy.


Original Recipe:
4 tablespoons shortening
1 cup sugar
1/4 cup milk
1 egg
2 cups flour
3 teaspoons baking powder
1/4 teaspoon salt
1/2 cup cocoa

Cream shortening and sugar together.
Add milk and beaten egg; mix well.
Sift flour, baking powder, cocoa and salt together and add.
Roll out 1/4-inch thick on floured board; cut with cookie cutter.
Bake in hot oven about 12 minutes.


The Verdict:
These cookies were soooo good! They were perfectly cooked, soft, fluffy, and delicious (even after they cooled). The chocolate flavour is mild, but still tasty. They're also fairly cheap, considering the recipe uses cocoa powder instead of chocolate, 1 egg, and only 1/4 cup of fat. And by the way, I used butter instead of shortening and they turned out fine. Rather than using cookie cutters, I rolled the dough into balls in my hands. The dough was too soft to roll, but I think a short time in the fridge would probably fix that. Anyway, it's just easier and cleaner to use my hands. I think the yield was something like 18 cookies, but I can't be sure because a bunch were gobbled up by Mr. Man while I was out of the kitchen. Little Y enjoyed hers too.

Modernized Recipe:
(Adapted from The New Dr. Price Cookbook)

The original recipe is easy to follow. Bake at 400F for about 10 minutes.


Banana Muffins (1920) ★★★★

These banana muffins can easily be vegan if shortening and vegan milk are used.


Original Recipe:
bananas
1 cup of brown sugar
4 tablespoons of shortening
2 cups of flour
5 teaspoons of baking powder
1 cup of milk
1/2 teaspoon of nutmeg

Rub a sufficient number of bananas through a sieve to measure one cup. Place in a mixing bowl and add rest of ingredients.

Beat to mix and then bake in well-greased and floured muffin pans in a moderate oven for twenty-five minutes. Ice the tops with water-icing.

Plain Water Icing
1 pound XXXX sugar
2 tablespoonfuls cornstarch
1 teaspoonful lemon juice
sufficient hot water to spread

Beat to mix, then use.


The Verdict:
I was a little sad about these muffins. There was only a very faint banana taste and the nutmeg was really overwhemling. Also, my family traditionally eats nutmeg on green beans, so it kind of weirded me out to have it that strong with bananas. Replace the nutmeg with cinnamon and these would be way tastier. The icing did improve the muffins as well. Mr. Man felt the same way, and Little Y gobbled hers up.
I do like that these don't have any eggs, though! I decided on four stars, because I probably would make these again, except using cinnamon.
Edit: These muffins improved heaps the next day! The flavours mellowed a bit and they were super tasty, especially with the frosting. I also tried adding some lemon extract to some of the frosting and that was really delicious too. I would make these again, but I would consider adding some more banana flavour somehow.

Modernized Recipe:
(Adapted from Mrs. Wilson's Cook Book)

1 cup PUREED BANANAS (about two)
1 cup BROWN SUGAR
4 tablespoons SHORTENING or UNSALTED BUTTER
2 cups FLOUR
5 teaspoons BAKING POWDER
1 cup MILK
1/2 teaspoon NUTMEG

1 pound POWDERED SUGAR
2 tablespoons CORNSTARCH
1 teaspoon LEMON JUICE
HOT WATER

1. Preheat oven to 350F and grease and flour a 12-cup muffin pan.
2. In a large bowl, beat together the pureed bananas, brown sugar, and shortening.
3. In a separate bowl, sift together the flour, baking powder, and nutmeg. Add the dry ingredients to the bananas alternately with the milk. Stir until well-mixed.
4. Divide the batter into the muffin pan, filling the cups to the top. I used about 2 heaping tablespoons per cup. They won't rise very much. Bake for 20 - 25 minutes, or until a toothpick comes out clean.
5. To make the icing, mix together the powdered sugar, cornstarch, and lemon juice. Add just enough hot water to make it spreadable and ice the tops of the muffins.


Baked Rice with Cheese (1923) ★★★★★

Here's a tasty side dish that dresses up plain old rice a little bit. I chose to add the tomato for some freshness.


Original Recipe:
2 c. boiled rice
1/2 c. cut cheese
1 large tomato, sliced, optional
milk to moisten, about 1/2 cup
buttered breadcrumbs to cover*
sprinkle of paprika

Arrange rice and cheese in alternate layers in buttered baking dish. A layer of tomatoes may be added if desired. Pour milk over. Cover with buttered crumbs and paprika. Bake at 450F until crumbs are brown, 10 - 15 minutes. 

Buttered Breadcrumbs (1932)
*Allow 1/8 as much butter as crumbs. To prepare crumbs, use 1 c. dry bread. Dry thoroughly in oven, then roll to crush. Melt butter, add crumbs, and stir until every crumb is coated.

The Verdict:
So good! Seriously, we had to restrain ourselves from eating the whole dish. This makes enough for about 4 servings, but I recommend you double the recipe because I wish I had more to eat! Mr. Man wanted salt on his, but he likes things really salty. I thought it was perfect just the way it was. I'll definitely make this again, even though it was slightly time consuming to make the breadcrumbs.

Modernized Recipe:
(Adapted from The Farmer's Wife)

The original recipe is easy to follow. If you like the crunchy topping, I would suggest doubling the amount of breadcrumbs to 2 cups, because 1 cup juuuuust barely covered everything.


Plain Blanc Mange (c.1928) ★★★★

Apparently today is Vanilla Custard Day. I don't know who decides these things, but there you go. I figure it might be fun to do some themed posts, so today I have a historical variation on vanilla custard. Custard typically uses eggs to thicken it. Blancmange is a custard, except instead of eggs it uses starch. It is a recipe which appears often in historical cookbooks, and it has been around in some form or another since the Middle Ages. In fact, the precursor to modern blancmange included chicken and rice!
Blancmage was often flavoured with almond (or even almond milk), but this is the plainest of the plain recipes. I think the point here is that it is a basic recipe which can be easily adapted.

Original Recipe:
A blanc mange is usually a mixture thickened to such an extent with starchy material that it may be turned out of a mold or cut into cubes. The plain blanc mange given here requires a well-flavored sauce to relieve its bland taste.

Sufficient to serve four.

2 cups milk
1/4 cup corn starch
1/4 cup sugar
1/4 teaspoon salt
1/2 teaspoon vanilla

Heat the milk in a double boiler, reserving enough to moisten the corn starch. Mix the corn starch, sugar, and salt and moisten with the cold milk. Pour into the hot milk and stir until the corn starch has thickened. Allow this to cook for 30 to 35 minutes, beat to keep smooth, and then remove from the fire and add the vanilla. Moisten cups or molds with cold water and fill with the blanc mange. Cool, turn out of the molds, and serve with any desired sauce.


The Verdict:
Not bad! The blancmange itself was quite plain. There was a hint of sweetness, but otherwise it was practically tasteless. I made a simple caramel sauce to go with this (just microwaved a little milk, brown sugar, vanilla, and butter for 2 minutes) and it improved it a lot. However...I can not handle this texture! I would eat it if it was served to me because the taste really isn't bad, but I just don't like the texture (I'm like this with a lot of foods). I also never ate any custard-type desserts growing up, so it's not something I am used to. Anyway, for those who don't mind that texture, this would be nice! I like that it's plain so that you can put practically anything on it...or even in it!
Also, it definitely didn't take me 30 minutes to make this. I could see it taking that long if you were cooking over a light bulb maybe....It took about 2 minutes once I added the cornstarch.
Oh, and I halved the recipe because I thought it would make too much for just me...which it was, because my sauce was very rich. However, it didn't make enough to even fill my mini bundt mold.


Modernized Recipe:
(Adapted from Woman's Institute Library of Cookery, Volume 4)

The original recipe is easy enough to follow.


Tutti Frutti Ice (1920) ★★★

I love that this recipe is "naturally" gluten-free and vegan. It's also really simple to make! If you don't want to bother with making your own almond milk, you can just use plain store bought...I did ;)

Original Recipe:

Tutti Frutti Ice
3/4 pound blanched sweet almonds 
12 bitter almonds 
2 pints sugar syrup
1 teaspoonful vanilla
fruit, either fresh or preserved peaches, pineapples, plums, cherries or apricots

Pound the almonds with a little cold water very fine; pour over 1 pint water and let them stand for 1/2 hour; then press them through a hair sieve; mix this almond milk with the sugar syrup and vanilla; put this into a freezer and freeze; when frozen take the paddle of the freezer out and put in different kinds of fruit cut into small dice, either fresh or preserved peaches, pineapples, plums, cherries or apricots.

Cold Sugar Syrup for Fruit Ice
Dissolve 1 pound sugar in 1 pint cold water and use as directed. This is the ordinary syrup of 32 degrees used for fruit ice. If a thicker syrup is wanted dissolve 1 pound sugar in 1/2 pint water.


The Verdict:
This got nice and creamy in my ice cream maker, and then instantly melted into a syrupy mess when I added the warm fruit. Oops. Anyway, almond isn't my favourite flavor, but this isn't bad. Little Y liked it quite a bit. I wish I had chopped the fruit all the same size and smaller though, I think that would've been nicer and easier to eat. It was also reaaaaally sweet and sugary to the point where it was too much, so although the sugar syrup makes enough for half a batch, it's probably a better amount for a full batch. Overall, it was okay, but I won't make it again because we're not really almond lovers.

Modernized Recipe:
(Adapted from Desserts and Salads)

Ice Cream
3/4 pound SWEET ALMONDS, blanched
12 BITTER ALMONDS
or
2 cups ALMOND MILK, unsweetened
4 cups SUGAR SYRUP
1 teaspoon VANILLA EXTRACT
~1 1/2 cups PEACHES, PINEAPPLES, PLUMS, CHERRIES, and APRICOTS, chopped

Cold Sugar Syrup
1 pound SUGAR
1 cup COLD WATER

1. First, make the sugar syrup by mixing together the sugar and cold water. The sugar will probably settle to the bottom, but that's okay. Stir in the almond milk and vanilla.
2. Pour the almond milk mixture into your ice cream maker and freeze according to manufacturer's directions, or freeze it in a pan, stirring every 30 minutes. Once frozen, but not hard, fold in the chopped fruit. Set in the freezer to harden before serving.


Frozen Spiced Punch (c. 1923) ★★★★

I've had my ice cream maker (thanks to Mr. Man for that birthday gift!) sitting in the freezer for months now, and I keep forgetting to use it! So when I came across this unique frozen dessert, I knew it was time to finally pull it out and make something. I ended up messing it up a bit, so I poured the half-frozen punch into a 9x9 pan and froze it overnight. Dessert for breakfast anyone? It's got fruit, so it's healthy, right?!

Original Recipe:
Something entirely different in the way of a frozen dessert can be made by making frozen spiced punch according to the accompanying directions. A dessert of this kind is a fitting conclusion to a meal that is somewhat hearty and varied in its nature.

Sufficient to serve six.

6 cloves
2-inch stick cinnamon
1 quart water
2 cups sugar
1/2 cup pineapple juice
1/2 cup orange juice
1/2 cup lemon juice
4 drops wintergreen oil

Put the cloves and cinnamon into the water, place over the fire, bring to the boiling point, and then add the sugar. Cook together for a few minutes, remove from the fire, and cool. Add the pineapple, orange, and lemon juice, strain, add the wintergreen oil, and freeze.

The Verdict:
Oddly...this tasted like rootbeer? Like a really fresh, fruity root beer. Totally was NOT expecting that!
(Okay, I looked up root beer and apparently some common flavours include clove, cinnamon, and wintergreen, so there you go)
I think I overdid the wintergreen juuuust a tad, though. I always second guess myself and end up adding too much of something or cooking something just a bit extra...*sigh*. It got really strong after freezing too, so don't be afraid to be a bit stingy with ingredients. But this is good! It's like a fruity, root beer-y, christmas-y granita. Yum!

Modernized Recipe:
(Adapted from Woman's Institute Library of Cookery, Volume 4)

6 CLOVES (was strong, try with 3-4?)
1 2-inch CINNAMON STICK
4 cups WATER
2 cups SUGAR
1/2 cup PINEAPPLE JUICE
1/2 cup ORANGE JUICE (~ 1/2 a large orange)
1/2 cup LEMON JUICE (~ 1 medium lemon)
4 drops WINTERGREEN OIL (~ 1/8 teaspoon or less)

1. In a medium saucepan, heat the water, cloves, and cinnamon stick until boiling. Add the sugar and cook until dissolved.
2. Remove the water from the heat and let cool. Stir in the remaining ingredients.
3. Freeze in an ice cream maker according to manufacturer's directions or in a large pan in the freezer, scraping every 30 minutes until no liquid remains.


Macaroni Italian Style (c. 1923) ★★★★★


This recipe calls for macaroni, but the term actually refers to the ingredients in the dough rather than the shape itself. So any kind of pasta made with durum wheat works fine here, regardless of shape. The fact that the recipe calls for breaking the pasta into pieces makes me think perhaps the pasta used was something like Bucatini.
(The painting to the left is Boy with Spaghetti by Julius Moser, c. 1808. It depicts the original way of eating pasta - plain and by hand.)

Original Recipe:
If small quantities of fried or boiled ham remain after a meal, they can be used with macaroni to make a very tasty dish known as macaroni Italian style. As ham is a highly seasoned meat, it improves the flavor of the macaroni and at the same time adds nutrition to the dish.


Sufficient to serve six.


1 cupful macaroni
2 quarts boiling water
2 teaspoonfuls salt
2 tablespoonfuls butter
2 tablespoonfuls flour
1 1/2 cupfuls scalded milk
2/3 cupful grated cheese
1 teaspoonful salt
1/2 teaspoonful paprika
1/2 cupful finely chopped, cold boiled ham
1/4 cupful crumbs


Break the macaroni into inch lengths and cook it in the boiling water to which has been added 2 teaspoonfuls of salt. Drain, and then reheat it in a white sauce made of the butter, flour, and milk. Add the cheese and season with salt and paprika.


Arrange in layers in a baking dish, placing the cold ham between each two layers of macaroni and having the top layer of macaroni, sprinkle the crumbs on top of the upper layer, and bake the food until the crumbs are brown. Garnish with parsley and serve.


The Verdict:
I think I like this better than the other macaroni and cheese on this blog! It was sooo good and had the perfect amount of creamy sauce. There aren't a lot of herbs or spices, but it doesn't taste plain at all. It was rich and tasty, but not so much that I didn't take another scoop ;)
The ham was a nice touch too, and I'm not going to complain about bumping up the protein. The only thing I'm going to mention is that the bread crumbs were not really crusty, so if you like a baked macaroni and cheese with that thick, crispy crust on top, this is not the one. Also, it doesn't make very much. Definitely a side dish. Nevertheless, an amazing recipe! Definitely remembering this one. It didn't take very long to make either!

Modernized Recipe:
(Adapted from Woman's Institute Library of Cookery, Volume 1)

The original recipe is easy to follow. When making the white sauce, just set the cooked pasta aside and use the same pot. Melt the butter and whisk in the flour. Whisk in the milk and cheese. Cook until thickened, whisking constantly. When the sauce is thickened and thoroughly mixed, add the pasta back in to coat.


Cherry Fritters (c. 1923) ★★★★★

As a Canadian, I love donuts, especially those from Tim Hortons (what can I say? I'm a traditionalist). Fritters are one of my favorites (although I prefer the crusty glaze to powdered sugar), but I've never had a cherry fritter before!
Also, for some reason this cookbook wasn't dated. I did a brief Google search and found it listed with both 1923 and 1928 as a date, so I just went with the earlier.

Original Recipe:
Something different in the way of dessert can be had by making cherry fritters according to the accompanying recipe.

Sufficient to serve six.
1 cup flour
2 teaspoons baking powder
1/4 teaspoon salt
2 tablespoons sugar
1/2 cup milk
1 egg
2 tablespoons butter
1/2 cup cherries cut into halves

Mix and sift the dry ingredients, add the milk and egg, and beat all together well. Add the melted butter and fold in the cherries. Drop by spoonfuls into hot fat and fry until brown. Remove from the fat, sprinkle with powdered sugar, and serve.


The Verdict:
Forget six, this recipe fed two! Mr. Man and I just inhaled these. But I got 12 golf-ball sized fritters, so if you're portioning out two per person, I suppose the recipe would feed six. They were really tasty. I was hoping for a fluffier inside though, so perhaps I should have whipped some more air into the batter. I also used closer to 3/4 cup of cherries, and even that was a tiny bit less than I would have liked. But overall, a winner!

Modernized Recipe:
(Adapted from Woman's Institute Library of Cookery, Volume 5)

1 cup FLOUR
2 tablespoons SUGAR
2 teaspoons BAKING POWDER
1/4 teaspoon SALT
1/2 cup MILK
1 EGG
2 tablespoons UNSALTED BUTTER, melted
1/2 to 3/4 cup CHERRIES, pitted and chopped in half
OIL, for frying
POWDERED SUGAR, for dusting

1. In a medium bowl, whisk together the flour, baking powder, sugar, and salt. Meanwhile heat about an inch or two of oil in a fry pan (I originally started with just a bit of oil, which resulted in a pancake-like shape. More oil will allow for a rounder fritter).
2. Add the milk and egg and whisk until well combined.
3. Whisk in the melted butter and fold in the cherries.
4. When the oil is hot, drop in about one tablespoon of batter for each fritter (don't overcrowd the pan), using an ice cream scoop or a spoon.
5. Let the fritters cool and sift or sprinkle powdered sugar over the top.


Rhubarb Shortcake (1920) ★★★★★

Here's another rhubarb recipe, this time a take on the classic strawberry shortcake!

Original Recipe:
Ingredients
2 cups of flour
1 teaspoon of salt
4 teaspoons of baking powder
1/2 cup of sugar
6 tablespoons of shortening
2/3 cup of milk
Instructions
Place flour in a bowl and add salt, baking powder, and sugar. Sift to mix and then rub in shortening. Mix to a dough with milk. Cut with a large cookie cutter and then bake in a hot oven for fifteen minutes. Split and butter, and then fill with the cooked rhubarb and serve with either plain or whipped cream or custard sauce.


The Verdict:
Mr. Man REALLY loved the cakes - even by themselves. I think he ate like five of them while I was busy taking photos. With the rhubarb is really nice, but overdoing the whipped cream could easily make it too rich. Also, my cakes were not tall or fluffy enough. I think it might be because I substituted butter for shortening? This was my first time making shortcakes actually, so I was just pleased that they were edible. Regardless of presentation, these were yummy and I would definitely make and eat them again!

Modernized Recipe:
(Adapted from Mrs. Wilson's Cook Book)

The original recipe is easy enough to follow. To make the cooked rhubarb, just simmer some chopped rhubarb with a small amount of water and sugar to taste.