Showing posts with label interwar. Show all posts

A Supper Drink (c.1936) ★★★


Peppermints are not really a big thing here in Japan. Sure, you can buy little breath mints, but you can't get real peppermints here - or at least not in my rural area. Luckily I thought to bring some along from Canada, so I broke out my one and only package of Wilhelmina Pepermunts.

I am half Dutch, so peppermints are kind of special to me. My grandfather always kept peppermints near at hand - in his pocket, in the car, and in his greenhouse. I remember one time when I sneaked into the greenhouse just to raid the peppermint stash. His peppermints were usually the cheap bulk barn kind. On the other hand, Wilhelmina is a pretty famous brand, with over 120 years of history, so I figured they were an appropriate choice for this recipe.

Original Recipe:


The Verdict:

You know, I'm not actually a big fan of milk. I get a milk box every day with my school lunch, but I never drink it. However, I didn't mind this drink! I wouldn't pick it over, say, hot chocolate or apple cider, but I could definitely finish a cup of this. I did find that two peppermints didn't really affect the taste much, so this is definitely a recipe where you can adjust to suit your tastes. I gave the rest to Little Y and she enjoyed it a lot, too.


Modernized Recipe:

(Adapted from Delicious milk dishes and drinks)

1 cup milk, boiling
strong peppermints, to taste

1. Place the peppermints into the boiling milk and stir until dissolved.
2. Drink while hot.


St. Patrick's Day Party (c. 1931)

I love that The Settlement Cook Book includes holiday menus like this one for a Saint Patrick's Day party. Its rather rare to find menus like this in early cookbooks, especially for something other than Christmas. The theme here seems to be green + mint - not so different from a menu we might see today! There is also an emphasis on potatoes and shamrocks, two items which have continued to symbolize Irish heritage even today.


Washington's Birthday Luncheon (c.1931)

Unless you're a new reader, you might already know that I'm Canadian. But I get a kick out of American holidays too! That's probably because I've spent a few years living there - in California for a year and later in Ohio for 4 years. So yes, Presidents' Day is today! Also called Washington's Birthday. If you want to get all festive and historical, try out this 1930s menu for a luncheon from The Settlement Cook Book! I've also done the work of finding the referenced recipes, so they're also included below the menu itself.

Original Recipe:


 So let's break down this menu.

Orange halves with maraschino cherries: Washington is often associated with cherries, and while some "cherry tree chopping" story has been debunked as myth, he did apparently like to eat the fruit.

Chicken a la Maryland: I'm not really sure where they're going with this one, as Washington is well-known to have been very fond of fish, not chicken.

Southern Sweet Potatoes: I'd guess this is a nod to Washington's southern heritage.

Virginia Corn Bread: There was no such recipe, but there were recipes for plain old "Cornbread." Since Washington was born in Virginia and lived there at Mt. Vernon, I assume this is a convenient re-naming.

Cherry Salad: Again, the association of Washington with cherries. I found it interesting that this recipe actually specifies in the instructions that it is good for celebrating his birthday.

Boston Brown Bread: Boston is a place that is really steeped in American heritage. During the American Revolution, Washington forced the British out of Boston, which saved the city from an ongoing siege.

Chocolate Roll: Again, this seems like an odd choice. Why not Washington Cake?!?! I mean, really...It's an obvious choice...

Nuts, Raisins, Coffee: GW apparently loved nuts, especially hazelnuts and shellbacks (similar to pecans).

If you're extra curious, there's lots more information on what Washington and other Presidents liked to eat here!

Macaroni with Tomatoes (1919) ★★★★★

I think the last recipe I made from Vaughan's Vegetable Cook Book was Cooked Muskmelon, which...didn't exactly turn out as I had hoped. But this was a recipe I was keen to try!


Original Recipe:

MACARONI WITH TOMATOES.
Remove from each tomato the pips and watery substance it contains; put the tomatoes in a saucepan with a small piece of butter, pepper, salt, thyme and a bay leaf, and a few tablespoonfuls of gravy or stock, keep stirring until they are reduced to a pulp, then strain through a sieve, and pour over macaroni already boiled soft and cover with grated cheese; bake until a light brown.


The Verdict:

Gotta love vague recipes. I decided on using 5 roma tomatoes with about a tablespoon or two of butter. I chose roma tomatoes because they have less seeds and wateryness than other varieties. However, note that this did not make enough sauce to cover an 8x8 dish of pasta, since the tomatoes cook down quite a bit.
So this was tasty! Which I wasn't surprised about, because tomatoes + pasta + cheese is a classic combination. It did take a while for the tomatoes to simmer down, but overall this recipe is easy to make - its just a bit time consuming.
Also, this recipe calls for pushing the cooked tomatoes through a sieve. Honestly, I would rather have the chunks of tomato in my pasta, so if I ever made this again, I would dice the tomatoes and cook until soft and then just toss with the pasta.
Overall, though, very yummy! Five stars for this recipe.


Modernized Recipe:

(Adapted from Vaughan's Vegetable Cook Book)

TOMATOES, seeds and pulp removed and diced
BUTTER
PEPPER
SALT
THYME
1 BAY LEAF
Few tablespoons GRAVY or STOCK
MACARONI, cooked
CHEESE, grated

1. In a saucepan, add all ingredients except macaroni and cheese. Cook until the tomatoes are reduced to a pulp. Rub the tomatoes through a sieve, if desired.
2. Heat the oven to 350F and lightly grease a pan. Add the cooked macaroni to the pan. Pour the strained sauce over the macaroni and toss to coat. Cover with grated cheese. Bake until the cheese has melted.


Portsmouth Orange Cake (1932) ★★★★


The cake I want to share with you today has a bit of an interesting history, much of which is strongly tied to New Hampshire. Portsmouth Orange Cake is included in a list of suggested foods to eat while in New Hampshire:

"Spongy and sweet in all the right places, Portsmouth orange cake is a favorite of many New Hampshire natives, who feasted on the dessert as children and who now consider the soft cake a summertime staple. It is usually made with orange zest or rinds and often with orange-flavored cream-cheese frosting. But some Portsmouth area restaurants and home bakers also add fresh-picked cranberries from New Hampshire bogs to sweeten the already wonderful after-dinner delight."

The earliest mention I found was in Green's Receipt Book (1894). This book, amazingly, seemed to have been very devoted to this particular cake recipe, as the title page actually advertises in very large print that it includes "the original receipts for Famous Portsmouth Orange Cake..." The first section of recipes is for cakes, and is preceded with a note stating, "First, I will give the receipts collected in Portsmouth, including Famous Portsmouth Orange cake, Black cake, and Walnut cake." Below is the supposed authentic recipe in its entirety:

It seems like the recipe was consistently popular, as forty years later it was still being printed in cookbooks. I've found several mentions of the cake from the 1930s, not including the version featured here, which is from 1932. It was also included as a suggestion for a worker's lunch in Ida Bailey Allen's Cooking, Menus, Service (1935) and a 1935 advertisement in the Portsmouth Times refers to a "Mello Gold Orange Cake" as "an ideal hot weather treat," which may or may not be the cake we're discussing here. I found newspaper references to Portsmouth Orange Cake throughout the 1970s and 80s as well. One of these mentioned the cake as part of a Christmastime feast. A recipe for the cake was also included in the 1975 The Thirteen Colonies Cookbook, a book highlighting foods from each of the original 13 colonies of the United States. This recipe is very basic and different from older recipes. If Portsmouth Orange Cake was a recipe brought over by settlers from the Old World, then this may be an early version of the recipe. Oranges had been introduced throughout Europe by the mid 1600s. It is interesting to note that the Thirteen Colonies version is most similar to the 1894 version from Green's (compare the methods of handling the eggs). This recipe is a good example of how methods and ingredients can change over time.

Original Recipe:


The Verdict:

Overall, not bad. But not amazing either. The cake itself was really dense and a bit bland. It also stuck to the pan a lot, but luckily because it was so dense I pried it out without any breakage. The icing was okay, but tasted way too strongly of orange zest. It overpowered every other part of the cake. As a whole, it was a nice concept - the fresh sections of orange in the middle were really nice and refreshing too. I would definitely eat this voluntarily, but I wasn't impressed enough with the cake to want to make this again myself. I'm going to give this 4 stars, but its probably closer to 3.5 stars.


Modernized Recipe:

(Adapted from The Sunny South and Golden West Cook Book)

3 EGGS
1 cup SUGAR
3 tablespoons ORANGE JUICE
1 cup FLOUR
1 teaspoon BAKING POWDER

1 ORANGE
2 cups ICING SUGAR
2 tablespoons LEMON JUICE
2 tablespoons WATER

1. Preheat the oven to 350F and liberally grease two 9 inch round cake pans.
2. In a mixing bowl, beat the eggs and sugar together until thick. Stir in the orange juice. Add the flour and baking powder and fold together.
3. Divide the batter between the two pans and bake for 10 - 15 minutes.
4. While the cakes are cooling, make the frosting. Mix the zest of half an orange with the icing sugar. Add the lemon juice and depending on the consistency, add water to make a thick but spreadable icing.
5. Spread the icing on the top of the first layer, and fill with thin sections of orange (thinly slice an orange, cut each slice in half, and cut off the peel). Place the second layer of cake on top and spread the rest of the icing on the top of the  cake layer.

Sources:

"Food Not To Miss In New Hampshire." KC Community News. N.p., n.d. Web. 02 Nov. 2013. <http://prewww.kccommunitynews.com/travelgetaways/18691300/detail.html>.

Green, Ralph. Green's Receipt Book. Concord, N.H.: Republican Associated, 1894. International Correspondence School & American School of Correspondence Directories Archive. Web. 2 Nov. 2013. <http://www.icsarchive.org/icsarchive-org/paperback/cookbooks/greens_receipt_book_1894.pdf>.

Mello Gold Orange Cake. Advertisement. Google News. N.p., n.d. Web. 2 Nov. 2013. <http://news.google.com/newspapers?id=vZFeAAAAIBAJ&sjid=t0sNAAAAIBAJ&dq=portsmouth%20orange%20cake&pg=2584%2C3133062>.

Olver, Lynne. "New Deal Food Programs." The Food Timeline. N.p., n.d. Web. 02 Nov. 2013. <http://www.foodtimeline.org/fooddecades.html>.

Under-the-Sea Salad (1931) ★★★


I won't bother giving a history lesson on this recipe, as Yesterdish already has done a stellar job on that front. I'll just summarize by saying the name for this Jell-O salad appeared as early as 1931, but the ingredients are very changeable (see alternative versions here, and here). The recipe does, however, always include lime gelatin. According to Yesterdish, it is possible that this recipe originated from General Foods itself, as it was being advertised by a General Foods employee. The recipe for Under the Sea Salad appearing in a 1931 General Foods Jell-O cookbook is very similar to the version most widely known today - a cream cheese and pear base with a clear lime top. This was reassuring to me, as I really wasn't keen on trying the cabbage or olive versions.


Original Recipe:


The Verdict:

It was okay. I wasn't really impressed with the results, and that's not just because I am fail at unmolding Jell-O. I'm not sure I'll finish eating this, and I wouldn't make it again. It didn't really taste bad, but it didn't taste good to me either. My favourite part was the pear chunks in the bottom, because they were fresh and sweet. The rest of it tasted a bit odd, maybe because of the pear juice, salt, and vinegar added to the lime Jell-O. I also discovered that I'm not really a fan of cream cheese unless its sweetened, and although this had Jell-O mixed in, it wasn't very sweet at all. Overall, just kind of "meh", but I gave it 3 stars because it is edible and it more or less turned out as advertised.


Modernized Recipe:

(Adapted from The Greater Jell-O Recipe Book)

1 package LIME JELL-O
1 1/2 cups BOILING WATER
1/2 cup PEAR JUICE (reserved from canned pears)
1 teaspoon VINEGAR (or sub. lemon juice)
6 ounces CREAM CHEESE, at room temperature
1/8 teaspoon GINGER
2 cups CANNED PEARS, diced

1. Dissolve the Jell-O in the boiling water. When it has dissolved, add the pear juice and vinegar. Pour a 1/2 inch layer in a loaf pan and leave the remainder to mix with the cream cheese later. Put both in the fridge to chill.
2. Once the remaining larger portion of Jell-O is cold and syrupy, place it in a bowl of ice and beat it until it is fluffy and thick like whipped cream. In a separate bowl, beat the cream cheese and ginger.
3. Gently fold the whipped Jell-O into the cream cheese, little by little. Fold in the pears. Pour over the first layer of Jell-O, which should be firm. Let all chill until firm before unmolding.


Maple Velvet (c. 1930) ★★★★★


Just a quick and simple recipe today! I couldn't find much history on it, except for two mentions of the recipe in newspapers. The first was in the Bolivar Breeze, October 9, 1947 (New York) and the second was printed in the Freeport Journal-Standard on November 13, 1947 (Illinois). The first suggests the recipe as a party drink for Halloween. In that case, it seems I'm three days too late, whoops!
Its possible this recipe may have been making the newspaper rounds in the mid 1940s. I'm not sure when this Canada Dry pamphlet I found the recipe in was printed, but we can definitively conclude that it wasn't any later than 1947!

Original Recipe:


Maple Velvet
Service for 1
In a tall glass place two tablespoons of pure maple syrup. Add a generous helping of vanilla ice cream. Fill the glass with ice cold Canada Dry and stir until well mixed.


The Verdict:

I don't really know what else to say except that this was freaking amazingly delicious! I've always been so-so about ice cream floats, but I'm in love with this. I felt like none of the flavours were overpowering and instead they all worked together really well. The addition of maple syrup was genius, and I think this wouldn't be as good if it was just ginger ale and ice cream. I hadn't ever heard of this recipe before, but I wish I had. I think this really could have been a great candidate for a Canadian classic, given the use of maple syrup and Canada Dry. 

Modernized Recipe:


2 tablespoons PURE MAPLE SYRUP
1 large scoop VANILLA ICE CREAM
GINGER ALE to fill the glass

1. Pour the maple syrup into a tall glass. Add the ice cream and fill with ginger ale. Stir to mix well. Drink and enjoy!

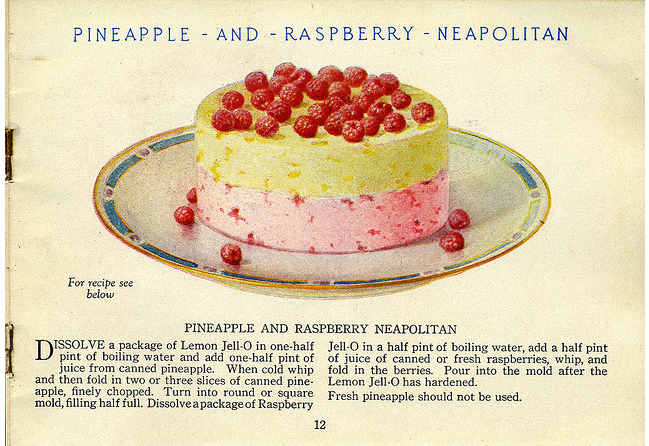
Pineapple and Raspberry Neapolitan (1926) ★★★★


Original Recipe:


Dissolve a package of Lemon Jell-O in one-half pint of boiling water and add one-half pint of juice from canned pineapple. When cold whip and then fold in two or three slices of canned pineapple, finely chopped. Turn into round or square mold, filling half full. Dissolve a package of Raspberry Jell-O in a half pint of boiling water, add half a pint of of juice of canned or fresh raspberries, whip, and fold in the berries. Pour into the mold after the Lemon Jell-O has hardened. 
Fresh pineapple should not be used.


The Verdict:

Well, visually, this was a huge disappointment. Which I should have anticipated, because honestly, how could Jell-O get that white and fluffy looking without adding any dairy? However, the "whipping" did make some beautiful bubbles in the Jell-O. I also had a problem with my layers not sticking together, which was interesting. When I tried to unmold my gelatin, the layers separated and the pineapple one even broke a little. Sad times. 
However, taste-wise, this was pretty good! I'm going to give this 4 stars because it was slightly above average. However, I wouldn't make this very often, because it does take a bit of work. The amount of real fruit/fruit juice really masked the fake Jell-O flavouring, which could be a good thing or a bad thing, depending on your preferences, I guess. I really enjoyed the taste. Also, the pineapple added a nice crunch, but the berries did get a bit mushy, which was a tad gross. 

Modernized Recipe:

(Adapted from Jell-O recipe booklet, found at Hey, My Mom Used to Make That!)

1 package LEMON JELL-O
1 cup PINEAPPLE JUICE (drained from the canned pineapple, add a little water if needed to reach 1 cup)
3 slices CANNED PINEAPPLE, finely chopped
1 package RASPBERRY JELL-O
1 cup RASPBERRY JUICE
A handful of RASPBERRIES
2 cups BOILING WATER, divided

1. In a mixing bowl (or directly in your mold, if you're lazy like me), dissolve the lemon Jell-O in 1 cup of boiling water. When the Jell-O has dissolved, mix in the pineapple juice. When the Jell-O is cooled, beat it with a hand mixer until very frothy. Gently fold in the fruit and let it set completely.
2. Do the same with the raspberry Jell-O, juice, and berries, making sure the pineapple layer is firm before pouring on the raspberry layer.
3. Let the mold set until firm. To unmold it, briefly soak the mold in warm water and invert onto a plate. Garnish with raspberries.


Honey and Raspberry Ade (1920) ★★★★★


I found this recipe while browsing and I thought the combination of honey and raspberry sounded delicious! It's especially fitting for summertime, when berries are bountiful. I imagine if one had access to berry bushes, this would be a great way to use up any extra berries, especially the squished or extra ripe ones.

Original Recipe:
HONEY AND RASPBERRY ADE
Place three baskets of well-washed raspberries in a saucepan and add
          One quart of water,
          One and one-half cups of honey,
          One-quarter teaspoon of nutmeg.
Bring to a boil and cook slowly until the fruit is soft, mashing frequently with the potato masher. Cool and strain into punch bowl. Add a piece of ice and the juice of one orange or one lemon.

The Verdict:
Yummy! I just used a whole bag of frozen raspberries (cheaper and already washed!), which ended up being 600g. I'm not sure if that's equal to "three baskets", but the flavour was good. With the juices from the berries and the orange, this didn't really cook down that much, so it probably makes about 4 cups (4 servings). Its a nice drink, although a little sweet, so the ice cubes are nice to water it down a bit. I actually tried some warm though, and it was really good, almost like a nice cider, but with raspberries. I think this recipe served warm would be an excellent cold weather drink. Overall, 5 stars. Simple and delicious is a win to me!

Modernized Recipe:
(Adapted from Mrs. Wilson's Cook Book)

4 cups WATER
600g RASPBERRIES
1 1/2 cups HONEY
1/4 teaspoon NUTMEG
1 ORANGE or LEMON

1. In a large pot, add all ingredients and bring to a boil. Let simmer for a few minutes, until the fruit has dissolved. Meanwhile, juice an orange or lemon.
2. Pour the orange or lemon juice into a large pitcher and strain in the raspberry ade. Let cool and serve with ice cubes (or serve hot!).


Peach Cup (1920) ★★★★

This recipe represents a very deep-rooted tradition of making fruit syrups for refreshing summer beverages.


Original Recipe:

PEACH CUP 
Place one quart of peeled and sliced peaches in a saucepan and add 
One pound of sugar,  
One cup of water. 
Cook until the fruit is soft and then rub through a fine sieve and add juice of one lemon. 
To use: Place one-half cup of the peach mixture in a glass and add 
Two tablespoons of cream, 
One-half cup of crushed ice, 
and fill with carbonated water. 
A box of straws to use in serving these iced drinks makes them doubly attractive.


The Verdict:
Well firstly, I was surprised at how much peach flavour the syrup actually had, because I used frozen peaches. That said, while I did taste the peach, it could have been even stronger, so I would suggest at least using some fresh peaches if you make this.
The cream was a little bit of a strange addition for my modern tastes. The flavour did grow on me, but it seemed like 2 tablespoons was a bit too much. Also, the syrup was very sweet, so maybe a little under 1/2 cup would be a better amount, but of course it all depends on how much carbonated water is added. I think even just using the peach syrup with carbonated water would be a yummy drink all on its own. Overall, this recipe is really nice and is definitely worth 4 stars!


Modernized Recipe:
(Adapted from Mrs. Wilson's Cook Book)

1 quart (4 cups) PEACHES, peeled and sliced
1 pound SUGAR
1 cup WATER
Juice of 1 LEMON
1-2 tablespoons CREAM
1/2 cup CRUSHED ICE
SODA WATER

1. In a medium saucepan, combine the peaches, sugar, and water. Bring to a boil and let it simmer until the peaches are very soft.
2. Strain the liquid through a sieve and gently push on the cooked peaches to ensure you get as much syrup as you can. Add the lemon juice to the syrup and stir well. (Tip: I saved the cooked peaches and blended them up in a smoothie! No need to waste!)
3. To make a "Peach Cup" put 1/2 cup of the peach syrup (cooled) in a large glass. Add 1-2 tablespoons of cream, as desired. Add 1/2 cup crushed ice and top the glass up with carbonated water, to taste. Stir well to combine and enjoy!


Apple Fladen (Hungarian) (1919) ★★★★


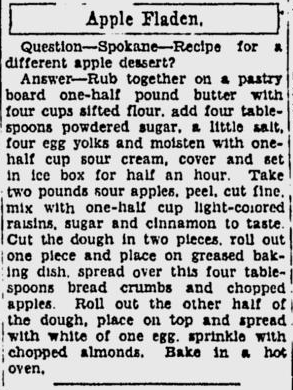
A slightly altered recipe for Apple Fladen
in the Oct. 22 1934 Spokesman-Review
I had a bunch of egg yolks left over from making my foam torte, and I found this recipe while searching for a way to use them up. I searched around for a bit, but couldn't find any references to "Apple Fladen" aside from this recipe itself. All I found was that "fladen" means "cakes" in German. I tried looking for variants of "Hungarian apple cake/pie/squares" and found that there is a Hungarian dessert known as Almas Pite which is very similar to this recipe. Hungary is actually a big exporter of apples, and almas pite is often made during the Christmas holidays.
One intriguing thing I did find was this recipe for apple fladen, which was printed in the Spokesman-Review in 1934 in response to a reader's query: "Recipe for a different apple dessert?" The Spokesman-Review is printed out of Washington, USA. The recipe printed is nearly a direct quote of the The International Jewish Cook Book recipe. It made me wonder why the author of the recipe column decided to feature this recipe (and without credit, too!). Obviously they had access to The International Jewish Cook Book, because the recipe is almost word-for-word. It was not necessarily the 1919 book either - The International Jewish Cook Book was popular for many years.


Original Recipe:


The Verdict:
I made two minor substitutions in this recipe: I used dark raisins instead of golden, and chopped up some whole almonds myself instead of using powdered almonds.
These are pretty much apple pie bars. However, there is a LOT of apple filling, so these are best eaten with a fork. The filling is nice, but the granny smith apples I used were VERY tart. If I made this again, I would probably use a mixture of sweet and sour apples. Also, I think I slightly undercooked the pastry, but it was still nice (yum, yum, sour cream pastry!) and the egg white made the top very brown and beautiful.
I baked mine on a cookie sheet, which was fine, but a 9x13 casserole dish would probably also work well.
Overall, 4 stars. Mr. Man and Little Y liked them, but they "weren't a favourite." Mr. Man really liked the pastry, and Little Y seemed to prefer the filling.


Modernized Recipe:
(Adapted from The International Jewish Cook Book)

1/2 pound UNSALTED BUTTER
1 pound FLOUR
4 tablespoons POWDERED SUGAR
A dash of SALT
4 EGG YOLKS
1/2 cup SOUR CREAM
2 pounds SOUR APPLES, peeled and minced
1/2 cup GOLDEN RAISINS
SUGAR, to taste (I used 3 tablespoons)
CINNAMON, to taste (I used 1 tablespoon)
4 tablespoons BREAD CRUMBS
1 EGG WHITE
2 tablespoons POWDERED ALMONDS

1. In a large mixing bowl, blend together the flour, powdered sugar, and butter, using your hands, a pastry cutter, or a food processor. When well blended, add the egg yolks and sour cream. Knead together until the dough forms a ball and doesn't stick to your fingers. Wrap it up and let it sit in the fridge for half an hour.
2. In a large bowl. mix together the minced apples, raisins, sugar, and cinnamon.
3. Preheat the oven to 400F. Roll out half of the dough into a rectangle and lay it in a greased 9x13 pan or on a cookie sheet lined with parchment paper. Trim the edges with a knife if necessary.
4. Sprinkle the breadcrumbs onto the bottom layer of the pastry. Add the apple filling. Roll out the second half of the pastry and place it on top of the apple filling. Trim if necessary.
5. Brush the top of the pastry with an egg white. Sprinkle on the almonds. Bake for about 25 - 35 minutes.


Foam Torte (1919) ★★★★★

So I had bought a bunch of strawberries which were about to become inedible. Naturally I looked for a way to use them up and I found this recipe by searching Feeding America. Reading the recipe, I thought this was similar to the Australian/New Zealand pavlova, and I think it definitely turned out that way.


Original Recipe: 


The Verdict:
Very delicious! I love the texture of the meringue - the crust dissolves on your tongue and the inside is chewy like a marshmallow. The strawberries provided a nice tang and freshness which was necessary to cut the very sweet meringue. I think with bananas only this would be too sweet. I'm not sure if the recipe was meant to be this way, but my foam torte turned out like...well, a tart's crust. I wish I had added more strawberries for filling, though, as the sides were pretty high. I also think that my springform pan was a tiny bit too big. I would have preferred a slightly smaller and thicker crust, especially on the bottom. Like a deep-dish pizza, kind of.

Modernized Recipe:
(Adapted from The International Jewish Cookbook)

4 EGG WHITES
1 tablespoon VINEGAR
1 cup SUGAR
1 teaspoon VANILLA
SLICED FRUIT, such as strawberries, peaches (with cream), or bananas

1. Preheat oven to 350F and grease a springform pan.
2. In a large bowl, beat the egg whites until frothy. Then slowly add the vinegar by drops, while beating. Add half the sugar and beat until soft peaks form. Add the rest of the sugar and the vanilla and beat until the egg whites are glossy and form stiff peaks.
3. Add the egg whites to the prepared pan (reserving some for decorating if desired) and spread with a spoon, making sure to line the sides of the pan to create a crust. Use the reserved egg whites to decorate the top of the torte. Bake for about 45 minutes. When done, let it cool in the oven without opening the door.
4. When cooled, add the sliced fruit to the top of the torte and serve.


ANZAC Biscuits (1927) ★★★★★

Today is ANZAC Day!
Okay, so two days ago I found out what the whole ANZAC business is about. For anyone else still in the dark, this acronym stands for Australian and New Zealand Army Corps. ANZAC Day in particular, is a nation-wide celebration in both countries, honouring those who fought at Gallipoli in the Ottoman Empire during World War One (although the day now serves as a more general memorial). ANZAC biscuits - cookies to us North American folk, but never call them that! - have come to play a crucial role in the celebration of this holiday, and are often used in fundraising efforts by the Royal New Zealand Returned Services' Association (RSA) and the Returned and Services League of Australia (RSL). These biscuits are very much a part of Australian society and culture. By preparing and eating these cookies, Australians and New Zealanders create a connection to ANZAC Day, often seen as the birth of the Australian nation, and to their fellow countrymen. This is one example of the scholar Benedict Anderson's theory of nations as imagined communities - members of a community imagine their peers participating in the same rituals as themselves, thus creating and perpetuating a specific culture. I'm getting a little bit scholarly on you here, but it is certainly a fascinating topic to consider!

However, the ANZAC biscuits which are baked today are quite different from the original recipe.
The original recipe is quite simple, so it is anyone's guess as to when it was "created". However, the earliest known use of the term "ANZAC" as a recipe is an advertisement for the 1915 copy of St. Andrew's Cookery Book, from Dunedin, New Zealand. But this recipe was for a cake, not biscuits. In Australia, a Sydney cookbook called War Chest Cookery Book included a recipe for Anzac Biscuits in 1917, but the ingredients do not correspond with the recipe known as ANZAC today. The 1917 recipe was contributed by an "Alice Anderson from "Oakdale" N. Sydney" and includes rice flour, spices, and eggs. Oddly enough, there is a recipe in War Chest Cookery Book which is extremely similar to ANZAC biscuit recipes published later, but in this case it is called Rolled Oats Biscuits. By 1921, Rolled Oats Biscuits finally became Anzac Crispies (published in the 9th edition of St. Andrew's Cookery Book) and in 1923 the recipe finally became Anzac Biscuits in Mrs H. W. Shaw's Six Hundred Tested Recipes. Coconut was introduced to the recipe in 1927. Therefore, the recipe can currently be traced back to New Zealand, where the recipe for Rolled Oats Biscuits was first published.

ANZAC biscuits reflect the circumstances in which they were created. The lack of eggs reflects food shortages during wartime years, specifically the lack of poultry. The hardness of the biscuits indicates that they were a good choice for baking and sending to soldiers abroad. While the origins of ANZAC biscuits certainly dates to the beginning of World War One (if not earlier, under a different name), it was not until after the war that they really began to take off as a cultural and culinary product.

I decided to go with the 1927 recipe, since this is the first time the recipe for ANZAC biscuits appeared as it is made today.


Original Recipe:
Take a quarter of a pound of butter and one tablespoon of golden syrup. Place in a saucepan and melt. Add two tablespoonsful of boiling water in which is dissolved one teaspoonful carbonate of soda. Add three-quarters of a breakfast cup of flour, one breakfast cup of sugar, one breakfast cup of desiccated coconut, one breakfast cup of oatina, and a few almonds finely chopped. Place in teaspoon quantities on a cold slide, and bake in a moderate oven. Leave on a tray for a few minutes to harden before removing from slide, but not too long. A knife slipped under each biscuit will readily remove.


The Verdict:
So for my first try, I used 1 teaspoon of baking soda. The cookies were really tasty and very chewy, but they spread a LOT and were a bit wonky. They were also a little greasy and the almonds didn't want to incorporate into the dough. Oh, and I really didn't want to go and buy a whole can of golden syrup when the recipe only called for 1 tablespoon, so I substituted 1/2 tablespoon honey and 1/2 tablespoon light corn syrup (I know, I know - sorry!). Despite any issues, these were very tasty. Mr. Man said that he was pleasantly surprised, as he doesn't like chewy cookies.
I decided to try again, this time with 1/2 teaspoon baking soda. I also used just a bit less than 1/4 lb of butter and went with a slightly different mixing method. This time the recipe turned out much better, but it was a tiny bit dry, so I think the full amount of butter should be used. This attempt tasted very similar to the first batch - chewy and delicious.


Modernized Recipe:
(Adapted from Terrace Tested Recipes, found at New Zealand Listener)
Yield: ~16 cookies

1/4 lb UNSALTED BUTTER
1 tablespoon GOLDEN SYRUP
2 tablespoons BOILING WATER
1/2 teaspoon BAKING SODA
3/4 cup FLOUR
1 cup SUGAR
1 cup DESICCATED COCONUT
1 cup ROLLED OATS
1/4 cup ALMONDS, chopped

1. Preheat the oven to 350F. Line a baking tray with parchment paper.
2. In a medium saucepan, melt the butter and golden syrup. In a mixing bowl, whisk together the flour, sugar, coconut, oats, and almonds until well combined.
3. In a small container, dissolve the baking soda in the boiling water and pour it into the melted butter. Stir, remove from heat, and pour into the dry ingredients. Mix well.
4. Take tablespoon-sized chunks of dough and roll into slightly flattened balls. Bake about 10 - 12 minutes.


-----
Sources


"Anzac Biscuit." Wikipedia. Wikimedia Foundation, 19 Apr. 2013. Web. 22 Apr. 2013. <http://en.wikipedia.org/wiki/Anzac_biscuit>.


Fleming, Kylie. "Kiwis or Us - Culinary Historian Allie Reynolds Traces Origins of Anzac Biscuits." The Australian. N.p., 20 Apr. 2013. Web. 22 Apr. 2013. <http://www.theaustralian.com.au/news/kiwis-or-us-culinary-historian-allie-reynolds-traces-origins-of-anzac-biscuits/story-e6frg6n6-1226624784496>.


Gofton, Allyson. "The Anzac Biscuit Myth." Allyson Gofton. N.p., 15 Apr. 2006. Web. 22 Apr. 2013. <http://www.allysongofton.co.nz/index.php/page/articles/pi_articleid/57>.


Rae, Fiona. "Anzac Biscuits 1994-2000." New Zealand Listener. N.p., 22 Apr. 2011. Web. 22 Apr. 2013. <http://www.listener.co.nz/from-our-archive/anzac-biscuits-1994-2000/>.


Supski, Sian. Anzac Biscuits - A Culinary MemorialHumanities: Research and Graduate Studies, Australia at War and Peace. Curtin University, n.d. Web. 22 Apr. 2013. 
<http://research.humanities.curtin.edu.au/groups/awp/pdf/ANZAC_BISCUITS_G2015.pdf>.


Cooked Muskmelon (1919) ★

I was keen to try this recipe because it seems so different from anything we would do today. Plus it was taken from a vegetable cookbook, when today melons are considered a fruit.


Original Recipe:

COOKED MUSKMELON.

Miss Corson, in one of her lectures, gives the following directions for making a very nice dessert from muskmelons:—Make a rich syrup from a pound of white sugar to half a pint of water. Pare and slice the melon and boil it gently in the syrup five to ten minutes flavoring with vanilla or lemon. Then take it up in the dish in which it is to be served, cool the syrup and pour it on the melon. To be eaten cold.

The Verdict:
No. Just, no. I'm already so-so about cantaloupe when it's raw, but cooked is just wrong. It's all soggy and the texture is gross. It also definitely wasn't improved by sugar and flavouring. I couldn't even finish one piece. To me, this recipe is pointless. It's quicker, easier, and tastier to just eat the melon raw.

Modernized Recipe:
(Adapted from Vaughan's Vegetable Cook Book)

1 CANTALOUPE
1 pound SUGAR
1 cup WATER
LEMON or VANILLA EXTRACT

1. Cut the cantaloupe into small pieces, leaving out the seeds and rind.
2. In a large saucepan, bring the sugar and water to a boil. Add the cantaloupe and simmer for 5 - 10 minutes or until tender. Flavour as desired.
3. Let cool before serving.


Vanilla Ice Cream with Marshmallows (c. 1931) ★★★★★


Today I have a menu for "Christmas Dinner," taken from The Settlement Cookbook. This cookbook was originally published in 1901 and was so successful that a further 34 editions were published. Today's excerpt comes from the edition published around 1931, which seems to be one of the more popular editions. In this edition the author, Lizzie Black Kander, includes several menu suggestions, including ones for holidays such as Christmas, St. Patrick's Day, Valentine's Day, Lent, and Washington's Birthday. Since making the whole Christmas menu would be a little...overwhelming, I chose to make just one dish, marshmallow ice cream. The menu didn't indicate a specific flavour, but the book gives a few varieties, including chocolate, coffee, orange, and New York.
What caught my attention while reading this cookbook was that it was written by a Jewish woman who wanted to assimilate young Jewish girls into mainstream American society. One might see Kander's fight for Americanization of immigrants as a negative thing - after all, she was encouraging the abandonment of traditional culinary values. However, it would be difficult not to describe Kander as a strong, courageous woman who actively sought out her goals (despite the fact that she proclaimed the importance of the woman in the domestic sphere).
The focus of the cookbook explains the emphasis on American holidays in the menus section. However, I did notice a few traditional Jewish recipes throughout the book, such as matzo balls, matzo pudding, and kugel. There are also a number of German and Eastern European influences present - in fact, the book is one of the largest collections of Jewish and German recipes published in the United States.
The Settlement Cookbook was also a charity cookbook - its aim was to raise funds for the Jewish Settlement House in Milwaukee, Wisconsin ("settlement work" was a term used to describe charitable work among immigrants). The success of the book meant that charities in Milwaukee benefited from the book's sales for over 75 years.
Overall, Kander's work was extremely influential in Milwaukee and the United States as a piece of socio-cultural history. Indeed, it is still influencing North American society today, in facsimile and new revised editions.

Original Recipe:


The Verdict:
This ice cream is ridiculously creamy. I was shocked at how silky it was on my tongue. I liked the flavour, but I think I might have preferred the chocolate variety a little more. Mr. Man thought it was cream cheese at first. He didn't like it, but that's because he doesn't like marshmallows.
I also happened to accidentally burn a little bit of the mixture while it was on the stove, but it actually gave a nice toasted marshmallow flavour. Really, this recipe is nice the way it is, but next time I would toast the marshmallows beforehand.

Modernized Recipe:
(Adapted from The Way to A Man's Heart ... The Settlement Cook Book)

1 cup MILK
20 MARSHMALLOWS
1 cup CREAM or EVAPORATED MILK
1 teaspoon VANILLA

1. In a medium saucepan, heat the milk. Cut the marshmallows into small pieces and add to the hot milk, stirring until dissolved.
2. To the saucepan, add the vanilla. Let cool.
3. Whip the cream until stiff peaks form. Gently fold into the cooled marshmallow mixture.
4. Put the ice cream mixture into the freezer to set or follow the directions on your ice cream maker.

-----
Sources

Fritz, Angela. "Lizzie Black Kander and Culinary Reform in Milwaukee, 1880 - 1920."Wisconsin Magazine of History 87.3 (2004): 36-49. Wisconsin Historical Society. 2007. Web. 20 Dec. 2012. <http://content.wisconsinhistory.org/cdm/compoundobject/collection/wmh/id/42933/show/42910>.

"Lizzie Black Kander." Wikipedia. Wikimedia Foundation, 12 May 2012. Web. 20 Dec. 2012. <http://en.wikipedia.org/wiki/Lizzie_Black_Kander>.

"The Settlement Cook Book." Feeding America. Web. 20 Dec. 2012. <http://digital.lib.msu.edu/projects/cookbooks/html/books/book_52.cfm>.