Showing posts with label 4 stars. Show all posts

Orange Butter Cookies (1967) ★★★★


This recipe comes from a 1967 volume of Boys' Life, a magazine which has been printed by the Boy Scouts of America since 1911. It was printed in a column called Tim's Tips, which featured Christmas cookie recipes.

Original Recipe:


The Verdict:

I was nervous about these cookies! I had to re-read several times to make sure I wasn't missing a leavener. Oh - and as a disclaimer, I used a mixture of butter and margarine in my batter. The batter was very wet and sticky, even after being chilled for several hours. After chilling the dough, I baked a batch. They came out very pale and soft inside - almost cake-like. But the edges were very crisy and brown. I thought maybe it was because I had used a hot pan, but I got the same result when I re-baked with a cold pan and frozen cookie dough. Taste-wise, they're nice, but perhaps a tiny bit bland. The citrus zest was definitely there, though. I think they just needed a bit of vanilla. I thought they were good, but not great. I would eat them by choice, but I'm not sure I'd make this recipe again myself. Mr. Man really loved them, though!


Modernized Recipe:

(Adapted from Boys' Life, vol. 57 no. 12)

The original recipe is delicious and easy to follow. Add a splash of vanilla, if you fancy.

Strawberry Eclairs / Boiled Icing (c.1909) ★★★★


This is a recipe I've had in my drafts for quite a while now, but just never got around to making.
It comes from The Good Housekeeping Woman's Home Cook Book, published around 1909. This cookbook is a good example of an early publication from a magazine. These kinds of cookbooks, compiled by readers and tested by committees became quite popular. For example, in Canada in the 20th and 21st century you can find a lot of cookbooks from Chatelaine, a women's lifestyle magazine.

This recipe sounded like a fun and summery take on the traditional eclair. Here in Japan it's already averaging 25 degrees during the day, so it's perfect weather for such a treat.


Original Recipe:


Strawberry Eclairs
Boil together in a saucepan one cup of 
boiling water, one-fourth cup of butter 
and a speck of salt. As it begins to boil 
stir in one cup of sifted flour. Stir con-
stantly until the mixture leaves the sides 
of the pan and cleaves together in a ball.
When partly cool add four eggs, beating 
them in one at a time. Drop carefully
in long narrow strips, some distance
apart, on buttered tins, and bake in a 
moderate oven until well risen--about
thirty minutes. Leave the oven door 
open a few minutes before removing the
eclairs, to prevent their falling. When
they are cool split one side, fill with
sweetened strawberries or jam. Spread
with boiled icing colored with strawberry 
juice.--Annabel Lee.


Boiled Icing
Boil one cup of granulated sugar with
one-fourth cup of water, until the syrup
hairs when dropped from a spoon. Have
ready the beaten white of one egg. Pour
the syrup slowly upon the egg, stirring
constantly. Flavor the same as the cake
and spread on the cold cake, when the
icing is stiff enough not to run. Cut in
squares or slices.

Notes:

Because I have only a Japanese measuring cup, I adjusted the measurements.

The choux pastry:
For the water, I used 237ml.
For the butter, I used 57g.
For the flour, I used 125g.
I only added 3 eggs, to account for modern large sized eggs.
I baked at 180C in a convection oven for around 25-35 minutes, depending on size.

The icing:
For the sugar, 200g.
For the water, 60ml.


The Verdict:

Overall, not too bad.
The pastry itself is kind of bland and gross on its own. It is a tiny bit eggy in taste, which I dislike. They were also a bit soggy inside, since the recipe didn't say anything about letting out the steam. However, these work alright as a vessel for a filling and icing.
I used a combination of fresh strawberries and strawberry jam as a filling. It worked nicely. Just jam on its own it alright, but using fresh strawberries really makes a difference. The icing is lovely and marshamallowy. I am a big fan of boiled icing. However, my icing didn't get very pink (I used the juice of 4 medium strawberries). Also, there was a ton of icing left over, which was kind of wasteful.
So, these aren't my favorite dessert, but they have some nice aspects to them. They were pretty quick and easy to prepare, as well. I probably don't like these enough to make them again, but if I did love choux pastry, I would probably enjoy this dessert a lot more. It's mostly personal preference here, so I give this recipe four stars.

Modernized Recipe:

(Adapted from The Good Housekeeping Woman's Home Cook Book)

1 cup water
1/2 cup butter
pinch of salt
1 cup flour, sifted
3 eggs
strawberries, or jam to fill

1 cup sugar
1/2 cup water
1 egg white
juice from strawberries, for color

1. In a saucepan, add the water, butter, and salt. Bring to a boil and let the butter melt.
2. Add the sifted flour and stir until the dough leaves the sides of the pan and comes together in a ball. Set aside to cool. Preheat the oven to 350F. Line a baking sheet with parchment paper. If desired.
3. When the dough is partly cool, add the eggs, one at a time. When the dough is smooth, put it onto the prepared baking sheet in fairly narrow strips. I used a plastic bag with the corner cut off to pipe the filling on.
4. Bake at 350F for 25-35 minutes, depending on the size. They should be crisp and golden.
5. When done, cut them in half or poke a hole in them to let the steam escape. Return them to the oven for 15 minutes to cool (oven off). Then let them cool completely before filling and icing.
6. To make the icing, mix the sugar and water in a saucepan. Slowly bring to a boil and simmer for about 3 minutes or until it reaches 245 degrees. Add the strawberry juice. Have the egg white beaten to stiff peaks in a mixing bowl. Slowly pour in the hot sugar syrup, while beating the egg white. Beat until cool and fluffy.


Chocolate Fudge Cake (1941) ★★★★


I know I've been MIA for a while here. I promise, its not because I have abandoned the blog! I have actually been busy researching for a big blog post. The problem is, it didn't start out so big. Somehow it snowballed into a huge project, so unfortunately its nowhere near ready to share yet.

So what is it about? Food rationing in Canada during WWII! I know, I know, theres TONS of information out there about wartime food rationing. But what I found was, there's hardly anything about Canada. And what little information there is is often incomplete or misleading. So I'm on a mission!

In the meantime, I thought I'd share a Canadian wartime recipe.

Original Recipe:


                            CHOCOLATE FUDGE CAKE
1 egg                                 1/2 tsp. baking powder
1/4 cup butter                    2 tsp. cocoa (large)
1 tsp. salt                          1/4 cup hot water
1/2 tsp. soda                     1 1/2 cups flour
1/2 cup sour milk
     Beat egg, add sugar slowly, then melted butter. Sift flour, cocoa and 
baking powder and add to egg mixture, beating well. Dissolve soda in 
sour milk and add alternately to cake mixture with the hot water. Cook 
in a moderate oven.
Filling----
2 tbsp. cocoa                    1 cup hot water
2 tbsp. butter                    1 cup brown sugar
2 tsp. corn starch
     Mix altogether and boil until thick, stirring constantly, and spread 
in centre and on top of cake.
---Mrs. D. H. Green.

The Verdict:

So as soon as I went to make the cake batter, I noticed that I managed to pick the ONE RECIPE that was missing an ingredient. See, the first step is to beat the egg and add the sugar....but oh wait, there's no sugar on the ingredients list! I saw that most of the other cake recipes in the book called for 1 cup of sugar, so I went with that. 
Also, as a disclaimer, I have a weird Japanese measuring cup, so everything was measured by grams on my scale or in liquid milliliters. 
I baked the cake in my convection oven at 180C, which is 356F. It took about 35 minutes.

This cake is pretty good! The cake itself was very moist, and a little heavy. It is a bit bland, but its not surprising, considering it only had 2 teaspoons of cocoa powder. However, its not necessarily a bad thing. The filling is pretty sweet, so I was glad that the cake wasn't strongly flavored. The filling is kind of like a fudge sauce. Mr. Man said it tasted like hot chocolate. Its definitely not an amazing chocolate cake, but I could see this being great for wartime and it definitely wins for ease and budget. Overall, we all enjoyed this cake and we will definitely finish it, so 4 stars!


Modernized Recipe:


1 egg
1 cup sugar
1/4 cup butter, melted
1 1/2 cups flour
2 heaping teaspoons cocoa powder
1/2 teaspoon baking powder
1/2 teaspoon baking soda
1/2 cup sour milk (substitute buttermilk or 1/2 tablespoon of lemon juice or vinegar mixed with enough milk to make 1/2 cup)
1/4 cup hot water

2 tablespoons cocoa powder
2 tablespoons butter
2 teaspoons cornstarch
1 cup hot water
1 cup brown sugar

1. Preheat the oven to 180C or 355F. Grease a cake pan. It's helpful to line the bottom with paper, too.
2. In a large mixing bowl, beat the egg. Slowly beat in the sugar. Add the melted butter, being sure that its not too hot (otherwise it will cook the eggs).
3. Sift the flour, cocoa powder, and baking powder into the egg mixture. Beat to combine. It will be thick like cookie dough, but don't worry if you can't get everything combined.
4. Mix together the baking soda and sour milk. 
5. Alternate adding the milk mixture and hot water to the batter. Mix well to combine between each addition. The batter should be smooth and fairly runny.
6. Pour into the prepared pan. Bake for about 30 - 35 minutes, or until a toothpick comes out clean. 
7. Prepare the filling by mixing everything together and boiling until smooth and thick. Let it cool before putting it between cake layers and on top. Make sure the cake is cool before filling, too.

Ginger Tablet (1845) ★★★★


Ages ago, in my 4th out of 5 years in university, I submitted an essay to be published in an online undergraduate journal. Unfortunately my essay wasn't chosen, but they told me I was the first alternate choice and they encouraged me to apply again the next year. So my 5th year rolled around and I received an email from the editor, asking if I would apply this time as well. I brushed up my work a bit and resubmitted. And they accepted it! I had to go through gruelling edits, which took months to complete - all during a move to Japan!

My essay was finally published this November. If you're interested in Scottish-Canadian foodways, please have a look! The official title is Cookbooks as Sources of Scottish-Canadian Identity, 1845 – 1934. Its all about the first two Scottish cookbooks published in Canada and how they interact with and reflect Scottish and Canadian identities at the time. Its my first published work, and to be honest, I can see that it needs still more refining. But for an undergraduate work, I'm pretty pleased.

So without further ado, here is a recipe from one of the cookbooks I analyzed in my essay. Modern Practical Cookery was an early cookbook publication in Canada, but it had already been published in Scotland nearly 40 years earlier. It was the first Scottish cookbook published in Canada. Of course I wanted to pick a recipe from this book which was distinctly Scottish.

Before I started research for my essay, I had never heard of tablet (also called butter tablet or Swiss milk tablet). Its actually a traditional Scottish sweet, similar to sucre a la creme, something I ate when I was a child in Canada. The Oxford Companion to Food includes an entry on tablet:


"...a Scottish sweet made from sugar and milk or cream boiled to the soft ball stage (116C/240F), and then stirred vigorously to make it ‘grain’ or crystallize. It is poured into trays and allowed to set before being cut into smaller pieces or ‘tablets’. The texture of this confection resembles crisp fudge. It was known in the early 18th century when purchases of ‘tablet for the bairns’ were recorded in The Household Book of Lady Grisell Baillie (1692-1733), and Mrs. McLintock (1736) gave recipes for orange, rose, cinnamon, and ginger tablets in the earliest work on cookery published in Scotland."

I tried to find this reference in Lady Grisell's book, but all I could find was an offhand reference by the editor of a 1911 edition, edited by Robert Scott-Moncrieff: "Fruits and confections are frequently bought, and occasionally 'taiblet for the bairens.'" Scott-Moncrieff's version is highly edited and transcribed, so plenty is left out. I couldn't find any record of "taiblet" in the book. I suppose we'll have to take his word for it, as I am unable to get my hands on the original source.

Unfortunately, Mrs. McLintock's Receipts for Cookery and Pastry Work seems to be a rare book, so I was unable to examine it myself. However, Food Timeline includes an interesting blurb from Sugar-Plums and Sherbet: The Prehistory of Sweets by Laura Mason:

"Recipes for tablets flavoured with orange, rose, cinnamon and ginger were published in Glasgow by Mrs. McLintock in 1736. These are simple candy recipes, made only with sugar, water and flavourings. This is her recipe: "Orange Tablets with the Grate: Grate the Oranges, take 2 lib. of sugar, and a mutchkin of water, then clarify it with the White of 2 Eggs, and set it on a slow Fire, and boil it till it be almost candyed, then put in the Grate of the Oranges, and take your white paper, rub it with fresh Butter, pour it on your Paper, and cut in little pieces." This is a candy similar to those from the previous century. The word tablet has medicinal overtones, as in the commonly accepted meaning of a small flat disc containing some drug or health-giving substance...In tablet now made in Scotland, both orange and ginger are still found amongst the flavourings, but milk has become essential to the definition."

As for the name, the Oxford English Dictionary suggests that it may have come from medicinal origins, which isn't uncommon for candy. This seems especially possible considering the common flavours of ginger, cinnamon, rose, and peppermint.

So what do we know about tablet? It dates back to at least the 1730s. The candy likely had medicinal origins. Popular flavours included ginger, cinnamon, peppermint, rose, and citrus. The earliest recipes were mostly sugar and water, and the dairy component came later. The texture should be hard and grainy, rather than smooth and soft like fudge.


Original Recipe:


GINGER TABLET.

Clarify the sugar, as directed for barley sugar
(p. 308,) and boil it down, but not so high as for
barley sugar ; to know when it is candy high, dip
the end of a spoon in cold water, then in the boil-
ing sugar, and when it hangs to the spoon, ropy,
take it off the fire ; to two pounds of sugar, have
half an ounce of the whitest ginger you can get,
pounded and sifted, put it in the sugar and stir 
it, rubbing it well, and breaking all the knots 
with the back of the spoon against the side of the
pan ; when done, have the marble slab rubbed
over with butter, pour it on it, and let it stand
till quite cold, then score it into dice for orna-
ment, but not too deep, cut it into square cakes,
and lay it by in boxes.

TO MAKE BARLEY SUGAR.

Take two pounds of lump sugar, break it in
small pieces, take a clean brass pan, put in a pint
(mutchkin) of water, drop in the white of an egg,
and whisk it well, put in the sugar, put it on the
fire, and, when melted, bring it to the boil ; as
soon as it boils, draw it to one side, to make it
boil on one side of the pan ; skim it till it be
perfectly clarified, then set on the fire, and boil
it down quick ; in the mean time have a marble
slab ready, rub it over with a piece of butter ; to
know when the sugar is at a proper height, dip
the end of a spoon in cold water, then into the 
boiling sugar, and quickly into the cold water,
if the sugar has gathered round the spoon, slip it
off, and if it be hard, and crimps in your teeth, it
is enough ; take it off, and drop six or eight drops
of the essence of lemon into it, pour it on the
marble slab, and before it gets too cold, with a
pair of large scissors, cut it into long sticks, rol
them on the slab, and lay them to cool ; this do
as quickly as possible, as it will get too cold for
cutting ; when done, keep it in a box, or in some
place from the air, and it will keep a long time.


The Verdict:

Well, the Oxford English Dictionary may be on to something when it says tablet may have had medicinal origins, because this is like medicinal strength ginger. Wow! It's very strong - but delicious! I like it, but I can only eat a small bite at a time. Mr. Man loves ginger and he really loves this. It is very sweet as well, though.

One thing - I wish I had made the tablet a bit thinner, because it was quite the feat to cut through it. Its a very hard candy, although it dissolves in the mouth. It has a rough and grainy texture, very unlike the smoothness of fudge.

It takes a bit of time to make with all that boiling, but overall, simple and tasty. I may make this again with Little Y, as it strikes me as something simple enough that a kid could do a lot of the recipe.

As for clarifying the sugar with the egg white...its probably an optional step by now. I did it just for fun, but I'm not sure it accomplished much.

Note: I used unrefined brown cane sugar (or at least I think so...it looked like it anyway) to make this recipe. I think any kind works fine, since its measured by weight and boiled down. The most authentic way would be to use lump sugar  - I suppose if you have access you can buy it, or if you're really dedicated you could make your own, but its really just sugar wetted with water and formed to a cone.


Modernized Recipe:

(Adapted from Modern Practical Cookery)

1 pint water
1 egg white (optional)
2 pounds sugar
1/2 ounce ginger, powdered
butter for greasing

1. In a large pot, whisk together the water and egg white (if using). Add the sugar.
2. Cook over medium heat until the sugar is dissolved. Then bring it to a boil.
3. If you are clarifying with the egg white, as soon as it starts to boil, move the pot so that only half of it is on the burner. This will allow any scum to shift to the opposite side. Skim it off until there is nothing left to skim.
4. Simmer the candy until it reaches the correct temperature. Make sure to stir and scrape down the sides from time to time. It is ready when it reaches around 240-245F. You can test by dropping a bit onto a plate and seeing that it does not run, or when it reaches the consistency of soft putty when dropped in cold water.
5. When the candy is ready, add the ginger and mix well. Pour it onto a greased marble slab or into a greased pan. Smooth it with a spoon or spatula to the desired thickness.
6. Let the tablet cool completely. Score into dice for decoration and cut into squares.


Sources:

Baillie, Grizel, and Robert Scott-Moncrieff. The Household Book of Lady Grisell Baillie, 1692-1733. Edinburgh: Printed at the UP by T. and A. Constable for the Scottish History Society, 1911.

Davidson, Alan. The Oxford Companion to Food. Oxford: Oxford UP, 2014.

Mason, Laura. Sugar-Plums and Sherbet: The Prehistory of Sweets. Devon: Prospect, 1998.

Olver, Lynne. "The Food Timeline: Tablet." The Food Timeline. Accessed 31 Jan. 2015. <http://www.foodtimeline.org/foodcandy.html#tablet>.

"Tablet (confectionery)." Wikipedia. Wikimedia Foundation. Accessed 31 Jan. 2015. <http://en.wikipedia.org/wiki/Tablet_(confectionery)>.

Breakfast-in-a-Glass (1959) ★★★★


For a while now I've seen smoothie recipes floating around the internet that include oatmeal in the ingredients. As a self-proclaimed smoothie enthusiast, I found the idea nothing short of heresy. Although I can't deny the fact that oatmeal is a very nutritious food, I just couldn't allow myself add it to my smoothies, which only contained fruit, juice, and yogurt...up until now, I guess.
Since we're now right in the midst of "warm summer mornings," I decided to go for it and make this Breakfast-in-a-Glass recipe from 1959. Okay, okay, so to be fair my original plan was to make Little Y the tester, since she loves smoothies and would be oblivious to the oatmeal secretly lurking within. But I felt up to a challenge today, so I decided to just go for it and see what an oatmeal smoothie is really like for myself. Historical style, of course.

Original Recipe:


For each serving of Breakfast-in-a-Glass put 1 cup milk and 1/3 cup cool, cooked oatmeal in Mixer or other container.
Add 1/3 cup crushed strawberries (fresh or frozen) or other fruit; add sugar to taste and vanilla if desired.
Blend in Mixer or blender...or use electric or hand beater until smooth. Serve immediately.


The Verdict:

The first thing I did was make the oatmeal. I was annoyed by the extra step and too lazy to bother looking up how to properly make oatmeal, so I threw a handful in a bowl, added what looked like enough milk, and zapped it in the microwave for one minute. It came out cooked, so that was a pleasant surprise. I added the cooked oatmeal, milk, and some frozen strawberries to my blender, along with a bit of vanilla and about two teaspoons of sugar. I whizzed that until it looked smooth.
Taste-wise, this was actually not bad. I could definitely taste the oatmeal, but I didn't mind. However, texture-wise this really bothered me. The oatmeal didn't completely blend in, so it was basically strawberry milk with chunks. Not so yummy. That said, Little Y loved it and happily drank the entire glass. I think that if the oatmeal had been completely blended I would drink this again by choice, so I give this recipe four stars on that condition.


Modernized Recipe:

(Adapted from a Quaker Oats advertisement, found at jonwilliamson.com)

The original recipe is good!


Nelson Balls (1881) ★★★★


If you haven't already heard of The Foods of England Project, I really recommend exploring the website. Its a really informative site and its where I found today's recipe for Nelson Balls.

Apparently Nelson Balls may have been named after Admiral Horatio Nelson (1758-1805). Nelson was a British officer, recognized for his service during the Napoleonic Wars. He is known for his famous quote, "England expects that every man will do his duty." I'm not sure what this has to do with lemon-flavoured confections, but I suppose its a nice enough legacy for a war hero.

Amusingly, the recipe on The Foods of England Project page came from a book published in the United States. There wasn't much other information, other than the earliest known reference to Nelson Balls was in an 1803 advertisement: "E Russell, Bread and Biscuit-baker ... the greatest variety of biscuits, Nelson's balls, Dutchess of York's biscuits..." So I decided to do a little internet digging. I did a search through Google Books and found a plethora of references to Nelson Balls. Several sources offered definitions of the food:
Salopia Antiqua (London, 1841)
Dictionary of Archaic and Provincial Words (London, 1855)
The English Dialect Dictionary (1905)

I also found an interesting article about Nelson Balls:
So it appears that the treat was known under several names: Nelson Balls, Nelson's Balls, Waterloo Balls, and Nelson's Bullets. In one case, it appears that some schoolboys decided to refer to the confection as "horseballs." Nelson balls also seem to be a critical ingredient in the recipe for Nelson Puddings:

While there was a huge selection of recipes available for Nelson Pudding, I could only find one other for Nelson Balls:

Massey and Son's Biscuit, Ice, & Compote Book (London, 1866)
By the way, if you're interested in what a biscuit break is, Ivan Day has a great post all about that.


Original Recipe:

NELSON BALLS  3 lbs flour ½ lb butter ½ lb sifted sugar Essence of lemon to flavor.   Mix up very stiff with milk; place in a cloth for a half hour; break smooth with a biscuit break; mould into small balls about the size of a walnut; bake in a rather quick oven, and put in a warm place to dry.

The Verdict:

This recipe looked huge, so I decided to third the amount of ingredients. In the end I got maybe 30 or slightly less balls out of the thirded recipe. There wasn't really a described method, so I ended up mixing the ingredients in order. I put the flour and sugar in a bowl and mixed in the butter with my fingers. Then I added the milk and lemon extract, working it to a stiff dough with my hands. I let it sit for longer than half an hour because I got distracted. I beat the dough with my rolling pin for a while, until it looked nice and smooth. I wasn't sure about "size of a walnut," but since the recipes for Nelson Puddings called for 6 balls or small cakes, I made them about golf ball size. I baked them for about 15 minutes at 380F.

These aren't bad. The are not very sweet at all and I could have used more lemon flavouring (even though the dough smelled strongly, it wasn't enough after they were cooked). Some fresh lemon zest would have been great, actually. Mr. Man loved them (he doesn't like overly sweet things), but we both agreed these would be improved by some icing on top or even lemon curd in the middle, as they're a bit dry and dense. I can really see how making them into a pudding would be a great improvement. They're definitely edible as is, though!

Modernized Recipe*:

(Adapted from The complete bread, cake and cracker baker)

455g FLOUR
76g SUGAR
76g BUTTER
LEMON EXTRACT
MILK

1. In a large mixing bowl, combine the flour and sugar. Add the butter and combine with your fingers until crumbly.
2. Add in a little milk at a time, mixing until you get a stiff dough. Add the lemon extract to taste. On a flat surface, knead and beat the dough with a rolling pin until it is smooth.
3. Cover the dough with a cloth or plastic wrap and let sit for 30 minutes. Meanwhile, heat the oven to 380F.
4. After the dough has rested, roll into balls about the size of a golf ball. Bake for about 15 minutes, or until the tops just start to turn light brown. They don't rise or spread much at all, so they can sit close together on the baking sheet.


*Thirded recipe

Chocolate Tarts (1829) ★★★★

I felt like the 1820s were being left out, so here's a recipe to fill in that time gap!


Original Recipe:


The Verdict:

Different, but not bad!
The flavour is a bit different from what we normally pair with chocolate today. Lemon and cinnamon is not what my tongue prefers, but I got used to it as I tasted and after finishing one tart, I think I could definitely eat another.
I had an issue with the chocolate filling not setting thickly, as I think it probably should have. That was probably because I didn't cook it enough and/or it needed more eggs. I like to round way down with eggs in historical recipes because I really hate eggy taste.
I used these pre-made puff pastry shells because I was feeling lazy (and Mr. Man picked those up instead of the tart shells haha), but I think puff paste tart shells would have worked way better.
Oh! I should add that I didn't add the diced lemon peel...I forgot about that and only had one lemon. I'm also not sure if the recipe meant fresh lemon peel (since its already in the recipe) or candied lemon peel. I imagine this can't have made much different flavour-wise, as there was already lemon in the filling.
Overall, this is a lovely recipe and although it may be a bit of an acquired taste, its good!

Edit: After sitting out for a while they did get firmer, and after being in the fridge the tarts became quite firm.


Modernized Recipe:

(Adapted from Modern Domestic Cookery, and Useful Receipt Book)

1/4 pound (4 ounces) CHOCOLATE, chopped
1/2 teaspoon CINNAMON
Zest of 1 LEMON
3 tablespoons SUGAR
2 teaspoons FLOUR
3+ EGGS, separated (see above about number of eggs)
1 tablespoon MILK
LEMON PEEL, diced fine
PUFF PASTRY SHELLS

1. In a saucepan whisk together the flour, egg yolks, and milk. To this add the chocolate, cinnamon, lemon zest, and sugar. Whisk together well and cook over medium heat until thick.
2. Add finely diced lemon peel to the cooked filling and let it stand until cold.
3. Meanwhile, beat the egg whites until stiff peaks form. Preheat oven to 350F.
4. Fill puff pastry shells with chocolate filling and cover with the beaten egg whites. Sift some sugar over the top. Bake for five minutes at 350F, then broil until egg whites are golden on top.


Pour faire tourtes de pommes (To make apple tarts) (1604) ★★★★


This recipe for apple tart comes from Ouverture de Cuisine, which was written by Lancelot de Casteau and published in Liege, Belgium. Although there is only one surviving copy of the book, it did play a significant role in culinary history. de Casteau's cookbook has been credited as a bridge between medieval food and haute cuisine. It was also the first cookbook published in French in the Low Countries. 

I also want to make two notes on ingredients: apples and short paste.

Antique apple varieties are either very difficult to find today or are completely lost to past palates. Apparently Faro and Reinette were popular varieties in France and Permain, Costard, Blaunderelle, and Pippins were common in England. I think the best bet for today's cooks are Pippins, but I can't find any myself, so I just used a random assortment of modern varieties. I should also note that historically, apples were smaller and had larger cores, which is probably why this recipe calls for 12 (which is a lot!). I didn't have 12 on hand, and I think I ended up using 8 or so. That was definitely enough.

As for the short paste, its a fairly basic element, so I just used a modern recipe: 7 ounces flour, 4 ounces butter, ice water to bind. However, afterward I did find a more period appropriate recipe, which could be used as well. 

Original Recipe:


[Transcription, by Thomas Gloning et. al.]

Pour faire tourtes de pommes.
Prennez vne douzaine de pommes
haschées fricassees dedans le beurre, trois
onces de succre, vn satin de canelle, &
quatre iaulnes d'oeuf, vn peu d'anisse
estampé, & faictes tourte de grasse pa-
ste.


[English translation, by Daniel Myers]

To make apple tarts.
Take a dozen chopped apples 
fried in butter, three 
ounces of sugar, a quarter ounce of cinnamon, & 
four yolks of eggs, a little 
ground anise, & make the tart with short 
paste.


The Verdict:

It was pretty good. The apples were nicely spiced and weren't too sweet, actually. I am not convinced about the point of the egg yolks, however. I thought maybe they were meant to sort of cook up with the juice from the apples, to prevent a watery tart, but I'm not sure how true that really is. If that is the case, I'd rather just use cornstarch, since separating eggs is annoying AND you end up with a bunch of whites. My pastry was pretty good, but I think adding a bit of sugar to the crust would have been nice. Overall, I would eat this again, but this recipe also calls for a LOT of peeling and chopping apples, which is a pain, so its definitely one I would save for special (read: not lazy) occasions.


Modernized Recipe:

(Adapted from Ouverture de Cuisine)

8 - 12 APPLES, peeled and chopped
~2/3 cup BUTTER
3 ounces SUGAR
1/4 ounce CINNAMON, ground
A little ANISE, ground
4 EGG YOLKS
1 SHORTCRUST PASTRY

1. Preheat oven to 375F and line a tart tin (or whatever - I used a springform pan) with the shortcrust pastry.
2. In a large pot, melt the butter and sugar. Add the chopped apples, cinnamon, and anise. Stir together well until the apples are evenly coated with spice.
3. Cook the apples until slightly tender. Let cool. Stir in the egg yolks. Pour the apple filling into the prepared pastry.
4. Bake for about 40 minutes. The apples should be bubbling and the crust should be lightly browned.


Sources:

Adamson, Melitta Weiss. Food in Medieval Times. Westport, CT: Greenwood Publishing Group, 2004.

"Lancelot De Casteau." Wikipedia. Wikimedia Foundation, 19 Oct. 2013. Web. 26 Jan. 2014. <http://en.wikipedia.org/wiki/Lancelot_de_Casteau>.

Portsmouth Orange Cake (1932) ★★★★


The cake I want to share with you today has a bit of an interesting history, much of which is strongly tied to New Hampshire. Portsmouth Orange Cake is included in a list of suggested foods to eat while in New Hampshire:

"Spongy and sweet in all the right places, Portsmouth orange cake is a favorite of many New Hampshire natives, who feasted on the dessert as children and who now consider the soft cake a summertime staple. It is usually made with orange zest or rinds and often with orange-flavored cream-cheese frosting. But some Portsmouth area restaurants and home bakers also add fresh-picked cranberries from New Hampshire bogs to sweeten the already wonderful after-dinner delight."

The earliest mention I found was in Green's Receipt Book (1894). This book, amazingly, seemed to have been very devoted to this particular cake recipe, as the title page actually advertises in very large print that it includes "the original receipts for Famous Portsmouth Orange Cake..." The first section of recipes is for cakes, and is preceded with a note stating, "First, I will give the receipts collected in Portsmouth, including Famous Portsmouth Orange cake, Black cake, and Walnut cake." Below is the supposed authentic recipe in its entirety:

It seems like the recipe was consistently popular, as forty years later it was still being printed in cookbooks. I've found several mentions of the cake from the 1930s, not including the version featured here, which is from 1932. It was also included as a suggestion for a worker's lunch in Ida Bailey Allen's Cooking, Menus, Service (1935) and a 1935 advertisement in the Portsmouth Times refers to a "Mello Gold Orange Cake" as "an ideal hot weather treat," which may or may not be the cake we're discussing here. I found newspaper references to Portsmouth Orange Cake throughout the 1970s and 80s as well. One of these mentioned the cake as part of a Christmastime feast. A recipe for the cake was also included in the 1975 The Thirteen Colonies Cookbook, a book highlighting foods from each of the original 13 colonies of the United States. This recipe is very basic and different from older recipes. If Portsmouth Orange Cake was a recipe brought over by settlers from the Old World, then this may be an early version of the recipe. Oranges had been introduced throughout Europe by the mid 1600s. It is interesting to note that the Thirteen Colonies version is most similar to the 1894 version from Green's (compare the methods of handling the eggs). This recipe is a good example of how methods and ingredients can change over time.

Original Recipe:


The Verdict:

Overall, not bad. But not amazing either. The cake itself was really dense and a bit bland. It also stuck to the pan a lot, but luckily because it was so dense I pried it out without any breakage. The icing was okay, but tasted way too strongly of orange zest. It overpowered every other part of the cake. As a whole, it was a nice concept - the fresh sections of orange in the middle were really nice and refreshing too. I would definitely eat this voluntarily, but I wasn't impressed enough with the cake to want to make this again myself. I'm going to give this 4 stars, but its probably closer to 3.5 stars.


Modernized Recipe:

(Adapted from The Sunny South and Golden West Cook Book)

3 EGGS
1 cup SUGAR
3 tablespoons ORANGE JUICE
1 cup FLOUR
1 teaspoon BAKING POWDER

1 ORANGE
2 cups ICING SUGAR
2 tablespoons LEMON JUICE
2 tablespoons WATER

1. Preheat the oven to 350F and liberally grease two 9 inch round cake pans.
2. In a mixing bowl, beat the eggs and sugar together until thick. Stir in the orange juice. Add the flour and baking powder and fold together.
3. Divide the batter between the two pans and bake for 10 - 15 minutes.
4. While the cakes are cooling, make the frosting. Mix the zest of half an orange with the icing sugar. Add the lemon juice and depending on the consistency, add water to make a thick but spreadable icing.
5. Spread the icing on the top of the first layer, and fill with thin sections of orange (thinly slice an orange, cut each slice in half, and cut off the peel). Place the second layer of cake on top and spread the rest of the icing on the top of the  cake layer.

Sources:

"Food Not To Miss In New Hampshire." KC Community News. N.p., n.d. Web. 02 Nov. 2013. <http://prewww.kccommunitynews.com/travelgetaways/18691300/detail.html>.

Green, Ralph. Green's Receipt Book. Concord, N.H.: Republican Associated, 1894. International Correspondence School & American School of Correspondence Directories Archive. Web. 2 Nov. 2013. <http://www.icsarchive.org/icsarchive-org/paperback/cookbooks/greens_receipt_book_1894.pdf>.

Mello Gold Orange Cake. Advertisement. Google News. N.p., n.d. Web. 2 Nov. 2013. <http://news.google.com/newspapers?id=vZFeAAAAIBAJ&sjid=t0sNAAAAIBAJ&dq=portsmouth%20orange%20cake&pg=2584%2C3133062>.

Olver, Lynne. "New Deal Food Programs." The Food Timeline. N.p., n.d. Web. 02 Nov. 2013. <http://www.foodtimeline.org/fooddecades.html>.

Lemon Biscuits (1861) ★★★★


Its funny, when I pick a recipe to make for this blog, I usually go by ingredients. Flour? Sugar? Butter? Eggs? Lemon? "This will be easy," I think to myself. And then I start the recipe. And read the instructions. And I end up thinking, "what the heck is going on here?!"

This recipe is weird. Why does it call for blending the butter with the flour, like a pastry? And after adding the eggs it looked so dry and crumbly, I was getting really worried. So I did a brief Google search and saw that some other people have tried this recipe without success....oh no.
But then I went back to my bowl and it had basically magically transformed into something that resembled a dough! Yay! I kneaded it a bit, dropped it onto a cookie sheet, put it in the oven, and crossed my fingers.


Original Recipe:

LEMON BISCUITS.
1743—INGREDIENTS.—1-1/4 lb. of flour, 3/4 lb. of loaf sugar, 6 oz. of fresh butter, 4 eggs, 1 oz. of lemon-peel, 2 dessertspoonfuls of lemon-juice.
Mode.—Rub the flour into the butter; stir in the pounded sugar and very finely-minced lemon-peel, and when these ingredients are thoroughly mixed, add the eggs, which should be previously well whisked, and the lemon-juice. Beat the mixture well for a minute or two, then drop it from a spoon on to a buttered tin, about 2 inches apart, as the cakes will spread when they get warm; place the tin in the oven, and bake the cakes of a pale brown from 15 to 20 minutes.
Time.—15 to 20 minutes. Average cost, 1s. 6d.
Seasonable at any time.

The Verdict:

Now, seeing as though we're looking at a British cookbook here, "biscuits" really means cookies. But there's no kind of leavening in the recipe at all. Mrs. Beeton states to drop the dough with a spoon, so I got some pretty lumpy cookies. Almost like coconut macaroons in look. They also didn't spread very much at all, despite what her recipe says.

These lemon biscuits are really quite beautiful. They bake up a very light color, and look like fluffy clouds. Taste-wise, they are just as delicate. The lemon flavour is light, but still present. I think I would personally prefer a touch more punch of lemon flavour, because the strongest flavour is just the sweetness from the sugar. Nevertheless, I would happily eat these cookies by choice, because they are good. I loved them best just out of them oven, when they're warm and soft and fluffy. Once they cool they become a bit dryer and denser.

Also! This makes a LOT of cookies! I got about 47 cookies. I would recommend halving the recipe, but I'm including the whole recipe below. Lastly, Mrs. Beeton's recipe calls for one ounce of "very finely-minced lemon-peel." I just assumed she meant lemon zest, but even zesting two lemons didn't weigh anything on my scale. I'm thinking she might have been referring to more of a candied peel. However, the lemon zest I used seemed to work just fine. And zesting requires no mincing!


Modernized Recipe:

(Adapted from The Book of Household Management)

1 1/2 pounds  (20 ounces) FLOUR
6 ounces UNSALTED BUTTER
3/4 pound (12 ounces) SUGAR
4 EGGS, beaten
1 ounce LEMON PEEL, or the ZEST of two LEMONS
2 teaspoons LEMON JUICE

1. Preheat oven to 350F. Line a cookie sheet with parchment paper.
2. Rub the butter into the flour as if to make a pastry dough. It should resemble wet sand.
3. Add the sugar and lemon peel to the flour and mix well. Add the beaten eggs and lemon juice and stir together until it forms a sticky dough (I used my hands to make sure everything was completely incorporated - you don't want chunks of egg). If the dough is still crumbly and isn't coming together, let it sit for a bit, to absorb the eggs.
4. Drop the dough by teaspoons onto the prepared cookie sheet. Bake for about 10-15 minutes (mine took 13).


Cranberry Tea (1850) ★★★★


What I love about this recipe is that it is so indicative of place and time. Cranberries are indigenous to North America, and were originally used by Aboriginals as food, medicine, and dye. When settlers from Europe arrived, they too began to utilize cranberries. There are very early references to using cranberries in recipes for sauces, jellies, and tarts.

The inclusion of this recipe in an American cookbook indicates that settlers were recognizing and utilizing native foods in their cooking. Additionally, According to Catharine Parr Strickland Traill, "necessity, no doubt, has taught the old settlers, both in the States and Canada, to adopt certain leaves, roots and berries, as a substitute for the genuine article; and habit has reconciled them to the flavour."

Today we commonly associate cranberries with the holiday season, a tradition which began long ago. It is possible that cranberries were eaten by early English settlers in Massachussets and were used in Thanksgiving feasts. In 1853, Canadian author Traill, wrote of using cranberries as a festive decoration.

Original Recipe:


The Verdict: 

Actually, this turned out better than I thought! Firstly, the cranberries were like impossible to mash. Those things are tough! I think some sort of pestle-like object would work better than my wirey potato masher. Secondly, I was really worried that just pouring hot water over the somewhat mashed berries wouldn't extract very much flavour. But it did! And my water wasn't even as hot as it could be, so I'm really pleased with that. I let it steep for a while (while I finished up the Doctor Who 50th anniversary special! Whee!), maybe 20 minutes? As you can see, the end result was a gorgeous color. I sweetened my tea with honey and added a little nutmeg, but to be honest I liked it better without the nutmeg. Little Y saw it and asked to try some "Jell-O juice" (hahaha) so I let her have a sip and she really liked it! Cranberry isn't my favourite, because its so sour, but I might make this again. Plus if you can employ child labour to mash the berries, its definitely worth the time ;)


Modernized Recipe:

(Adapted from Miss Beecher's Domestic Receipt Book)

The original recipe is easy to follow. Steep the mashed berries in the hot water until it turns a vibrant red-pink color. I think I used maybe 1/2 cup berries to 1 1/2 cups water, roughly.


Sources:


"Cranberry." Wikipedia. Wikimedia Foundation, 21 Nov. 2013. Accessed 24 Nov. 2013. <http://en.wikipedia.org/wiki/Cranberry>.

Traill, Catharine Parr Strickland. The Female Emigrant’s Guide, And Hints on Canadian Housekeeping. Toronto, Canada West: Maclear and Company, 1855.

Pineapple and Raspberry Neapolitan (1926) ★★★★


Original Recipe:


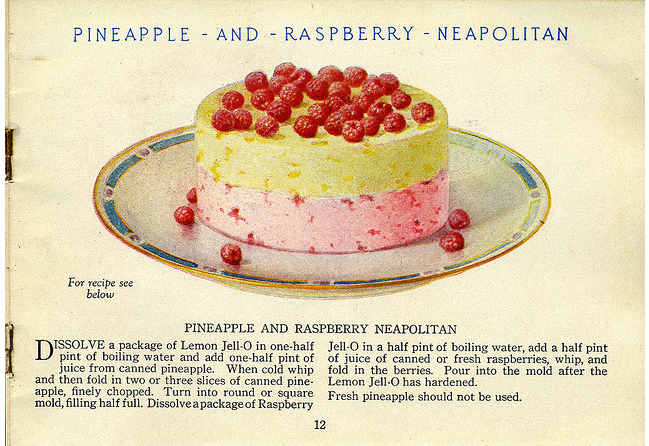
Dissolve a package of Lemon Jell-O in one-half pint of boiling water and add one-half pint of juice from canned pineapple. When cold whip and then fold in two or three slices of canned pineapple, finely chopped. Turn into round or square mold, filling half full. Dissolve a package of Raspberry Jell-O in a half pint of boiling water, add half a pint of of juice of canned or fresh raspberries, whip, and fold in the berries. Pour into the mold after the Lemon Jell-O has hardened. 
Fresh pineapple should not be used.


The Verdict:

Well, visually, this was a huge disappointment. Which I should have anticipated, because honestly, how could Jell-O get that white and fluffy looking without adding any dairy? However, the "whipping" did make some beautiful bubbles in the Jell-O. I also had a problem with my layers not sticking together, which was interesting. When I tried to unmold my gelatin, the layers separated and the pineapple one even broke a little. Sad times. 
However, taste-wise, this was pretty good! I'm going to give this 4 stars because it was slightly above average. However, I wouldn't make this very often, because it does take a bit of work. The amount of real fruit/fruit juice really masked the fake Jell-O flavouring, which could be a good thing or a bad thing, depending on your preferences, I guess. I really enjoyed the taste. Also, the pineapple added a nice crunch, but the berries did get a bit mushy, which was a tad gross. 

Modernized Recipe:

(Adapted from Jell-O recipe booklet, found at Hey, My Mom Used to Make That!)

1 package LEMON JELL-O
1 cup PINEAPPLE JUICE (drained from the canned pineapple, add a little water if needed to reach 1 cup)
3 slices CANNED PINEAPPLE, finely chopped
1 package RASPBERRY JELL-O
1 cup RASPBERRY JUICE
A handful of RASPBERRIES
2 cups BOILING WATER, divided

1. In a mixing bowl (or directly in your mold, if you're lazy like me), dissolve the lemon Jell-O in 1 cup of boiling water. When the Jell-O has dissolved, mix in the pineapple juice. When the Jell-O is cooled, beat it with a hand mixer until very frothy. Gently fold in the fruit and let it set completely.
2. Do the same with the raspberry Jell-O, juice, and berries, making sure the pineapple layer is firm before pouring on the raspberry layer.
3. Let the mold set until firm. To unmold it, briefly soak the mold in warm water and invert onto a plate. Garnish with raspberries.