A new name, a new look, and a new site


When I first started Kitchen Historic in 2011, I really had no idea what I was doing.

I was beginning to really get into my history degree and I enjoyed cooking, so I figured why not combine those interests and start a blog.

In the five years since then I have learned a lot about historical cookery. I've learned what a slow oven and a hot oven are. I've learned what butter the size of an egg is and what galangal is. I've learned to interpret vague instructions and to never use as many eggs as a recipe tells me to. I've struggled with issues of authenticity. It's been a great adventure, and I'm so thankful to have had many supportive readers along the way.

But after five years, it's time for change.

To be honest, this is something I've been thinking about for quite a while. And while I hope it won't cost me what I've built up over the years, I feel it's necessary. And it's time.

So the bad news is, I'm closing Kitchen Historic...

And opening a new, hopefully even better version!

My new blog is called Food Roots.
It's the same idea, same purpose, and same types of posts. It's just a new name, a new look, and a new URL. It's essentially an upgrade. I wanted to shed this old blog and move forward with something new and fresh.

This will be my last post on Kitchen Historic.
The blog and content will all stay here.
I'm still working out kinks and figuring out how I want things to be, but I hope you'll follow along with my new adventures over at Food Roots!
Please note that I will also be changing my twitter and facebook.

Thank you so much for everything,
Anje

[HFF] Pineapple Caramel Upside-Down Cake (1935)


[In case you're wondering, yes, I did skip challenge #5. I can't get roastable cuts of meat here and I couldn't find a suitable alternative. Sorry!]


For this HFF challenge, I decided to go retro with a pineapple upside-down cake.

Let's talk about pineapples.

Dole advertisement, 1952
I'm going to focus on Hawaiian pineapples, since this recipe comes from a Dole cookbook. No one really knows when exactly the first pineapples were introduced to Hawaii, however, they were first recorded in 1813. Outside of Hawaii, early on, and before canning, pineapple was a mark of well-to-do tables. With it's unusual appearance and the fact that it was not easily grown in the continental states, pineapple was an exotic luxury for those who could afford it. In fact, early colonials were so entranced by pineapple that it was featured in art, design, ice and jelly molds, and even architecture!


Canning of pineapple began in Baltimore in the mid-1860s, but this fruit was imported from the Caribbean, not Hawaii. Pineapple canning in Hawaii first began with the quickly defunct Kona Fruit Preserving Co. in 1882, and it was not until 1901 that James D. Dole founded Dole's Hawaiian Pineapple Company. Dole's company flourished, and as a result Dole's can credited as a major contribution to the rapid growth of the canned pineapple industry.

By the 1920s, canned pineapple was readily available and by 1930 Hawaii was leading the world in the production of canned pineapple. By 1933 there was also a rapid growth in sales of canned pineapple juice, an important by-product which increased industry profits after the Great Depression. However, by the end of World War II, the industry had changed. New competitors emerged and cheap foreign canneries eventually replaced all the canneries on Hawaii. Today, only fresh pineapples are grown in Hawaii, and mostly for local consumption. Nevertheless, Hawaii's pineapple legacy is so strong that even today dishes made with pineapple are often called "Hawaiian style".

*****

The Ladies' Home Journal, 1953
Upside-down cakes likely grew out of old American methods of cooking. "Skillet cakes" were traditionally cooked in a cast iron pan, on top of the stove. With fruit and a sugar put in the pan first, when inverted onto a plate the cake would appear already decorated. It's quite probable that the classic pineapple upside-down cake has it's origins in these recipes. 

In 1925, Dole ran a contest calling for canned pineapple recipes. In the end, one recipe for pineapple upside down cake was published in the compiled cookbook, however, Dole apparently received 2,500 recipes for the cake! Clearly by 1925 pineapple upside-down cake was widely known. Although pineapple upside-down cake enjoyed a lot of popularity, today it is often seen as "retro" and a nostalgic symbol of the mid-century, especially when topped with vibrant red maraschino cherries!


Today's recipe comes from a 1935 cookbook released as part of a Dole advertising scheme. 


HFF Challenge:
6. Juicy Fruits (March 11 - March 24) It’s fruits! Do something with fruits. It doesn’t get more simple than that. Bonus points for use of heritage crops and ingredients!


Original Recipe:


The Verdict:
Amusingly, when Mr. Man saw me buying canned pineapple, he became very alarmed and said to me, "You better not be making one of those cakes." He complained that upside-down cakes are always soggy and gross because of the fruit. Clearly this retro classic isn't a welcome throwback for all of us.

In the end, the cake itself was okay. It fell quite a bit after I took it out of the oven. The "caramel" topping was basically goop. And with 1/2 cup of sugar, it was VERY sweet. The pineapple was the best part, as it cut the sugary sweetness and added flavor, which was otherwise lacking.

Mr. Man and I both rated this cake "just okay". It's definitely edible and not awful, but the mushiness and over sweetness of the topping really didn't do this cake any favours.


Notes:
I can't get canned Dole fruits, so I used another brand. I did use Dole pineapple juice.
I didn't put 3 tablespoons of butter on the bottom, but I did liberally grease the pan.
I baked the cake in an oven-safe frying pan.


Sources:

[HFF] Valentine Crunch (1961)


It's time for Historical Food Fortnightly challenge number four! No surprise to anyone, I'm sure, this challenge's theme is based on Valentine's Day and it's sweet traditions.

Now, HFF technically describes "historical" to mean anything up to 1960, so I'm fudging it a little here with this 1961 recipe. It comes from the Lakeland Ledger, a newspaper based in Florida. 
The Challenge:
4. Sweets for the Sweet (February 12 - February 25) It’s sugar, and maybe spice, and definitely everything nice. Test out a historic recipe for sweets, sweetmeats and candies - but don’t let them spoil your appetite!

The Recipe:
Valentine Crunch
Yield: 1 pound


3/4 cup margarine
1 cup sugar
2 tablespoons water
1 tablespoon light corn syrup
1 cup chopped nuts
1/2 cup coconut, optional
1/2 teaspoon rum extract
1 cup semi-sweet chocolate pieces

Melt margarine in a heavy saucepan. Add sugar and combine well. Cook over low heat, stirring constantly, until mixture is well blended and begins to bubble. Add water and corn syrup and mix well. Continue cooking mixture over low heat, stirring frequently, until 290 degrees F. registers on a candy thermometer or until a drop in cold water "cracks" or is brittle. Remove from heat.

Stir in nuts, coconut, and rum extract. Pour out onto a cooky sheet. Cool to room temperature. Melt semi-sweet chocolate pieces over boiling water. Spread evenly over candy and set aside until firm. When firm, break into pieces
The Verdict:
Unfortunately, it seems that I've already got my recipe for challenge 24, "Redo". I'm not sure if it was the temperature or the corn syrup substitution, but my candy went from liquid and glossy to thick and crumbly. There was no "crunch" at all. I hoped it would keep together well once it cooled down, but unfortunately it didn't work out that way. Also, I found it way too sweet for my tastes - I think maybe having the chocolate mixed in instead of just on top might help...on the other hand, Mr. Man really loved it!

Notes:

* I can't get corn syrup here, so I tried using mizuame.
* I didn't have a thermometer, so I used the cold water method.
* I used almonds and peanuts as my nuts.
* I forgot the rum extract, so I sprinkled some on top at the last minute. I couldn't really taste it.


[HFF] To bake Spritzgebackenes (1553)


I recently came across and interesting historical foodie challenge called  Historical Food Fortnightly. I wanted to join immediately. I know I've been scarce around here for the past year and a half. My hope is that I can start posting here more often, and that having specific challenges to complete will help me with that. From now on, my challenge posts will be tagged with HFF to indicate that they are part of Historical Food Fortnightly. Since I missed the first two challenges, here is my answer to challenge number three - history detective!

The Brief:
3. History Detective (January 29 - February 11) For this challenge, you get to be the detective! Either use clues from multiple recipes to make a composite recipe, or choose a very vague recipe and investigate how it was made.
I spent some time reading through cookbooks and flip-flopping between ideas for this challenge, but I felt especially drawn to a 1553 recipe for Spritzgebackenes. This recipe comes from a cookbook called Das Kochbuch der Sabina Welserin, so named because it was written by a woman named Sabina Welserin, whose family was part of the mercantile upper class in Augsburg. This was a private, hand-written cookbook, so it was never published in Sabina's lifetime - in fact, not until 1980. It was translated into English in 1998.

A very preliminary search pulled up the Wikipedia entry for Spritzgebäck. Often known as spritz or German/Scandanavian spritz cookies, it seemed like my search was over! But alas, that would be too easy, wouldn't it.

I went to work looking for other recipes under name variations on Spritzgebäck and spritz cookies. I collected a variety of recipes from 1941 to 2009 and started comparing. But something was odd. The 1553 recipe called for milk, but no other recipe did. And the 1553 recipe mentioned frying, but spritz cookies are baked (could this be a translation error? I wondered). I decided I needed to take the leap into German-language cookbooks.

Initially, I was having some difficulty finding German cookbooks, but as it turns out, HathiTrust Digital Library was my big break. In the cookbook, Tausend und ein rezept (c.1916), I found an intriguing recipe for Spritz-Krapfen. This recipe called for a choux dough which is fried in hot fat and sprinkled with vanilla sugar. Although it was in a completely different direction than where I was headed, it felt similar to my 1553 recipe.

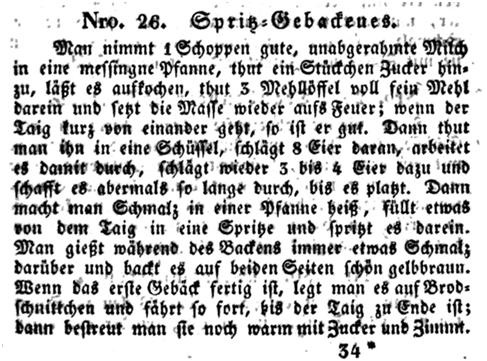
Then I found another cookbook, Die vollkommene Köchin (1838). Amazingly, it had a recipe titled Spritz-Gebackenes - the exact title of the 1553 recipe I started with. However, the ingredients and the methods were very similar to the 1916 Spritz-Krapfen. This recipe did not resemble any spritz cookie recipes I had looked at earlier.

Now, for a mini German lesson (keeping in mind, my German is very basic, so please correct me if I'm wrong on any account). Spritz is a form of the verb spritzen, which means to squirt or inject. Gebacken means baked. Gebäck can mean cookies, biscuits, tarts, or buns. And Krapfen means doughnut. So we have a lot of options here. But with the "spritz" prefix, we can at least assume that the dough for whatever may be produced is squirted out somehow. Originally, I was certain the 1553 recipe was a precursor of today's short, buttery spritz cookies. But after considering the ingredients, the frying method, and the discovery of the 1838 recipe, I believe the 1553 recipe is for fried choux pastry doughnuts.

Now, onto the recipes! Aside from the 1553 recipe, I must disclose that I translated and transcribed entirely myself, with the help of Google Translate. So please be aware that while it was not my intention, there may be mistakes, and if you notice any, please let me know!


1553 Das Kochbuch der Sabina Welserin Transcription / Translation:

<<162>>
Ain spritzenbaches zú bachen
Nim ain masß wasser oder milch aúff ain disch vnnd thú
es jn ain pfannen, lasß sieden, rier ain schen mell darein/
das er woll drúcken wirt/ nim jn aús der pfannen, well jn
woll, doch mit mell darein/ thú jn dan jn ainen morser,
stosß jn woll mit airen, bis er zech vnnd gút wirt/ thú jn/ jn
die bix, bach jn langsam.

162 To bake Spritzgebackenes Take one quart* of water or milk for a meal and put it into a pan. Bring it to a boil, stir good flour into it, so that the dough becomes fairly dry, take it out of the pan, roll it out well, but with additional flour, put it into a mortar, blend it well with eggs, until it becomes good and sticky, put it in a pastry bag, fry them slowly. 
* The original German is masß, which would have been 1.4 litres.


1838 Die vollkommene Köchin Transcription / Translation:


Nro. 26 Spritz – Gebackenes.
Man nimmt 1 Schoppen gute, unabgerahinte Milch in eine messingne Pfanne, thut ein Stückchen Zuder hinzu, läßt es ausfochen, thut 3 Mehllöffel voll fein Mehl darein und feßt die Masse wieder aufs Feuer ; wenn der Taig furz von einander geht, so ist er gut. Dann thut man ihn in eine Schüssel, schlägt 8 Eier daran, arbeitet es daikit durch, schlägt wieder 3 bis 4 Eier dazu und schafft es abermals so lange durch, bis es platzt. Dann macht man Schmalz in einer Pfanne heiß, füllt etwas von dem Taig in eine Spritze und sprizt es darein. Man gießt während des Backens immer etwas Schmalz darüber und backt es auf beiden Seiten schön gelbraun. Wenn das erste Gebäck fertig ist, legt man es auf Brodschnittchen und fährt so sort, bis der Taig zu Ende ist ; [w?]ann befireut man sie noch warm mit Zuder und Zimmt.


Take 1 pint of creamed milk* in a brass pan*, add a bit of sugar, let it boil, add 3 flour spoon scoops of fine flour, and put it again on the fire; when the dough* comes apart, it is good. Then put in a bowl, beat in 8 eggs, working it thoroughly, beat again 3 or 4 eggs into that and beat thus once more for a long time, until it bursts. Then heat lard in a pan, fill some of the dough into a syringe and squirt it in. Pour over the pastries always some fat and bake it nice on both sides until it is beautiful golden brown. When the first pastry is ready, place it on a Brotschnittchen* and immediately pass the dough over; when free while still warm put sugar and cinnamon.
* I found “unabgerhinte” in several old culinary books, but I believe the modern German phrase is “aufgerahmte Milch”, which translates to “creamed milk”.
* After a lot of research, I believe messingne Pfanne translates to brass pan. In modern German, messing means brass, therefore messing Pfanne would be the modern spelling.
* This very clearly looks like “Taig” to me, but Teig (dough), seems to be the modern word/spelling.
* This seems to translate to bread sandwiches or canapes/tidbits. Not sure if this is referring to a method of plating/preparation, or perhaps to drain the excess oil onto bread before rolling.


c.1916 Tausend und ein rezept Transcription / Translation:


726. Spritz-Krapfen.
Man fuellt eine Strauben-Spritze, (Krapfen Spritze) oder man einen Stern oder sonst eine Form einsetzt, mit dem Brandteig No.667 und schiebt den teig mit leichtem Druck in rauchend heisses Fett No. 408, wobei man, wenn die eingelegte Straube die gewuenschte Groesse hat, abbrechen und immer wieder frisch ansetzen muss. Es muss genuegend Fett in der Pfanne sein, damit die Strauben darin schwimmen und darf man nur 3 oder 4 auf einmal einlegen, bewegt die Pfanne ganz leicht etwas hin und her und wenn auf der unteren Seite goldfarben, dreht man die Spritzkrapfen mit einem Loeffel um. Sie werden bis alle fertig sind, auf Papier gelegt und dann aufgehaeuft mit Vanille-Zucker bestreut warm servirt. Man reicht Marmelade, Compote oder auch eine beliebige, suess Sauce dazu.

Fill a strauben-syringe (doughnut syringe), which has a star or some other form, with the choux No. 667 and push the dough lightly into smoking hot fatt No. 408, in which,  if the inserted doughnut makes the required size, break it off and again you must begin afresh. There must be enough fat in the pan, so that the doughnuts floating in it must be 3 or 4 at once, the pan moves easily back and forth slightly, and when golden on the bottom, turn the squirted doughnuts around with a spoon. When they all become done, place on paper and then heap with vanilla sugar strewn over and serve warm. With it, marmelade, compote, or even any sweet sauce.


667. Gebruehter Teig (Brandtieg).
Drei Unzen (9 Dkg.) Butter werden mit einer Tasse Milch, ein wenig Zucker und Salz aufgekocht, dann werden 5 Unzen (15 Dkg.) Mehl dazu geschuettet, und rasch auf dem Feuer fort-waehrend geruehrt und abgeschlagen bis es einen glatten, dicken sammtartigen Brei gibt, der sich von Loeffel und Casserole losloest. Wenn abgekuehlt, kommen nach und nach sechs ganze Eier dazu und verwendet man den Teig nach Angabe.

Three ounces (9 dekagrams) butter boiled with a cup of milk, a little sugar and salt, and then five ounces flour (15 dekagrams), and quickly stirred constantly on the fire until smooth and blended, thick and velvety mixture,  which comes apart from the spoon and pan. When cooled, gradually add six whole eggs to it and use the dough according to instructions.

(Note: for space and because I didn't utilize it, I've left out recipe No.408 About the Fat, but it is available here.)

The Verdict:
These are soooooo good! We literally had to stop ourselves from eating all at once. And they totally turned out how I imagined! They are best rolled in sugar, but to be honest, the plain dough isn't bad either! It takes a bit of elbow grease to work that dough, and the frying takes a while, but I would definitely make these again.

Notes:
The original 1553 recipe calls for nearly 6 cups of milk...that would make a TON of doughnuts. So I reduced the recipe way down to the 1916 amounts. Since the original recipe didn't list amounts for anything other than milk and I didn't want 247 doughnuts, I figured it was best.

I used an electric hand mixer to help me out with mixing the dough. I didn't have a mortar or a good spoon and it was really difficult to get the eggs fully incorporated. 

I used canola oil for frying. Obviously such a processed item wasn't available at the time, but I didn't have the means nor the money to get my hands on any other fat for frying (the 1916 recipe mostly mentions fat taken from animals).

It's really helpful to have another set of hands to immediately take cooked doughnuts and roll them in sugar while they're warm, as they cool quickly.

On the note of cinnamon sugar, it was not referenced in the 1553 recipe. Since cinnamon and sugar are both frequently mentioned elsewhere in the cookbook, they were certainly available. And since more recent recipes mention dredging in sugar, I feel it's still a relevant addition to the 1553 recipe.

If you pipe shapes onto parchment paper and freeze them for 20 minutes or so, you can have greater control over shapes.


Modernized Recipe:

1 cup whole milk
5 ounces flour
4 large eggs
cinnamon
sugar

1. In a saucepan, heat the milk to boiling. When it has boiled, take it off the heat. Beat in the flour (using a strong spoon or a stand mixer) until it comes away from the spoon and pan and makes a ball.
2. When you can handle it, knead the dough to make it smooth, using a bit of flour.
3. Let the dough cool to room temperature. Add the eggs one at a time. If it's too difficult, use your hands to mix in the eggs as best you can. If you haven't been using a stand mixer, once one or two eggs have been added and the dough is loose, you can use a hand mixer.
4. Put the dough into a pastry bag with your desired tip. Heat oil in a pan - enough that the spritzgebackenes will float as they cook. 
5. Using the pastry bag, squirt dough into the oil. Flip it at least once. Cook to golden brown. Cook time depends on size and shape, but shouldn't take long. If desired, roll in cinnamon sugar while warm.

Orange Butter Cookies (1967) ★★★★


This recipe comes from a 1967 volume of Boys' Life, a magazine which has been printed by the Boy Scouts of America since 1911. It was printed in a column called Tim's Tips, which featured Christmas cookie recipes.

Original Recipe:


The Verdict:

I was nervous about these cookies! I had to re-read several times to make sure I wasn't missing a leavener. Oh - and as a disclaimer, I used a mixture of butter and margarine in my batter. The batter was very wet and sticky, even after being chilled for several hours. After chilling the dough, I baked a batch. They came out very pale and soft inside - almost cake-like. But the edges were very crisy and brown. I thought maybe it was because I had used a hot pan, but I got the same result when I re-baked with a cold pan and frozen cookie dough. Taste-wise, they're nice, but perhaps a tiny bit bland. The citrus zest was definitely there, though. I think they just needed a bit of vanilla. I thought they were good, but not great. I would eat them by choice, but I'm not sure I'd make this recipe again myself. Mr. Man really loved them, though!


Modernized Recipe:

(Adapted from Boys' Life, vol. 57 no. 12)

The original recipe is delicious and easy to follow. Add a splash of vanilla, if you fancy.

Banana Tea Bread (1940) ★★★


Hello! Yes, I am still alive! I'm nearing the end of a 2 week summer vacation, which was spent mostly cleaning and sleeping. I really wanted to make a recipe for the blog, but it's difficult here. Honestly, I've been feeling a little defeated lately because it seems my baked goods never quite work out properly. But I had some ripe bananas (they go moldy within a day in this heat - blech!) and they were literally falling apart, so I made up my mind to make something historical!

The recipe comes from a WWII banana-themed cookbook, which I've used before. This time the source I used said it was published in 1940, while the source I used last time said 1941. Amazon lists one dated 1942. I'm not sure if these are multiple editions or some confusion, but regardless, it is clear this is an early 1940s book.

Original Recipe:


The Verdict:

This recipe comes together pretty quickly and easily. As a note, I don't have a sifter, so I just whisked some flour really well before measuring. The batter is really light and fluffy. I baked it in two thin loaf pans, as I don't have a regular 9x5 or 8x4 pan here. In my little Japanese convection oven it took 40 minutes to cook those thin pans.

I'm giving this 3 stars, but I think its more of a 3.5. The recipe without modifications is sort of blah, but I think even with some vanilla it would really improve. Maybe the use of butter instead of shortening, too. That said, the texture of the bread is nice and soft. I would happily eat this banana bread, but its not going to be my go-to recipe.


Modernized Recipe:

(Adapted from Bananas..how to serve them found at And Everything Else Too)

The original recipe is easy to follow! My only suggestion would be to add in some extra flavor with vanilla, chocolate chips, cinnamon, etc. 

Strawberry Eclairs / Boiled Icing (c.1909) ★★★★


This is a recipe I've had in my drafts for quite a while now, but just never got around to making.
It comes from The Good Housekeeping Woman's Home Cook Book, published around 1909. This cookbook is a good example of an early publication from a magazine. These kinds of cookbooks, compiled by readers and tested by committees became quite popular. For example, in Canada in the 20th and 21st century you can find a lot of cookbooks from Chatelaine, a women's lifestyle magazine.

This recipe sounded like a fun and summery take on the traditional eclair. Here in Japan it's already averaging 25 degrees during the day, so it's perfect weather for such a treat.


Original Recipe:


Strawberry Eclairs
Boil together in a saucepan one cup of 
boiling water, one-fourth cup of butter 
and a speck of salt. As it begins to boil 
stir in one cup of sifted flour. Stir con-
stantly until the mixture leaves the sides 
of the pan and cleaves together in a ball.
When partly cool add four eggs, beating 
them in one at a time. Drop carefully
in long narrow strips, some distance
apart, on buttered tins, and bake in a 
moderate oven until well risen--about
thirty minutes. Leave the oven door 
open a few minutes before removing the
eclairs, to prevent their falling. When
they are cool split one side, fill with
sweetened strawberries or jam. Spread
with boiled icing colored with strawberry 
juice.--Annabel Lee.


Boiled Icing
Boil one cup of granulated sugar with
one-fourth cup of water, until the syrup
hairs when dropped from a spoon. Have
ready the beaten white of one egg. Pour
the syrup slowly upon the egg, stirring
constantly. Flavor the same as the cake
and spread on the cold cake, when the
icing is stiff enough not to run. Cut in
squares or slices.

Notes:

Because I have only a Japanese measuring cup, I adjusted the measurements.

The choux pastry:
For the water, I used 237ml.
For the butter, I used 57g.
For the flour, I used 125g.
I only added 3 eggs, to account for modern large sized eggs.
I baked at 180C in a convection oven for around 25-35 minutes, depending on size.

The icing:
For the sugar, 200g.
For the water, 60ml.


The Verdict:

Overall, not too bad.
The pastry itself is kind of bland and gross on its own. It is a tiny bit eggy in taste, which I dislike. They were also a bit soggy inside, since the recipe didn't say anything about letting out the steam. However, these work alright as a vessel for a filling and icing.
I used a combination of fresh strawberries and strawberry jam as a filling. It worked nicely. Just jam on its own it alright, but using fresh strawberries really makes a difference. The icing is lovely and marshamallowy. I am a big fan of boiled icing. However, my icing didn't get very pink (I used the juice of 4 medium strawberries). Also, there was a ton of icing left over, which was kind of wasteful.
So, these aren't my favorite dessert, but they have some nice aspects to them. They were pretty quick and easy to prepare, as well. I probably don't like these enough to make them again, but if I did love choux pastry, I would probably enjoy this dessert a lot more. It's mostly personal preference here, so I give this recipe four stars.

Modernized Recipe:

(Adapted from The Good Housekeeping Woman's Home Cook Book)

1 cup water
1/2 cup butter
pinch of salt
1 cup flour, sifted
3 eggs
strawberries, or jam to fill

1 cup sugar
1/2 cup water
1 egg white
juice from strawberries, for color

1. In a saucepan, add the water, butter, and salt. Bring to a boil and let the butter melt.
2. Add the sifted flour and stir until the dough leaves the sides of the pan and comes together in a ball. Set aside to cool. Preheat the oven to 350F. Line a baking sheet with parchment paper. If desired.
3. When the dough is partly cool, add the eggs, one at a time. When the dough is smooth, put it onto the prepared baking sheet in fairly narrow strips. I used a plastic bag with the corner cut off to pipe the filling on.
4. Bake at 350F for 25-35 minutes, depending on the size. They should be crisp and golden.
5. When done, cut them in half or poke a hole in them to let the steam escape. Return them to the oven for 15 minutes to cool (oven off). Then let them cool completely before filling and icing.
6. To make the icing, mix the sugar and water in a saucepan. Slowly bring to a boil and simmer for about 3 minutes or until it reaches 245 degrees. Add the strawberry juice. Have the egg white beaten to stiff peaks in a mixing bowl. Slowly pour in the hot sugar syrup, while beating the egg white. Beat until cool and fluffy.


Chocolate Fudge Cake (1941) ★★★★


I know I've been MIA for a while here. I promise, its not because I have abandoned the blog! I have actually been busy researching for a big blog post. The problem is, it didn't start out so big. Somehow it snowballed into a huge project, so unfortunately its nowhere near ready to share yet.

So what is it about? Food rationing in Canada during WWII! I know, I know, theres TONS of information out there about wartime food rationing. But what I found was, there's hardly anything about Canada. And what little information there is is often incomplete or misleading. So I'm on a mission!

In the meantime, I thought I'd share a Canadian wartime recipe.

Original Recipe:


                            CHOCOLATE FUDGE CAKE
1 egg                                 1/2 tsp. baking powder
1/4 cup butter                    2 tsp. cocoa (large)
1 tsp. salt                          1/4 cup hot water
1/2 tsp. soda                     1 1/2 cups flour
1/2 cup sour milk
     Beat egg, add sugar slowly, then melted butter. Sift flour, cocoa and 
baking powder and add to egg mixture, beating well. Dissolve soda in 
sour milk and add alternately to cake mixture with the hot water. Cook 
in a moderate oven.
Filling----
2 tbsp. cocoa                    1 cup hot water
2 tbsp. butter                    1 cup brown sugar
2 tsp. corn starch
     Mix altogether and boil until thick, stirring constantly, and spread 
in centre and on top of cake.
---Mrs. D. H. Green.

The Verdict:

So as soon as I went to make the cake batter, I noticed that I managed to pick the ONE RECIPE that was missing an ingredient. See, the first step is to beat the egg and add the sugar....but oh wait, there's no sugar on the ingredients list! I saw that most of the other cake recipes in the book called for 1 cup of sugar, so I went with that. 
Also, as a disclaimer, I have a weird Japanese measuring cup, so everything was measured by grams on my scale or in liquid milliliters. 
I baked the cake in my convection oven at 180C, which is 356F. It took about 35 minutes.

This cake is pretty good! The cake itself was very moist, and a little heavy. It is a bit bland, but its not surprising, considering it only had 2 teaspoons of cocoa powder. However, its not necessarily a bad thing. The filling is pretty sweet, so I was glad that the cake wasn't strongly flavored. The filling is kind of like a fudge sauce. Mr. Man said it tasted like hot chocolate. Its definitely not an amazing chocolate cake, but I could see this being great for wartime and it definitely wins for ease and budget. Overall, we all enjoyed this cake and we will definitely finish it, so 4 stars!


Modernized Recipe:


1 egg
1 cup sugar
1/4 cup butter, melted
1 1/2 cups flour
2 heaping teaspoons cocoa powder
1/2 teaspoon baking powder
1/2 teaspoon baking soda
1/2 cup sour milk (substitute buttermilk or 1/2 tablespoon of lemon juice or vinegar mixed with enough milk to make 1/2 cup)
1/4 cup hot water

2 tablespoons cocoa powder
2 tablespoons butter
2 teaspoons cornstarch
1 cup hot water
1 cup brown sugar

1. Preheat the oven to 180C or 355F. Grease a cake pan. It's helpful to line the bottom with paper, too.
2. In a large mixing bowl, beat the egg. Slowly beat in the sugar. Add the melted butter, being sure that its not too hot (otherwise it will cook the eggs).
3. Sift the flour, cocoa powder, and baking powder into the egg mixture. Beat to combine. It will be thick like cookie dough, but don't worry if you can't get everything combined.
4. Mix together the baking soda and sour milk. 
5. Alternate adding the milk mixture and hot water to the batter. Mix well to combine between each addition. The batter should be smooth and fairly runny.
6. Pour into the prepared pan. Bake for about 30 - 35 minutes, or until a toothpick comes out clean. 
7. Prepare the filling by mixing everything together and boiling until smooth and thick. Let it cool before putting it between cake layers and on top. Make sure the cake is cool before filling, too.

A Supper Drink (c.1936) ★★★


Peppermints are not really a big thing here in Japan. Sure, you can buy little breath mints, but you can't get real peppermints here - or at least not in my rural area. Luckily I thought to bring some along from Canada, so I broke out my one and only package of Wilhelmina Pepermunts.

I am half Dutch, so peppermints are kind of special to me. My grandfather always kept peppermints near at hand - in his pocket, in the car, and in his greenhouse. I remember one time when I sneaked into the greenhouse just to raid the peppermint stash. His peppermints were usually the cheap bulk barn kind. On the other hand, Wilhelmina is a pretty famous brand, with over 120 years of history, so I figured they were an appropriate choice for this recipe.

Original Recipe:


The Verdict:

You know, I'm not actually a big fan of milk. I get a milk box every day with my school lunch, but I never drink it. However, I didn't mind this drink! I wouldn't pick it over, say, hot chocolate or apple cider, but I could definitely finish a cup of this. I did find that two peppermints didn't really affect the taste much, so this is definitely a recipe where you can adjust to suit your tastes. I gave the rest to Little Y and she enjoyed it a lot, too.


Modernized Recipe:

(Adapted from Delicious milk dishes and drinks)

1 cup milk, boiling
strong peppermints, to taste

1. Place the peppermints into the boiling milk and stir until dissolved.
2. Drink while hot.


Baked Crispy Peaches (c.1939-1945) ★★★★★


Back around November, a friend contacted me about a recipe book she had recently acquired. It was an undated WWII cookbook, focused on using canned foods. Although we don't know the publication date of the cookbook, it was obviously sometime during WWII. It was published by the American Can Company, possibly in Iowa. She asked me if I was interested in the recipes, and of course I replied that I was. She was very generous in photographing the entire cookbook and sending it to me. You can see the cookbook in its entirety here. There isn't a huge selection of canned foods in my little Japanese town, so I settled on this fairly simple recipe for baked peach halves.

(By the way, Kitchen Historic's 4th birthday was on February 6th! I can't believe it's been this long. Many thanks to you, my lovely readers!)


Original Recipe:


BAKED CRISPY PEACHES

1/2  No. 21/2 can Peach Halves     3  tablespoons Brown Sugar
3/4   cup Cornflakes                       1  tablespoon Butter or Margarine

Drain peach halves. Crush cornflakes. Roll peach halves in cornflakes.
Place peaches, hollow side up, in baking dish. Fill centers with sugar;
dot with butter or margarine. Pour 1/4 cup juice around peaches. Bake
in moderately hot oven at 375 F. for about 25 minutes until browned.
Serve hot with cream or evaporated milk.                             4 servings.


The Verdict:

Well, at first I didn't think much of this dessert. But then I was surprised to find myself wanting more, even after eating two. However, there is no mistaking - this is a cheap recipe. It's certainly not surprising to find this in a wartime cookbook. But, it's a tasty and simple recipe to make, and I can see it being a fun treat during wartime.

Some notes:
The majority of the cornflakes were kind of soggy.
The syrup from the peaches mostly just burned to the bottom of the pan. Not sure what the point of that was, other than to just prevent the peaches from burning to the bottom, I guess.
After 25 minutes, the peaches were still very firm; not inedible at all, but definitely firm.
I drizzled my peaches with some sweetened condensed milk sauce I already had on hand. I couldn't really taste it, and the peaches would be just as good without it.


Modernized Recipe:

(Adapted from Wartime Recipes From Canned Foods)

The original recipe is easy to follow.


Ginger Tablet (1845) ★★★★


Ages ago, in my 4th out of 5 years in university, I submitted an essay to be published in an online undergraduate journal. Unfortunately my essay wasn't chosen, but they told me I was the first alternate choice and they encouraged me to apply again the next year. So my 5th year rolled around and I received an email from the editor, asking if I would apply this time as well. I brushed up my work a bit and resubmitted. And they accepted it! I had to go through gruelling edits, which took months to complete - all during a move to Japan!

My essay was finally published this November. If you're interested in Scottish-Canadian foodways, please have a look! The official title is Cookbooks as Sources of Scottish-Canadian Identity, 1845 – 1934. Its all about the first two Scottish cookbooks published in Canada and how they interact with and reflect Scottish and Canadian identities at the time. Its my first published work, and to be honest, I can see that it needs still more refining. But for an undergraduate work, I'm pretty pleased.

So without further ado, here is a recipe from one of the cookbooks I analyzed in my essay. Modern Practical Cookery was an early cookbook publication in Canada, but it had already been published in Scotland nearly 40 years earlier. It was the first Scottish cookbook published in Canada. Of course I wanted to pick a recipe from this book which was distinctly Scottish.

Before I started research for my essay, I had never heard of tablet (also called butter tablet or Swiss milk tablet). Its actually a traditional Scottish sweet, similar to sucre a la creme, something I ate when I was a child in Canada. The Oxford Companion to Food includes an entry on tablet:


"...a Scottish sweet made from sugar and milk or cream boiled to the soft ball stage (116C/240F), and then stirred vigorously to make it ‘grain’ or crystallize. It is poured into trays and allowed to set before being cut into smaller pieces or ‘tablets’. The texture of this confection resembles crisp fudge. It was known in the early 18th century when purchases of ‘tablet for the bairns’ were recorded in The Household Book of Lady Grisell Baillie (1692-1733), and Mrs. McLintock (1736) gave recipes for orange, rose, cinnamon, and ginger tablets in the earliest work on cookery published in Scotland."

I tried to find this reference in Lady Grisell's book, but all I could find was an offhand reference by the editor of a 1911 edition, edited by Robert Scott-Moncrieff: "Fruits and confections are frequently bought, and occasionally 'taiblet for the bairens.'" Scott-Moncrieff's version is highly edited and transcribed, so plenty is left out. I couldn't find any record of "taiblet" in the book. I suppose we'll have to take his word for it, as I am unable to get my hands on the original source.

Unfortunately, Mrs. McLintock's Receipts for Cookery and Pastry Work seems to be a rare book, so I was unable to examine it myself. However, Food Timeline includes an interesting blurb from Sugar-Plums and Sherbet: The Prehistory of Sweets by Laura Mason:

"Recipes for tablets flavoured with orange, rose, cinnamon and ginger were published in Glasgow by Mrs. McLintock in 1736. These are simple candy recipes, made only with sugar, water and flavourings. This is her recipe: "Orange Tablets with the Grate: Grate the Oranges, take 2 lib. of sugar, and a mutchkin of water, then clarify it with the White of 2 Eggs, and set it on a slow Fire, and boil it till it be almost candyed, then put in the Grate of the Oranges, and take your white paper, rub it with fresh Butter, pour it on your Paper, and cut in little pieces." This is a candy similar to those from the previous century. The word tablet has medicinal overtones, as in the commonly accepted meaning of a small flat disc containing some drug or health-giving substance...In tablet now made in Scotland, both orange and ginger are still found amongst the flavourings, but milk has become essential to the definition."

As for the name, the Oxford English Dictionary suggests that it may have come from medicinal origins, which isn't uncommon for candy. This seems especially possible considering the common flavours of ginger, cinnamon, rose, and peppermint.

So what do we know about tablet? It dates back to at least the 1730s. The candy likely had medicinal origins. Popular flavours included ginger, cinnamon, peppermint, rose, and citrus. The earliest recipes were mostly sugar and water, and the dairy component came later. The texture should be hard and grainy, rather than smooth and soft like fudge.


Original Recipe:


GINGER TABLET.

Clarify the sugar, as directed for barley sugar
(p. 308,) and boil it down, but not so high as for
barley sugar ; to know when it is candy high, dip
the end of a spoon in cold water, then in the boil-
ing sugar, and when it hangs to the spoon, ropy,
take it off the fire ; to two pounds of sugar, have
half an ounce of the whitest ginger you can get,
pounded and sifted, put it in the sugar and stir 
it, rubbing it well, and breaking all the knots 
with the back of the spoon against the side of the
pan ; when done, have the marble slab rubbed
over with butter, pour it on it, and let it stand
till quite cold, then score it into dice for orna-
ment, but not too deep, cut it into square cakes,
and lay it by in boxes.

TO MAKE BARLEY SUGAR.

Take two pounds of lump sugar, break it in
small pieces, take a clean brass pan, put in a pint
(mutchkin) of water, drop in the white of an egg,
and whisk it well, put in the sugar, put it on the
fire, and, when melted, bring it to the boil ; as
soon as it boils, draw it to one side, to make it
boil on one side of the pan ; skim it till it be
perfectly clarified, then set on the fire, and boil
it down quick ; in the mean time have a marble
slab ready, rub it over with a piece of butter ; to
know when the sugar is at a proper height, dip
the end of a spoon in cold water, then into the 
boiling sugar, and quickly into the cold water,
if the sugar has gathered round the spoon, slip it
off, and if it be hard, and crimps in your teeth, it
is enough ; take it off, and drop six or eight drops
of the essence of lemon into it, pour it on the
marble slab, and before it gets too cold, with a
pair of large scissors, cut it into long sticks, rol
them on the slab, and lay them to cool ; this do
as quickly as possible, as it will get too cold for
cutting ; when done, keep it in a box, or in some
place from the air, and it will keep a long time.


The Verdict:

Well, the Oxford English Dictionary may be on to something when it says tablet may have had medicinal origins, because this is like medicinal strength ginger. Wow! It's very strong - but delicious! I like it, but I can only eat a small bite at a time. Mr. Man loves ginger and he really loves this. It is very sweet as well, though.

One thing - I wish I had made the tablet a bit thinner, because it was quite the feat to cut through it. Its a very hard candy, although it dissolves in the mouth. It has a rough and grainy texture, very unlike the smoothness of fudge.

It takes a bit of time to make with all that boiling, but overall, simple and tasty. I may make this again with Little Y, as it strikes me as something simple enough that a kid could do a lot of the recipe.

As for clarifying the sugar with the egg white...its probably an optional step by now. I did it just for fun, but I'm not sure it accomplished much.

Note: I used unrefined brown cane sugar (or at least I think so...it looked like it anyway) to make this recipe. I think any kind works fine, since its measured by weight and boiled down. The most authentic way would be to use lump sugar  - I suppose if you have access you can buy it, or if you're really dedicated you could make your own, but its really just sugar wetted with water and formed to a cone.


Modernized Recipe:

(Adapted from Modern Practical Cookery)

1 pint water
1 egg white (optional)
2 pounds sugar
1/2 ounce ginger, powdered
butter for greasing

1. In a large pot, whisk together the water and egg white (if using). Add the sugar.
2. Cook over medium heat until the sugar is dissolved. Then bring it to a boil.
3. If you are clarifying with the egg white, as soon as it starts to boil, move the pot so that only half of it is on the burner. This will allow any scum to shift to the opposite side. Skim it off until there is nothing left to skim.
4. Simmer the candy until it reaches the correct temperature. Make sure to stir and scrape down the sides from time to time. It is ready when it reaches around 240-245F. You can test by dropping a bit onto a plate and seeing that it does not run, or when it reaches the consistency of soft putty when dropped in cold water.
5. When the candy is ready, add the ginger and mix well. Pour it onto a greased marble slab or into a greased pan. Smooth it with a spoon or spatula to the desired thickness.
6. Let the tablet cool completely. Score into dice for decoration and cut into squares.


Sources:

Baillie, Grizel, and Robert Scott-Moncrieff. The Household Book of Lady Grisell Baillie, 1692-1733. Edinburgh: Printed at the UP by T. and A. Constable for the Scottish History Society, 1911.

Davidson, Alan. The Oxford Companion to Food. Oxford: Oxford UP, 2014.

Mason, Laura. Sugar-Plums and Sherbet: The Prehistory of Sweets. Devon: Prospect, 1998.

Olver, Lynne. "The Food Timeline: Tablet." The Food Timeline. Accessed 31 Jan. 2015. <http://www.foodtimeline.org/foodcandy.html#tablet>.

"Tablet (confectionery)." Wikipedia. Wikimedia Foundation. Accessed 31 Jan. 2015. <http://en.wikipedia.org/wiki/Tablet_(confectionery)>.

Lemon Cake (Finest ever.) (c.1905) ★★★★★


I am alive!
And living in Japan!

It has been quite the adventure so far, especially culinarily. Firstly, I eat kyuushoku, the same school lunch the students eat, every day at work. Kyuushoku is mostly so-so, sometimes awful, sometimes good, and every now and then delicious. The lunches are made by a nutritionist, but they are very high in calories (600-900) and often lack vegetables or much color other than beige. The meals always include rice or bread, whole milk, and some kind of soup. However, I am consuming more fish and seaweed than ever before in my life, which I guess is probably a good thing overall.

One neat thing I love about Japan is their obsession with local food. Each prefecture has its famous foods - mine happens to be famous for Japanese pears, which have become my new obsession.

I've felt bad for neglecting this blog. Mostly I have been too overwhelmed getting used to life in Japan and my first real job. Also, its difficult finding ingredients. A lot of things are difficult to find, especially if they're out of season (absolutely no berries in my grocery store right now!). On top of that, Japanese people don't really use ovens, so we had to purchase one, which is so small that it fits on a countertop!

My current kitchen set-up. That's my oven on the counter! The whole other side opposite the fridge and counter is a giant sink and a stovetop.

Anyway, enough about Japan! I finally feel good about posting a new recipe here! I picked something simple, with ingredients I basically already had on hand (although it took me a while to find cornstarch!).

Original Recipe:


NO. 18. LEMON CAKE. (Finest ever.) Mrs.
Clara Moulton, Loura, Cal,--Take one good
cup sugar, one-half cup butter, three eggs,
(save the yolk of one,) one-half cup milk, two
cups of flour, one tablespoon baking powder,
jelly between layers, one cup cold water, one
cup sugar; the rind and juice of one large
lemon, one tablespoon corn starch, heaping
with the yolk of one egg and a little butter,
and a little water. Put in the corn starch and
yolk when it commences to boil and cool it
before spreading the layers.


The Verdict:

Delicious!
The cake was a bit dense, but very soft and a wonderful texture. There was a bit of a crunchy crust on top of the cake, but I actually kind of like the extra crunch thrown in there. The cake itself was a bit bland, but it wasn't bad. I think it could have benefitted from a bit of vanilla is all.
The curd was lovely and bright. I ended up adding waaaaay more cornstarch, partially due to it not thickening up and partially due to a huge mistake! But it turned out really great and the perfect consistency.
Overall, my whole family loved this cake! We ate it with fresh whipped cream, but its just fine on its own too.

Baking notes: I used cake margarine instead of butter because it was what I had on hand. Also, my measuring cup may be different from North American measurements and I used my weird little convection oven to bake.


Modernized Version:

(Adapted from the Los Angeles Times Cook Book No. 2)

1 cup sugar
1/2 cup butter
3 eggs (save one yolk)
1/2 cup milk
2 cups flour
1 tablespoon baking powder

1 cup water
1 cup sugar
juice and rind of one lemon
1 tablespoon cornstarch
1 egg yolk
1 tablespoon butter

1. Preheat the oven to 350F and grease a cake pan.
2. In a mixing bowl, cream the butter and sugar. Add the eggs and milk and mix until smooth. Add the flour and baking powder, mix well, and pour into the prepared pan.
3. Bake the cake. It took around an hour for me, but I have a weird oven.
4. Let the cake cool and prepare the filling.
5. In a saucepan, mix the water, sugar, and lemon juice and rind. Bring to a boil.
6. Add the butter, egg yolk, and cornstarch to the filling. Whisk well to combine.
7. When the filling has thickened, remove from heat and let it cool before filling the cake.