Showing posts with label egg-free. Show all posts

"Busy-Day" Lemon Cheesecake (1959) ★★


Today's recipe is actually sort of relevant, as I've been super busy lately! I have been meaning to post something but I just haven't been able to follow through - so sorry! I came across this recipe, which I had pinned a while back, and I thought it would be perfect. Seemed safe enough and also quick and easy.

So what am I so busy with? Well, for starters I finished my undergraduate degree! Which I started back in 2009, ha. I'm pretty proud of myself, though, to be honest. Although a bit nervous to be done school and having to actually start real real life now.

Hasty Apple Fritters (1769) ★★


Apple fritters are one of those amazing foods which have been around for ages. Fritter-type foods can be traced back all the way to the Romans, who introduced the recipe to Europe as their influence and power spread. This precursor of the fritter (and doughnuts as well) was called scriblita and was created by frying dough in hot fat. Cryspeys, a medieval rendition, were served with sugar sprinkled on top. A fritter refers to essentially anything coated in dough and fried, but apple fritters have long been a favourite. In medieval times, fritters were considered dangerous to consume and indigestible, but they remained on the menu, often as part of the last course of a meal. However, because of their supposed dangerous nature, it was recommended to eat fritter only while hot.

Early varieties of apples in the U.K. around the time this cookbook was published include the Pippin (Ribston or Sturmer), Blenheim Orange, Bramley, and Ashmead's Kernel. These varieties were first cultivated between the late 1700s and early 1800s. I don't have access to any of these in my grocery store. Its also a bit of the wrong season for apples (bad me!), so I just used McIntosh apples as a substitute. 

Original Recipe:

Hasty Apple FRITTERS. Pare your apples, scoop out the core, cut them in slices acros, as thick as a half crown; have ready some thin batter made only of strong beer and flour, put a large quantity of lard, dripping, or butter, into your stew-pan, dip the apple into the batter, and then immediately into the hot lard. When they are a light brown, take them out with a slice, and lay them upon a drainer before the fire. Send them to table with beaten cinnamon and sugar.

The Verdict:

So I couldn't figure out how wide a half crown piece is. If anyone knows, please share!
Anyway, we're talking about a coin here, so I just sliced my apples fairly thin.
For the batter, I used approximately equal parts flour to beer.
Now, I'm only giving this recipe two stars, but I think that part of that is my fault. Firstly, I used butter for frying. Secondly, I the butter was salted.
I also had a hell of a time trying to core the apples. I don't own an apple corer, but now I see the use of such a device. The McIntoshes I used were really small too, so that didn't help.
Next I added 2 cups of butter to a pot, figuring that counted as "a large quantity." Yeah, well, then I discovered that basically boiling the fritters in butter didn't turn out well. For your viewing, on the left are the apples fried in a small quantity of butter and on the right are the ones that were completely submerged in butter:

So I finally figured that out, and then my butter burned and I had none left. That was the end of the apple fritters. In the end I only got 3 edible ones.

How were they? Well the batter was very chewy, stretchy, and soft. Some of the apples were almost mushy, so they cook VERY quickly. Also, the salted butter made them sooooo salty. Big mistake. As for the beer, there was no taste of it at all. I think that if I used oil (or even unsalted butter, but being careful not to burn it and only using a small amount) these would be alright. The batter isn't great, but I guess its okay for being "hasty."

Modernized Recipe:

(Adapted from The Lady's, Housewife's, and Cookmaid's Assistant: or, the Art of Cookery)

APPLES
BEER
FLOUR
LARD or OIL or UNSALTED BUTTER, for frying
CINNAMON
SUGAR

1. Peel the apples and remove the core, leaving the apple intact. Slice into rings. Meanwhile, heat your fat for frying.
2. Make the batter out of flour and beer. It should be thin.
3. Dip the apple rings into the batter and let any excess drip off a bit. Immediately fry until they are light brown. Let the fried apples drain on paper towels or over a rack.
4. Serve hot with cinnamon sugar sprinkled over the top.


Pineapple and Raspberry Neapolitan (1926) ★★★★


Original Recipe:


Dissolve a package of Lemon Jell-O in one-half pint of boiling water and add one-half pint of juice from canned pineapple. When cold whip and then fold in two or three slices of canned pineapple, finely chopped. Turn into round or square mold, filling half full. Dissolve a package of Raspberry Jell-O in a half pint of boiling water, add half a pint of of juice of canned or fresh raspberries, whip, and fold in the berries. Pour into the mold after the Lemon Jell-O has hardened. 
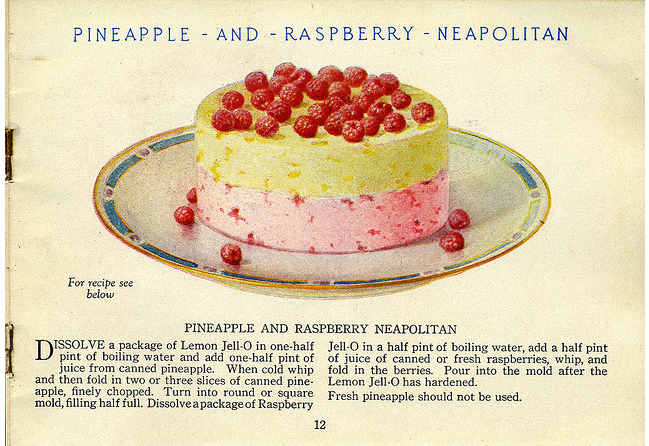
Fresh pineapple should not be used.


The Verdict:

Well, visually, this was a huge disappointment. Which I should have anticipated, because honestly, how could Jell-O get that white and fluffy looking without adding any dairy? However, the "whipping" did make some beautiful bubbles in the Jell-O. I also had a problem with my layers not sticking together, which was interesting. When I tried to unmold my gelatin, the layers separated and the pineapple one even broke a little. Sad times. 
However, taste-wise, this was pretty good! I'm going to give this 4 stars because it was slightly above average. However, I wouldn't make this very often, because it does take a bit of work. The amount of real fruit/fruit juice really masked the fake Jell-O flavouring, which could be a good thing or a bad thing, depending on your preferences, I guess. I really enjoyed the taste. Also, the pineapple added a nice crunch, but the berries did get a bit mushy, which was a tad gross. 

Modernized Recipe:

(Adapted from Jell-O recipe booklet, found at Hey, My Mom Used to Make That!)

1 package LEMON JELL-O
1 cup PINEAPPLE JUICE (drained from the canned pineapple, add a little water if needed to reach 1 cup)
3 slices CANNED PINEAPPLE, finely chopped
1 package RASPBERRY JELL-O
1 cup RASPBERRY JUICE
A handful of RASPBERRIES
2 cups BOILING WATER, divided

1. In a mixing bowl (or directly in your mold, if you're lazy like me), dissolve the lemon Jell-O in 1 cup of boiling water. When the Jell-O has dissolved, mix in the pineapple juice. When the Jell-O is cooled, beat it with a hand mixer until very frothy. Gently fold in the fruit and let it set completely.
2. Do the same with the raspberry Jell-O, juice, and berries, making sure the pineapple layer is firm before pouring on the raspberry layer.
3. Let the mold set until firm. To unmold it, briefly soak the mold in warm water and invert onto a plate. Garnish with raspberries.


Honey and Raspberry Ade (1920) ★★★★★


I found this recipe while browsing and I thought the combination of honey and raspberry sounded delicious! It's especially fitting for summertime, when berries are bountiful. I imagine if one had access to berry bushes, this would be a great way to use up any extra berries, especially the squished or extra ripe ones.

Original Recipe:
HONEY AND RASPBERRY ADE
Place three baskets of well-washed raspberries in a saucepan and add
          One quart of water,
          One and one-half cups of honey,
          One-quarter teaspoon of nutmeg.
Bring to a boil and cook slowly until the fruit is soft, mashing frequently with the potato masher. Cool and strain into punch bowl. Add a piece of ice and the juice of one orange or one lemon.

The Verdict:
Yummy! I just used a whole bag of frozen raspberries (cheaper and already washed!), which ended up being 600g. I'm not sure if that's equal to "three baskets", but the flavour was good. With the juices from the berries and the orange, this didn't really cook down that much, so it probably makes about 4 cups (4 servings). Its a nice drink, although a little sweet, so the ice cubes are nice to water it down a bit. I actually tried some warm though, and it was really good, almost like a nice cider, but with raspberries. I think this recipe served warm would be an excellent cold weather drink. Overall, 5 stars. Simple and delicious is a win to me!

Modernized Recipe:
(Adapted from Mrs. Wilson's Cook Book)

4 cups WATER
600g RASPBERRIES
1 1/2 cups HONEY
1/4 teaspoon NUTMEG
1 ORANGE or LEMON

1. In a large pot, add all ingredients and bring to a boil. Let simmer for a few minutes, until the fruit has dissolved. Meanwhile, juice an orange or lemon.
2. Pour the orange or lemon juice into a large pitcher and strain in the raspberry ade. Let cool and serve with ice cubes (or serve hot!).


Ravioli (c. 1272 - 1307) ★★★


You may have noticed I tend to make early 20th century recipes most often on this blog. Why? Well, I think for three reasons:
1) Ingredients. Some really old recipes have obscure or difficult to find ingredients. It is easier to whip out some flour and sugar and eggs and make a cake than go out searching for galangal and golden syrup.
2) Taste. Modern tastes like modern recipes. Older recipes can be really, really weird to the modern tongue and it can be a little daunting.
3) Translation. Older recipes are commonly written either with hardly any instructions, in some barely legible Old English, or in a foreign language. This makes it difficult to accurately translate for the modern kitchen.


However, I decided to step a bit outside my comfort zone and try this recipe dated from the 13th or 14th century. I picked a recipe for ravioli, which seemed pretty straight forward and surprisingly in line with modern tastes. Ravioli is one of the earliest forms of pasta, and could be filled with sweet or savory fillings. Ravioli was an Italian invention, so its interesting to note that by the 13th or 14th century it had reached as far as England. There are many different claims as to the "inventor" or first mention of ravioli, but it's hard to really say which is truth, especially with a food which exists in so many cultures - wontons in Asia, Jewish kreplach, and gujia in India, for example.

I needed to do a fair amount of research though, as even recipes with the same names can look very different from their modern counterparts. For example, what type of cheese was available during this time period? What other ingredients went into the pasta dough?

Original Recipe:


The Verdict:
These ravioli were very different from what I normally eat, but not bad! The taste takes some getting used to because they are quite flavourful. Mr. Man really liked them, but agreed that they were a bit strong. He said that with some modifications these could become a favourite. Part of that is likely because there were no specified amounts so I just sort of eyeballed it. The scallions and sage were the most potent. If you want to make these but don't want it quite so strong, I would suggest using dried sage and onions, or just pureeing the herbs and scallions together so it mixes in consistently with the cheese.

Dough: I did some research, but couldn't find any recipes for 13th or 14th century pasta dough recipes, so I settled on one by Scappi from the 16th century. I followed the recipe for stuffed pasta, but used only 1 teaspoon of rose water. I kind of wish I hadn't, because it was a little odd for my tastes. Other than the rose water, this dough was super simple and had a great texture! This recipes makes enough for 2 people, as part of a meal, i.e. you'll probably want a salad or something on the side.

Filling: I opted for fresh herbs, because it seemed nicer, but I'm not sure if fresh or dried would have been used. I guess maybe both, depending on the circumstance. As I mentioned above, the sage and scallions can be a bit strong, so I would suggest modifying the filling to suit your tastes. Also, I used about 1/2 cup butter, 1 1/2 cups ricotta, 2 tablespoons of each herb, and 1/2 scallion, but it made WAY WAY WAY too much filling. Like, enough filling for a whole lasagna. Unfortunately, I have no idea what measurements would make enough for this amount of pasta dough, so if you want to make this you're kind of on your own (sorry!). If you do make it, please let me know in the comments!

Cheese: The recipe calls for cheese as a topping and as a filling, but does not specify varieties. There are several kinds of period-appropriate hard cheese listed at Gode Cookery. I decided to go with ricotta for the filling and mozzarella for the garnish, but I'm not sure if that's what would have been used in the British Isles at the time. It was hard to find any information Anglo-Norman cheese specifically, other than they ate it.

Cooking: I've read that in Medieval times, pasta was boiled in stock or almond milk. It was also boiled to a much softer consistency than what we generally enjoy today. Over time a sturdier texture was desired, until we reached the modern "al dente" style. It is not unique to pasta - it seems like many old recipes call for soft or mushy foods. I wonder if it's because they all had bad teeth? Or just cultural differences? Anyway, the recipe was pretty vague about cooking, but since it suggested reheating the boiled ravioli once they had cheese on top, I decided to boil them in stock and then melt the cheese under the broiler in the oven. It worked out great, except that I ended up not having stock or bouillon on hand. I added salt and pepper to the water instead and just pretended it was stock.

Overall, I give this recipe three stars, mostly because I know the same directions would be better knowing what I know now after making the recipe once. Omitting the rosewater and fiddling with the filling a bit would probably make this 4 stars.


Modernized Recipe:
(Adapted from Two Anglo-Norman Culinary Collections Edited from British Library Manuscripts Additional 32085 and Royal 12.C.xii)

1 cup + 2 tablespoons FLOUR
1 teaspoon SUGAR
1/2 teaspoon SALT
1 tablespoon UNSALTED BUTTER, melted
3.5 ounces WATER, room temperature

CHEESE, soft cheese for filling and hard cheese for grating
BUTTER, room temperature
PARSLEY, finely chopped, pureed, or dried
SAGE, finely chopped, pureed, or dried
SHALLOTS, finely chopped or pureed

1. On a flat work surface or in a large bowl, mix the flour with the sugar and salt. make a well in the center and add the melted butter. Slowly add the water, little at a time, stirring in the flour with your finger and using your other hand to keep the liquid from spilling out. You may need less or more water depending on the weather and where you live. Roll the dough into a ball and knead it for at least ten minutes, until it is smooth and elastic. Cover in plastic wrap and let it sit for 30 minutes. Meanwhile, mix together the ingredients for the filling.
2. Roll out the dough with a rolling pin, or use a pasta machine. Cut desired shapes - I used circles. Put a small amount of filling - I used about 1/2 teaspoon - on one circle, wet the edges, and press another circle on top. Set aside and repeat. Re-knead and roll out leftover dough if required.
3. Bring a pot of broth to a boil and add the ravioli. Cook for about 5-7 minutes or until tender. In an oven-proof dish, grate a layer of cheese. Place the boiled ravioli in the dish and top with another layer of cheese. Put in the oven and broil until cheese is golden brown and melted.


Sources
-----
Adler-France, Chrid. "Medieval Pasta: History, Preparation, and Recipes." Homepage of Chris Adler-France. N.p., 26 Feb. 2005. Web. 23 June 2013. <http://www.katjaorlova.com/PastaClass.html>.


Muusers, Christianne. "Italian Pasta from the Sixteenth Century." Coquinaria. N.p., 03 Mar. 2011. Web. 25 June 2013. <http://www.coquinaria.nl/english/recipes/scappipasta.html>.

Olver, Lynne. "Pasta." The Food Timeline. N.p., n.d. Web. 23 June 2013. <http://www.foodtimeline.org/foodfaq2.html#pasta>.

Cider Cake (1840) ★★★★

Last semester I was working on a website project for school, which I named Early Canadian Cookbooks Online. I'm actually still working on it, but I hope to have it completed eventually! Anyway, I had planned to make this cake for a blog post on the website. Unfortunately things didn't go as planned...


Original Recipe:

11. Cider Cake.
Take two pounds of flour, one pound of sugar, half a pound of butter, one pint of cider, cloves and cinnamon, with or without fruit, two teaspoonsful of saleratus; put the saleratus in the cider, and mix it while foaming.
N.B. - As a general rule, every thing mixed with saleratus should be put in the oven immediately.


The Verdict:           
Well, as you can see by the pictures, I kind of undercooked this cake. Um, a lot. And the worst bit of it is that this is actually a really delicious cake! The taste is very similar to the Dutch breakfast cake called ontbijtkoek. Also, this recipe only has 5 ingredients (not counting spices)! And no eggs! I'm pretty impressed, actually. The texture is was nice and fluffy, with a hard-ish crust. I think what I would do next time is divide the dough in half and make two cakes, rather than trying to shove it all into one pan. Or maybe use a bundt pan. That might be big enough. I was really alarmed at the amount of sugar in this recipe, but it actually doesn't taste that sweet. Mr. Man and I both enjoyed this cake (we ate the cooked part).


Modernized Recipe:
(Adapted from The Frugal Housewife's Manual)

1/2 lb. butter, softened
1 lb. sugar
2 lbs. flour
Cloves, to taste (I used 1 teaspoon)
Cinnamon, to taste (I used 2 teaspoons)
2 cups apple cider
2 1/2 teaspoons baking soda

1. Preheat oven to 350F. Grease and flour two 9 inch cakes pans or a large bundt pan.
2. In a very large bowl, beat together the butter and the sugar until combined and fluffy. Add in the flour and the spices. The mixture will be crumbly like a pastry dough. Using your hands to mix is beneficial.
3. Add the baking soda to the apple cider and mix it into the dough. Make sure it is well combined, but be gentle and get the dough into the oven quickly.
4. Bake for about 35 - 40 minutes for one large cake or 15 - 20 for each small cake.


Chocolate Syrup/Refreshing Drinks for Summer (c.1909) ★★★

I was browsing historical cook books online and I came across this recipe for "Refreshing Drinks for Summer." Even though the first day of summer isn't officially for another month or so, it certainly feels like it's here already in Canada! This seemed like a simple yet tasty recipe for a nice warm-weather beverage.
The cookbook today's recipe comes from was written by Miss Parloa and Mrs. Hill as an advertisement for the Walter Baker Chocolate Company, which many of you might recognize as simply "Baker's chocolate", still widely used in baking today. The company has had remarkable longevity, having been established in Massachusetts 1764. Perhaps their advertising tactics worked!


Original Recipe:


Into a granite-ware saucepan put one ounce—three tablespoonfuls—of Walter Baker & Co.'s Soluble Chocolate, and gradually pour on it half a pint of boiling water, stirring all the time. Place on the fire, and stir until all the chocolate is dissolved. Now add one pint of granulated sugar, and stir until it begins to boil. Cook for three minutes longer, then strain and cool. When cool, add one tablespoonful of vanilla extract. Bottle, and keep in a cold place.
Put into a tumbler about two tablespoonfuls of broken ice, two tablespoonfuls of chocolate syrup, three tablespoonfuls of whipped cream, one gill of milk, and half a gill of soda-water from a syphon bottle, or Apollinaris water. Stir well before drinking. A tablespoonful of vanilla ice-cream is a desirable addition. It is a delicious drink, even if the soda or Apollinaris water and ice-cream be omitted. A plainer drink is made by combining the syrup, a gill and a half of milk, and the ice, shaking well.


The Verdict:
Although this tasted fine, I was kind of disappointed. All this really is is homemade chocolate milk. I thought it would be more like a float, but with only 1/4 cup of soda water, the fizz is pretty much nonexistant. The chocolate syrup is good, but it's a fairly basic recipe to begin with. The amount of vanilla was a tiny bit too much, and I think if possible a vanilla bean boiled in there would have been much tastier than extract. If I were to make this again I would go fancier - forget the ice altogether, mix the milk and chocolate syrup with more soda water, and add the whipped cream and ice cream on top, perhaps with a drizzle of syrup. I give this recipe 3 stars, not because it tasted bad, but because was pretty average and tasted just like chocolate milk which could have been made without the ice, whipped cream, and soda water. Anyway, the rest of the syrup will make a yummy ice cream topping!


Modernized Recipe:
(Adapted from Chocolate and Cocoa Recipes By Miss Parloa and Home Made Candy Recipes By Mrs. Janet McKenzie Hill)

Chocolate Syrup
1 ounce COCOA POWDER
1 cup BOILING WATER
2 cups SUGAR
1 tablespoon VANILLA EXTRACT

Refreshing Drinks for Summer
2 tablespoons BROKEN ICE
2 tablespoons CHOCOLATE SYRUP
3 tablespoons WHIPPED CREAM
1/2 cup MILK
1/4 cup SODA WATER
1 tablespoon VANILLA ICE CREAM (optional)

1. To make the chocolate syrup: boil 1 cup of water, dissolve the cocoa in it when boiling, add the sugar, simmer about 3 more minutes, remove from heat, and add vanilla extract. Let cool before using.
2. To make a refreshing drink: Essentially mix all ingredients together. See "The Verdict" for serving suggestions.


Peach Cup (1920) ★★★★

This recipe represents a very deep-rooted tradition of making fruit syrups for refreshing summer beverages.


Original Recipe:

PEACH CUP 
Place one quart of peeled and sliced peaches in a saucepan and add 
One pound of sugar,  
One cup of water. 
Cook until the fruit is soft and then rub through a fine sieve and add juice of one lemon. 
To use: Place one-half cup of the peach mixture in a glass and add 
Two tablespoons of cream, 
One-half cup of crushed ice, 
and fill with carbonated water. 
A box of straws to use in serving these iced drinks makes them doubly attractive.


The Verdict:
Well firstly, I was surprised at how much peach flavour the syrup actually had, because I used frozen peaches. That said, while I did taste the peach, it could have been even stronger, so I would suggest at least using some fresh peaches if you make this.
The cream was a little bit of a strange addition for my modern tastes. The flavour did grow on me, but it seemed like 2 tablespoons was a bit too much. Also, the syrup was very sweet, so maybe a little under 1/2 cup would be a better amount, but of course it all depends on how much carbonated water is added. I think even just using the peach syrup with carbonated water would be a yummy drink all on its own. Overall, this recipe is really nice and is definitely worth 4 stars!


Modernized Recipe:
(Adapted from Mrs. Wilson's Cook Book)

1 quart (4 cups) PEACHES, peeled and sliced
1 pound SUGAR
1 cup WATER
Juice of 1 LEMON
1-2 tablespoons CREAM
1/2 cup CRUSHED ICE
SODA WATER

1. In a medium saucepan, combine the peaches, sugar, and water. Bring to a boil and let it simmer until the peaches are very soft.
2. Strain the liquid through a sieve and gently push on the cooked peaches to ensure you get as much syrup as you can. Add the lemon juice to the syrup and stir well. (Tip: I saved the cooked peaches and blended them up in a smoothie! No need to waste!)
3. To make a "Peach Cup" put 1/2 cup of the peach syrup (cooled) in a large glass. Add 1-2 tablespoons of cream, as desired. Add 1/2 cup crushed ice and top the glass up with carbonated water, to taste. Stir well to combine and enjoy!


Mint Julep (1917) ★★★★★

Today, Mint juleps are very closely associated with the Kentucky Derby, which runs on the first Saturday in May. This year, 2013, the event falls on May 4th.

As with nearly any recipe, it is difficult to pin an exact date when the mint julep was created. Currently, the first known mention of the drink is in the 1803 book Travels of Four Years and a Half in the United States of America by John Davis. The reference appears in a passage called "Story of Dick the Negro" and states, "This young chap, Sir, (here Dick winked his left eye,) was a trimmer. The first thing he did on getting out of bed was to call for a Julep;* and I honestly date my own love of whiskey, from mixing and tasting my young master's Juleps." The footnote reads, "A dram of spirituous liquor that has mint steeped in it, taken  by Virginians of a morning."  In Kentucky, silver julep cups were being awarded as fair prizes as early as 1816.

The origins of the term "julep" can be traced to a Middle Eastern beverage of rose petals muddled in water, called a "gulab" or "julab." "Julep" is a French translation. The Oxford English Dictionary cites the earliest use of the word as around 1400, when it was used to describe a syrup used to administer medicine. This method of improving the flavour of water eventually made its way to the Americas, and apparently evolved along the way. One theory is that the mint julep was created in order to mask the flavour of poorly made whiskey - similar to the original use of a medicinal julep.

Naturally, such a popular beverage did not arise without argument. The main issue is whether to crush the mint or not. This debate dates back to the earliest incarnations of the drink in the nineteenth century. Furthermore, there is a bit of a rivalry between Kentucky and Virginia, as to who can claim ownership of the beverage.
LIFE, May 1937
The association of the drink with the Kentucky Derby began in 1875, with the inception of the racetrack. It was first advertised as the official Derby drink at Churchill Downs in 1938. An 1937 edition of LIFE magazine included details of Julian P. Van Winkles' "mint julep party" held during that years Kentucky Derby. Apparently the Van Winkle recipe for mint juleps used only 17 year old bourbon. The recipe LIFE provided was: "put sugar and bruised mint at the bottom of the silver cup, pack in finely-cracked ice to induce proper frosting, stick mint sprigs in after two ounces of Bourbon have been poured." Today hundreds of thousands of juleps are served at the Derby and collectible cups have been soldd since 1938.

While mint juleps are traditionally alcoholic, this recipe is safe for the whole family! It may not be authentic, but it hits the spot when you can't or don't drink alcohol. It is possible that this unusual 1917 recipe was a result of the prohibition movement. Temperance, or abstinence from drinking alcohol, had gained momentum during the nineteenth century, and  by the early twentieth century laws were being passed which prohibited the sale of alcohol, partially in order to save resources for World War One. The Eighteenth Amendment in the United States took effect in 1920 and prohibited the sale, transport, and production of alcohol. (Fun fact: here in Ontario we can only buy alcohol from LCBO [Liquor Control Board of Ontario] stores, a remnant method of control in the post-prohibition era.)
LIFE, August 1941
For those wishing to imbibe in the traditional version, here is an early printing of the recipe, from 1845. It was published in Eliza Acton's Modern Cookery for Private Families in Britain:

Mint Julep, An American Receipt.
Strip the tender leaves of mint into a tumbler, and add to them as much wine brandy, or any other spirit, as you wish to take. Put some pounded ice into a second tumbler; pour this on the mint and brandy, and continue to pour the mixture from one tumbler to the other until the whole is sufficently impregnated with the flavour of the mint, which is extracted by the particles of the ice coming into brisk contact when changed from one vessle to the other. Now place the glass in a larger one, containing pounded ice: on taking it out of which it will be covered with frost-work.' Obs.--We apprehend that this preparation is, like most other iced American beverages, to be imbibed through a reed: the recei, which was contributed by an American gentleman, is somewhat vague.
Alternatively, you could try Henry Watterson's recipe: "Pluck the mint gently from its bed, just as the dew of the evening is about to form upon it. Select the choicer sprigs only, but do not rinse them. Prepare the simple syrup and measure out a half-tumbler of whiskey. Pour the whiskey into a well-frosted silver cup, throw the other ingredients away and drink the whiskey."


Original Recipe:

25.—MINT JULEP (Ginger Ale)

¾ cup sugar4 sprigs mint
1 cup water1 pint ginger ale
Juice of 3 lemons
Boil sugar and water ten minutes, and cool; add strained lemon juice, mint leaves bruised, and ginger ale; half fill glasses with crushed ice, add julep, and garnish with a sprig of mint.


The Verdict:
This drink basically tastes like sweet, lemony mint tea. I enjoyed it. The ginger ale wasn't really tasteable, but it gave a nice fizz. It was definitely refreshing. The drink alone is quite sweet, so it definitely needs the ice (or even just water if need be) to dilute it a bit. While it was definitely a delicious recipe, I'm not sure it actually resembles a real mint julep at all.

Modernized Recipe:
(Adapted from Better Meals for Less Money)

3/4 cup SUGAR
1 cup WATER
Juice of 3 LEMONS, strained
4 sprigs MINT, plus more for garnishing
1 pint (2 cups) GINGER ALE
CRUSHED ICE

1. In a small saucepan, boil the sugar and water for 10 minutes. Let cool.
2. Add the lemon juice to the cooled sugar syrup. Add the mint leaves, and gently bruise them by pressing on them with the back of a spoon (or use a muddler). Add the ginger ale.*
3. Fill glasses with crushed ice, add the julep, and garnish with a sprig of mint.

* Although the recipe didn't mention this, I strained the syrup before adding the ginger ale. I used frozen mint leaves (a mistake, I might add), so they were all shriveled and nasty and I didn't want them in my cup.

Also note, I've read a recipe in which the mint leaves are muddled in hot water, in order to bring out the flavour. It might be worth it to add them to the hot syrup to mimic this method.


-----
Sources

Davis, John. Travels of Four Years and a Half in the United States of America during 1798, 1799, 1800, 1801, and 1802. Bristol: R. Edwards, 1803. Print.

Egerton, John. Southern Food: At Home, on the Road, in History. North Carolina: University of North Carolina, 1993. Print.

Four Roses. "This Is a Lucky Year for Julep Lovers!" LIFE 25 Aug. 1941: 34. Google Books. Web. 30 Apr. 2013. <http://books.google.ca/books?id=ZE0EAAAAMBAJ&source=gbs_navlinks_s>.

"Life Goes to a Party." LIFE 24 May 1937: 90-92. Google Books. Web. 30 Apr. 2013. <http://books.google.ca/books?id=1kQEAAAAMBAJ&dq>.

"Mint Julep." Wikipedia. Wikimedia Foundation, 23 Apr. 2013. Web. 30 Apr. 2013. <http://en.wikipedia.org/wiki/Mint_julep>.

Nickell, Joe. The Kentucky Mint Julep. Lexington, KY: University of Kentucky, 2003. Print.

Olver, Lynne. "Mint Julep." The Food Timeline. N.p., 2000. Web. 30 Apr. 2013. <http://www.foodtimeline.org/foodbeverages.html>.

ANZAC Biscuits (1927) ★★★★★

Today is ANZAC Day!
Okay, so two days ago I found out what the whole ANZAC business is about. For anyone else still in the dark, this acronym stands for Australian and New Zealand Army Corps. ANZAC Day in particular, is a nation-wide celebration in both countries, honouring those who fought at Gallipoli in the Ottoman Empire during World War One (although the day now serves as a more general memorial). ANZAC biscuits - cookies to us North American folk, but never call them that! - have come to play a crucial role in the celebration of this holiday, and are often used in fundraising efforts by the Royal New Zealand Returned Services' Association (RSA) and the Returned and Services League of Australia (RSL). These biscuits are very much a part of Australian society and culture. By preparing and eating these cookies, Australians and New Zealanders create a connection to ANZAC Day, often seen as the birth of the Australian nation, and to their fellow countrymen. This is one example of the scholar Benedict Anderson's theory of nations as imagined communities - members of a community imagine their peers participating in the same rituals as themselves, thus creating and perpetuating a specific culture. I'm getting a little bit scholarly on you here, but it is certainly a fascinating topic to consider!

However, the ANZAC biscuits which are baked today are quite different from the original recipe.
The original recipe is quite simple, so it is anyone's guess as to when it was "created". However, the earliest known use of the term "ANZAC" as a recipe is an advertisement for the 1915 copy of St. Andrew's Cookery Book, from Dunedin, New Zealand. But this recipe was for a cake, not biscuits. In Australia, a Sydney cookbook called War Chest Cookery Book included a recipe for Anzac Biscuits in 1917, but the ingredients do not correspond with the recipe known as ANZAC today. The 1917 recipe was contributed by an "Alice Anderson from "Oakdale" N. Sydney" and includes rice flour, spices, and eggs. Oddly enough, there is a recipe in War Chest Cookery Book which is extremely similar to ANZAC biscuit recipes published later, but in this case it is called Rolled Oats Biscuits. By 1921, Rolled Oats Biscuits finally became Anzac Crispies (published in the 9th edition of St. Andrew's Cookery Book) and in 1923 the recipe finally became Anzac Biscuits in Mrs H. W. Shaw's Six Hundred Tested Recipes. Coconut was introduced to the recipe in 1927. Therefore, the recipe can currently be traced back to New Zealand, where the recipe for Rolled Oats Biscuits was first published.

ANZAC biscuits reflect the circumstances in which they were created. The lack of eggs reflects food shortages during wartime years, specifically the lack of poultry. The hardness of the biscuits indicates that they were a good choice for baking and sending to soldiers abroad. While the origins of ANZAC biscuits certainly dates to the beginning of World War One (if not earlier, under a different name), it was not until after the war that they really began to take off as a cultural and culinary product.

I decided to go with the 1927 recipe, since this is the first time the recipe for ANZAC biscuits appeared as it is made today.


Original Recipe:
Take a quarter of a pound of butter and one tablespoon of golden syrup. Place in a saucepan and melt. Add two tablespoonsful of boiling water in which is dissolved one teaspoonful carbonate of soda. Add three-quarters of a breakfast cup of flour, one breakfast cup of sugar, one breakfast cup of desiccated coconut, one breakfast cup of oatina, and a few almonds finely chopped. Place in teaspoon quantities on a cold slide, and bake in a moderate oven. Leave on a tray for a few minutes to harden before removing from slide, but not too long. A knife slipped under each biscuit will readily remove.


The Verdict:
So for my first try, I used 1 teaspoon of baking soda. The cookies were really tasty and very chewy, but they spread a LOT and were a bit wonky. They were also a little greasy and the almonds didn't want to incorporate into the dough. Oh, and I really didn't want to go and buy a whole can of golden syrup when the recipe only called for 1 tablespoon, so I substituted 1/2 tablespoon honey and 1/2 tablespoon light corn syrup (I know, I know - sorry!). Despite any issues, these were very tasty. Mr. Man said that he was pleasantly surprised, as he doesn't like chewy cookies.
I decided to try again, this time with 1/2 teaspoon baking soda. I also used just a bit less than 1/4 lb of butter and went with a slightly different mixing method. This time the recipe turned out much better, but it was a tiny bit dry, so I think the full amount of butter should be used. This attempt tasted very similar to the first batch - chewy and delicious.


Modernized Recipe:
(Adapted from Terrace Tested Recipes, found at New Zealand Listener)
Yield: ~16 cookies

1/4 lb UNSALTED BUTTER
1 tablespoon GOLDEN SYRUP
2 tablespoons BOILING WATER
1/2 teaspoon BAKING SODA
3/4 cup FLOUR
1 cup SUGAR
1 cup DESICCATED COCONUT
1 cup ROLLED OATS
1/4 cup ALMONDS, chopped

1. Preheat the oven to 350F. Line a baking tray with parchment paper.
2. In a medium saucepan, melt the butter and golden syrup. In a mixing bowl, whisk together the flour, sugar, coconut, oats, and almonds until well combined.
3. In a small container, dissolve the baking soda in the boiling water and pour it into the melted butter. Stir, remove from heat, and pour into the dry ingredients. Mix well.
4. Take tablespoon-sized chunks of dough and roll into slightly flattened balls. Bake about 10 - 12 minutes.


-----
Sources


"Anzac Biscuit." Wikipedia. Wikimedia Foundation, 19 Apr. 2013. Web. 22 Apr. 2013. <http://en.wikipedia.org/wiki/Anzac_biscuit>.


Fleming, Kylie. "Kiwis or Us - Culinary Historian Allie Reynolds Traces Origins of Anzac Biscuits." The Australian. N.p., 20 Apr. 2013. Web. 22 Apr. 2013. <http://www.theaustralian.com.au/news/kiwis-or-us-culinary-historian-allie-reynolds-traces-origins-of-anzac-biscuits/story-e6frg6n6-1226624784496>.


Gofton, Allyson. "The Anzac Biscuit Myth." Allyson Gofton. N.p., 15 Apr. 2006. Web. 22 Apr. 2013. <http://www.allysongofton.co.nz/index.php/page/articles/pi_articleid/57>.


Rae, Fiona. "Anzac Biscuits 1994-2000." New Zealand Listener. N.p., 22 Apr. 2011. Web. 22 Apr. 2013. <http://www.listener.co.nz/from-our-archive/anzac-biscuits-1994-2000/>.


Supski, Sian. Anzac Biscuits - A Culinary MemorialHumanities: Research and Graduate Studies, Australia at War and Peace. Curtin University, n.d. Web. 22 Apr. 2013. 
<http://research.humanities.curtin.edu.au/groups/awp/pdf/ANZAC_BISCUITS_G2015.pdf>.